Navigating Dating Myths: A Deeper Understanding of Relationship Realities
The labyrinth of modern dating is often clouded by well-intentioned yet misleading clichés that promise simplicity in the complex realm of love. These myths, though comforting, can obscure the nuanced realities of building meaningful connections. By dissecting five prevalent misconceptions, we can foster healthier, more intentional relationships grounded in authenticity rather than fantasy.
Misconception 1: Love Alone Sustains a Relationship While love is a cornerstone of romantic partnerships, it cannot single-handedly resolve fundamental incompatibilities. Relationships thrive on shared values, mutual goals, and emotional alignment. For instance, two individuals may deeply care for one another but find themselves at odds over core life choices, such as marriage, career ambitions, or lifestyle preferences. These divergences, if unaddressed, create fissures that affection alone cannot mend. Love must coexist with practical collaboration to navigate challenges and sustain long-term harmony.
Equally critical is recognizing when love becomes a catalyst for self-betrayal. Sacrificing personal boundaries or core values to preserve a relationship often breeds resentment. Over time, partners may contort themselves into roles that feel inauthentic, eroding the connection they once cherished. A relationship rooted in enduring respect and compatibility—not just passion—allows both individuals to grow without losing themselves. Acknowledging this balance helps couples prioritize holistic health over fleeting romantic idealism.
Misconception 2: Love Inspires Fundamental Change The belief that love can transform a partner’s inherent traits is a recipe for disillusionment. While small compromises are natural, expecting someone to overhaul their personality or habits for the sake of romance ignores the reality of human nature. For example, a chronically disorganized individual may improve punctuality with support, but a fundamental shift in temperament requires internal motivation, not external pressure. True change arises from self-awareness, not coercion.
Moreover, fixating on a partner’s “potential” risks devaluing their present self. Relationships strained by constant criticism often spiral into resentment, as the criticized partner feels unaccepted. Conversely, fostering a safe space for mutual growth—where flaws are acknowledged without judgment—can organically inspire positive evolution. Embracing authenticity over idealized versions of each other nurtures a bond built on trust rather than conditional approval.
Misconception 3: Breakups Happen Without Warning Most relationship endings are the culmination of unresolved issues rather than sudden whims. Subtle signs, like dwindling communication or recurring arguments, often signal underlying discontent. Partners may dismiss minor conflicts—such as disagreements over finances or emotional distance—until these patterns solidify into irreparable rifts. Prolonged neglect of such issues creates a chasm that even earnest efforts may struggle to bridge.
Research underscores the predictability of relational breakdowns. The Gottman Institute’s identification of the “Four Horsemen”—criticism, contempt, defensiveness, and stonewalling—highlights how toxic communication styles corrode intimacy. Couples who habitually employ these tactics during disputes often find their connection irreversibly damaged. Recognizing these patterns early allows partners to address conflicts constructively, potentially averting a breakdown. Hindsight often reveals that the seeds of a breakup were sown long before the final farewell.
Misconception 4: Breakups Require a Villain Labeling one partner as the “bad guy” oversimplifies the intricate dynamics of failed relationships. While some situations involve clear misconduct, most splits stem from mismatched needs or mutual misunderstandings. For instance, one partner may prioritize career over romance, not out of malice, but misaligned priorities. Framing such scenarios as black-and-white moral failures stifles personal growth and accountability.
Reflecting on shared responsibility fosters emotional maturity. Examining why certain traits initially attracted us—such as a free-spirited partner later deemed unreliable—reveals patterns in our choices. This introspection, free from self-blame, empowers individuals to make wiser decisions in future relationships. By releasing the need for villainy, we embrace the complexity of human connections and cultivate empathy, both for ourselves and others.
Misconception 5: Faded Passion Signals Relationship Death The transition from fiery romance to steady companionship is often mistaken for emotional decay. Long-term relationships inevitably ebb and flow, with passion waxing and waning due to life’s demands—parenthood, career stress, or health challenges. A couple might find date nights scarce but discover deeper intimacy through shared responsibilities, like co-parenting or managing a household. This evolution reflects natural progression, not failure.
Revitalizing connection requires intentional effort. Engaging in novel experiences, practicing gratitude, or prioritizing quality time can reignite sparks. For example, planning spontaneous getaways or revisiting shared hobbies fosters renewed appreciation. Embracing the relationship’s evolving nature—rather than clinging to its initial intensity—allows love to mature into a resilient, enduring bond.
Conclusion Dispelling dating myths invites a shift from rigid expectations to adaptive understanding. Relationships demand patience, self-awareness, and a willingness to embrace complexity. By rejecting oversimplified narratives, individuals can navigate love’s challenges with clarity, fostering connections that are not only passionate but purposeful and enduring.
Affiliate Disclosure: This blog may contain affiliate links, which means I may earn a small commission if you click on the link and make a purchase. This comes at no additional cost to you. I only recommend products or services that I believe will add value to my readers. Your support helps keep this blog running and allows me to continue providing you with quality content. Thank you for your support!
This lecture by a senior curriculum manager at Codesmith covers large language models (LLMs), explaining their underlying mechanisms, such as tokenization and the self-attention mechanism in transformer architectures. The lecture details the training process, including pre-training and fine-tuning, and emphasizes the importance of prompting as a crucial skill for effectively utilizing LLMs. Various prompting strategies are discussed, along with methods for evaluating LLM outputs and mitigating risks associated with their deployment. Finally, the lecture explores the future of prompting and the challenges of maintaining LLM applications while keeping costs low.
Large Language Model Study Guide
Quiz
Instructions: Answer the following questions in 2-3 sentences each.
Why is data quality significant in training Large Language Models (LLMs)?
Briefly describe the “AI winter” and its impact on AI research.
How does AlphaGo version 2.0 differ from version 1.0, and what is the significance of this difference?
Explain the importance of tokenization in the context of LLMs.
What are embeddings, and how are they used to represent words in a mathematical space?
How does the self-attention mechanism allow LLMs to understand the context of a sentence?
Describe the process of self-supervised learning in pre-training an LLM.
What is a base model, and how does it differ from a fine-tuned LLM?
What does it mean to say LLMs are like playing a word association game?
What is the purpose of a “ground truth data set” when evaluating a model’s output?
Quiz Answer Key
Data is critical because the quality and biases within the data significantly impact the LLM’s performance and can lead to skewed or biased outcomes. Training data sets are massive and, therefore, even subtle biases are amplified within a model.
The “AI winter” refers to a period in the 1970s and 80s when enthusiasm for AI waned due to early promises not being met. This led to the splintering of AI into smaller subfields like machine learning, computer vision, and natural language processing.
AlphaGo 1.0 was trained by imitating human play, whereas version 2.0 was allowed to play millions of games in a sandbox environment with a reward function for winning. This allowed it to surpass human-level play, unconstrained by imitation.
Tokenization is the process of breaking down text into smaller units (tokens) for LLMs to understand. This process allows the model to work with linguistic meaningful units for processing and analyzing text data.
Embeddings are stored as vectors or arrays that represent the meaning of words in a mathematical space. Similar words, used in similar contexts, have similar embeddings which allows the model to understand semantic relationships.
The self-attention mechanism enables LLMs to analyze the relevance of each word in a sentence to other words in that sentence. This contextual understanding allows the model to interpret the meaning of words based on their context within a sentence.
Self-supervised learning allows models to use the data itself to generate the labels for training, for example by using the next word in a sequence as its label. This removes the need for time-consuming manual labeling, allowing much larger data sets to be used.
A base model (or foundation model) is a result of the pre-training process that can generate documents based on text input but isn’t capable of tasks such as question answering. Fine-tuning a model adapts it for a specific task, enhancing its performance in those areas.
The word association game analogy implies that LLMs respond instinctively based on patterns in their training data rather than understanding the underlying concepts. It is a simplification of the process, but the model is more or less just predicting the next word, given its input.
A “ground truth data set” is a collection of known inputs and their corresponding outputs which is used to evaluate an LLM’s performance. This allows developers to test the model and ensure that it provides the expected results.
Essay Questions
Discuss the evolution of AI, highlighting the key breakthroughs and challenges that have led to the development of Large Language Models (LLMs). Consider the impact of “AI winters” and subsequent technological advancements.
Explain the concepts of tokenization and embeddings, and analyze their critical roles in enabling an LLM to process and interpret textual data. Consider the nuances of tokenization such as subword splitting.
Compare and contrast the pre-training and fine-tuning processes of LLMs, highlighting the different purposes and methods involved. How does the shift towards self-supervised learning impact the scale and capability of current models?
Describe and evaluate different prompt engineering strategies, including the use of personas, Chain of Thought, few-shot learning, and structured outputs. Consider the trade-offs between computational complexity and effectiveness.
Analyze the ethical and societal considerations surrounding the use of LLMs, including concerns about bias, representation, environmental impact, and the potential for misuse. What measures can be taken to mitigate these risks?
Glossary of Key Terms
AI Winter: A period of reduced funding and interest in artificial intelligence research, usually due to unfulfilled early promises.
Base Model/Foundation Model: An LLM that has been pre-trained on a large amount of data but not fine-tuned for a specific task.
Back Propagation: An algorithm that allows a model to change internal weights based on its error rate.
Bite Pair Encoding: A method of tokenization that represents common words as a single token and breaks uncommon words down into subwords.
Chain of Thought: A prompting technique that encourages the model to break down a complex problem into intermediate steps before arriving at a final answer.
Constrained Decoding: A method used to specify the schema for JSON output by limiting the possible next tokens during generation.
Embeddings: Vector or array representations of words or tokens that capture their semantic meaning in a mathematical space.
Few-Shot Prompting: A technique where a prompt includes several examples of the desired input-output pairing to guide the model.
Fine-Tuning: Adapting a base model with additional training data for a specific task or domain.
Ground Truth Data Set: A set of input-output pairs used to evaluate the model’s performance.
Hallucination: When an LLM generates an output that is factually incorrect or not supported by its training data.
Instruction Tuning: Fine-tuning an LLM to respond well to instructions or prompts.
LLM (Large Language Model): A type of AI model trained on large amounts of text data capable of generating text, code, and other types of content.
Mechanistic Interpretability: The field of study that focuses on understanding the inner workings and processes of machine learning models.
Morphologically Rich Languages: Languages where the forms of words can change depending on their meaning in a sentence (e.g., Arabic, Turkish).
Parameters: The internal variables of the model that are adjusted during the training process.
Pre-Training: The initial training of a large language model on a massive dataset, focusing on learning general patterns and representations.
Prompt: The input given to an LLM to elicit a particular response.
Prompt Engineering: The process of designing and refining prompts to achieve the desired outcomes from LLMs.
RAG (Retrieval Augmented Generation): A technique that enhances LLM’s ability to access external knowledge bases during generation.
Self-Attention: A mechanism that enables an LLM to assess the relevance of different parts of an input when generating an output.
Self-Supervised Learning: A type of machine learning where the model generates its own labels from input data.
Stochastic Gradient Descent: An iterative optimization algorithm used to adjust model parameters to minimize error.
System 1/System 2 Thinking: A mental model that distinguishes between instinctive (System 1) and deliberate/rational (System 2) modes of thinking, according to Daniel Kahneman.
Tokenization: The process of breaking down text into smaller units (tokens) that can be processed by an LLM.
Vector Database: A type of database designed to store and efficiently retrieve embeddings or vector representations.
Zero-Shot Prompting: A technique where a prompt is given to a model without any prior examples.
Large Language Models and Embeddings
Okay, here is a detailed briefing document synthesizing the key themes and ideas from the provided text, complete with relevant quotes.
Briefing Document: Large Language Models (LLMs) and Embeddings
Introduction This document summarizes a presentation on Large Language Models (LLMs) and related concepts, focusing on how these models are built, how they work, and how they can be used effectively, especially through skillful prompting. The presentation emphasizes the role of software engineering principles in working with LLMs, highlighting both the challenges and the opportunities presented by this technology.
Key Themes and Concepts
Data is Paramount
The quality and biases of an LLM are directly determined by the data on which it’s trained.
LLMs are trained on “massive massive amounts of data” such as the entirety of English language Wikipedia (2.5 billion words) and a large book corpus (800 million words).
Quote: “the data is hugely significant in determining the quality and the biases of the model”
Evolution of AI
AI research started in the 1950s and 60s with initial optimism, followed by an “AI winter” in the 70s and 80s when that optimism faded.
This led to the splintering of AI into fields like machine learning, computer vision, and natural language processing.
The recent “rebirth of AI” is due to advances like AlexNet, AlphaGo, BERT, and ChatGPT.
Key to this latest wave is “self-improvement” models that learn by playing millions of games, not just imitating human players.
Quote: “In the past 10 to 15 years we’ve seen the Rebirth of AI as an umbrella field”
LLMs: Versatile and Accessible
Unlike specialized models trained for a single task, LLMs can perform many tasks well.
LLMs can be adapted to specific use cases, reducing the need for in-house ML teams.
LLMs have applications in natural language processing (text classification, translation, text generation, speech recognition, summarization, question answering), code generation, medical diagnosis, and more.
Quote: “…these large language model can do a lot of things very well”
Tokenization: The Foundation
Tokens, not words or characters, are the basic inputs for LLMs.
Tokenization splits text into linguistically or statistically meaningful units.
Spaces are included with the word tokens, and words are sometimes split into multiple tokens or subwords.
A tokenizer dictionary is fitted to the training data set to create the vocabulary for the model.
Quote: “tokens are the basic inputs for a large language model”
Embeddings: Representing Meaning
Embeddings are vector representations (arrays of numbers) that capture the meaning of words and tokens.
Similar words have similar embeddings, forming clusters in a multi-dimensional space.
Embeddings can be interpolated, such as combining “king,” “man,” and “woman” to get “queen”.
Embeddings can be used for semantic search, not just keyword-based search.
Quote: “an embedding is stored as a vector… it is not entirely possible as of now to understand what each number actually means to the model”
Attention Mechanism
The self-attention mechanism in the Transformer architecture allows models to determine the relevance of each word in a sentence to other words.
It enables understanding context by considering the relationship between words in a sentence, this is a groundbreaking element of the technology.
Each word stores three vectors: a value vector (meaning), a key vector (contextual meaning), and a query vector (input meaning).
Quote: “…the meaning of one word depends on the words around it”
Pre-Training and Document Generation
The pre-training process is about capturing the meaning of the data using large quantities of data, high end GPUs, and significant time investments.
Models are trained through self-supervised learning by predicting the next token in a sequence.
The result of pre-training is a base or foundation model that can only generate documents.
Quote: “the model essentially creates its own labels… the label is the following token”
Fine-Tuning for Specific Tasks
To adapt a base model for tasks like question answering, it must be fine-tuned with a smaller set of labeled data.
Fine-tuning can be instruction-based, iterative, or tailored to the last few layers of the model.
Quote: “we have to fine-tune it and we take the base model or Foundation model and we train it on a much smaller set of data”
Prompting: Programming with Natural Language
Prompting is the core skill for using LLMs, acting as the code used to guide models to produce desired outputs.
It’s a “subtractive” process, narrowing down the massive set of possible completions.
Prompts should be maintainable, readable, modular, and flexible, much like good code.
Prompting is an iterative process; a methodical process is essential for improvement.
Quote: “prompting is conditional generation meaning we are generating an output conditioned on some input”
Mental Models for LLMs
LLMs are not search engines, knowledge stores, or Stack Overflow in your editor.
They perform “system one” thinking: instinctive and automatic, akin to a word association game.
Framing LLMs in human thinking is misleading, but helpful until you form your own understanding.
Quote: “these models are not capable of system two thinking they are only capable of system one thinking”
Evaluating LLM Output
Key evaluation dimensions: grounding (assertions based on a reliable source), consistency (similar queries yielding similar results), confidence (acknowledging uncertainty), interpretability (why a response was generated), alignment (avoiding harm), and robustness (resisting manipulation).
Quote: “every assertion has authoritative basis”
Risks and Challenges
Lack of transparency around training data, potential for bias based on that training data.
Representation issues: internet data overrepresents certain demographics, and some models have been trained on content with particular biases.
Environmental costs and energy consumption of training large models must be considered.
Hallucinations are a built-in feature, not a bug, as the models are predictive engines, not knowledge stores.
Quote: “Hallucination is actually a feature it’s a feature it’s not a bug”
Software Engineering Opportunities
Many challenges in deploying LLMs are software engineering concerns, such as testing, version control, latency, maintainability, and monitoring.
LLMs can enhance productivity through automation and augment functionality, creating new, previously unfeasible products.
Quote: “These questions around testing and inversion control… are very much software engineering challenges”
Prompting Strategies
Key elements of a prompt: goal, role, and output format.
Use personae to invoke archetypes, process guidance to give step by step logic.
Use a “few shot” method by providing examples of desired input and output for the model to follow.
Delimiters and structured outputs are crucial.
Use techniques like “Let’s think step by step” and asking models to “check their work” to improve output.
Decompose complex problems into smaller sub-problems.
Employ ensembling (generating several responses and selecting the most common one) to improve accuracy.
Future Directions
The future of prompting is likely to involve a convergence between improved models and improved prompting techniques.
Use-case specific prompting will remain essential.
Multimodality and cross model versatility will become more important.
Conclusion Large Language Models are powerful and transformative tools with the ability to impact many fields. Understanding how they function, how to guide them with carefully crafted prompts, and how to integrate them using software engineering principles, are vital skills moving forward. While there are risks and challenges to be addressed, the opportunities presented by this technology are immense and exciting.
Large Language Models & Embeddings: A Comprehensive Guide
Large Language Models & Embeddings: An FAQ
What are Large Language Models (LLMs) and how do they work? LLMs are complex neural networks trained on massive datasets to understand and generate human-like text. They operate by first tokenizing input text (breaking it into smaller units), mapping these tokens to numeric IDs, and then using these IDs in mathematical operations to predict the next token in a sequence. This process allows them to learn complex relationships and patterns in the text, enabling them to generate new text, translate languages, and perform a wide variety of tasks. Crucially, this predictive ability is learned from the massive dataset provided in the pre-training phase, allowing the models to generate new data based on those learned patterns.
Why is data so critical in training LLMs, and what does the training process look like? The quality and quantity of data are paramount because the model learns its understanding of the world from it. For example, some of the first LLMs were trained on the entirety of English Wikipedia and large book corpora. The training process involves the model predicting the next token in a sequence over many rounds (epochs). The model is continuously adjusted using back propagation based on the difference between the predicted and actual tokens, eventually achieving an understanding of the patterns in the data. This training approach is also “self-supervised,” as the labels (i.e., the correct next token) are already part of the dataset, removing the need for manual labeling. This self-supervised technique allows the massive amounts of data to be used for training.
What are tokens and embeddings, and why are they important? Tokens are the basic units of input for LLMs. These aren’t always whole words; they can be sub-word units or punctuation with spacing included. This approach allows the model to capture the contextual meaning of the word by encoding the boundaries between words. Embeddings are vector representations of these tokens, where similar tokens used in similar contexts have similar embeddings. These embeddings encapsulate the model’s understanding of a word’s meaning, context, and relationships to other words. Embeddings are useful for semantic search where search is conducted based on meaning rather than keyword matches.
What is “self-attention,” and how does it help LLMs understand context? Self-attention is a mechanism in the Transformer architecture that allows LLMs to determine the relevance of every word in a sentence to every other word in that sentence. This is crucial for understanding the context of each word and resolving ambiguities, such as understanding which “it” is being referred to in a sentence like, “The dog chewed the bone because it was delicious.” The self-attention mechanism is able to associate the “it” with “bone” in that instance, whereas another similar sentence would likely associated “it” with “dog”. Self-attention allows models to consider the entire context of a sentence, rather than just the immediate neighboring words.
What is the difference between a “base model” and a model used in applications like chat? A “base” or “foundation” model is the output of the pre-training process. It can generate documents similar to those in its training data. It cannot answer questions or provide any kind of interactive experience. To adapt a base model for a specific purpose (e.g. question answering, acting as a helpful assistant), it needs to be “fine-tuned” or further adapted with a smaller set of labeled data relevant to the task at hand. This process adjusts the model’s parameters to be more responsive to a more specific domain and format of response.
What is “prompt engineering,” and why is it important? Prompt engineering is the art and science of crafting effective prompts to guide LLMs to produce the desired results. Since LLMs are conditional text generators, the quality of the generated text is heavily dependent on the prompt used. Effective prompts will not only produce results that meet the criteria you are looking for, but also will not introduce negative behavior in the model, such as hallucinations or toxic responses. Effective prompt engineering requires a software engineering mindset, emphasizing practices like clear intent, modularity, version control, and iteration.
What strategies can we use to make our prompts more effective? Several strategies can improve prompt effectiveness:
Clearly define the role, goal, and output format.
Provide instructions in a clear, itemized fashion.
Use delimiters to separate instructions, context, and data.
Set a persona for the model to emulate.
Provide examples of desired input/output patterns (Few-shot learning).
Guide the model’s reasoning process with “Let’s think step by step”.
Use Chain of Thought prompting where the model generates its reasoning steps in addition to its final output.
Use “cognitive verifier” prompts where the model asks clarifying questions of the user.
Give the model access to external tools like web search or code execution.
Use ensembling strategies by having the model generate many responses and choose the one most similar to the other generated responses.
Decompose the problem into smaller sub problems so the model can reason about each one individually. These approaches are rooted in making our implicit assumptions explicit to guide the LLM toward the intended behavior.
What are the key risks and challenges when working with LLMs, and what are some of the important opportunities in this field? Key risks and challenges include:
The lack of transparency around training data which introduces questions of bias, representation, and copyright
Model “hallucinations” or the generation of responses that are factually incorrect
The large carbon and financial footprint required to train these large models
The risk of models being exploited by malicious actors via prompt injections
Key opportunities include:
Automating tedious tasks and augmenting functionality by leveraging LLMs
Improving productivity through the automation of mundane work
Enhancing a range of products by making LLMs a core part of their functionality
Implementing new testing and version control systems specific to prompts and LLM interactions
Applying software engineering techniques to the development of prompts to improve their readability, flexibility, and maintainability
Large Language Models and Embeddings
Large language models (LLMs) and embeddings are key concepts in modern AI, and the sources provide a detailed look into how they work and how they are used [1, 2].
LLMs:
LLMs are complex models that learn from massive amounts of data [1].
One early LLM, Bert, was trained on the entirety of English Wikipedia (2.5 billion words) and an additional 800 million words from a book corpus [1].
The models need to understand text input and generate new text output based on the rules learned from the data [1].
LLMs can tackle tasks beyond natural language processing, including code generation and addressing challenges in engineering and medicine [3].
The basic inputs for an LLM are tokens, which are mapped to numeric IDs [3].
Tokenization is the process of breaking down text into smaller units [3]. The goal of tokenization is to have linguistically or statistically meaningful units [4].
Common words are represented by single tokens, and uncommon words are broken down into subwords, using byte pair encoding [4].
The tokenizer dictionary is fitted to the entire training dataset [4].
The vocabulary is the complete list of words that the model can understand [4].
The number of tokens a given input will be represented by is about 3/4 of the number of words [5].
LLMs do not distinguish between semantic knowledge and world knowledge, and they learn relationships between words [6].
They are pattern-learning machines that can predict the next token in a sequence [6, 7].
LLMs use key, query, and value vectors in their attention mechanism to understand the relationships between words in a sentence [6, 7].
Pre-training involves capturing the meaning of the pre-training data, which is computationally expensive and time-consuming [7].
In each training epoch, the model tries to predict the next token, adjusts its parameters through backpropagation and gradient descent, and repeats the process [7].
The result of pre-training is a base model, which is essentially a document generator [8].
Fine-tuning adapts the base model to specific tasks, using smaller, labeled datasets [9].
LLMs use beam search to lay out a string of next tokens and compare multiple pathways [10].
LLMs can “hallucinate,” or generate factually incorrect information, because they are predictive engines and not knowledge stores [11].
LLMs are not search engines and they do not go into a database to pull information [12].
Embeddings:
An embedding is a vector, or an array of numbers, representing the model’s understanding of a word [5].
Each value in an embedding signifies a dimension of the model’s understanding [13].
Similar words, used in similar contexts, have similar embeddings, forming clusters of related words [13].
Embeddings can be visualized in two dimensions, where each dimension is color-coded [13].
Embeddings can be interpolated, meaning the vector for “king” minus the vector for “man” plus the vector for “woman” results in a vector close to that of “queen” [2].
Embeddings can be stored to capture the semantic relevance of text and enable semantic search [2].
Embeddings are flattened representations of the information contained in a large language model [2].
The value vector is the meaning of the word, while key and query vectors act as output and input [6].
The key and query vectors can be considered the “plumbing” that underlies language, connecting words on a deeper level [6].
Additional Insights:
The quality and biases of the model are determined by the data it is trained on [1].
AI research started in the 1950s and 60s, followed by an “AI winter” in the 1970s and 80s, which led to the splintering of AI into smaller fields [1].
There are concerns about representation and biases in the pre-training data, as well as environmental impact and costs of training LLMs [14, 15].
Many challenges in deploying LLMs are software engineering concerns, such as testing, version control, latency, and maintainability [16, 17].
LLMs can enhance productivity by automating tedious work and augmenting functionality [17].
Prompting is a core skill for working with LLMs, involving conditional generation [12, 18].
A prompt guides the model to generate the right output from a massive set of possible completions [19].
Prompts can be broken into modular components and improved through iteration [20, 21].
Effective prompts include a goal, a role, and an output format [22].
Other elements of a prompt may include persona, process guidance, and additional context [23].
Prompting is an iterative process and the starting point is less important than the process to improve from there [21].
Evaluation of LLM outputs is critical, and methods like ground truth datasets, user feedback, and testing should be implemented [24, 25].
There are many prompting strategies to improve the response, including setting personas, using mimic proxies, using multiple roles, and few shot prompting [26, 27].
Additional strategies include rephrasing and responding, using a cognitive verifier and the system 2 attention concept [28, 29].
Chain of thought prompting, using both zero-shot and few-shot methods, can improve the reasoning process [30, 31].
LLMs can use external tools like web search and code editors, utilizing frameworks like “react” (reason and act) [32, 33].
Post-generation strategies include asking the model to self-check and improve its answer, decomposition, and ensembling [33, 34].
The future of prompting may involve a meeting in the middle, with models and users getting better at interpreting prompts [35, 36].
Use-case specific prompting and maintainability of prompts will continue to be important [36, 37].
Large Language Models: An Overview
Large language models (LLMs) are complex AI models that learn from massive amounts of data and generate new text outputs [1]. Here’s an overview of their key aspects:
Training and Data:
LLMs are trained on massive datasets, such as the entirety of English Wikipedia (2.5 billion words) plus an additional 800 million words from a book corpus [1].
The data used to train LLMs significantly influences the quality and biases of the model [1].
The models learn to understand text input and generate new text based on the rules they infer from the training data [1].
The models capture both semantic knowledge and world knowledge, learning the relationships between words [1, 2].
Functionality and Capabilities:
LLMs can perform various tasks, including natural language processing (text classification, machine translation, text generation, speech recognition, summarization, and question answering) [3].
They are also capable of tackling tasks beyond natural language processing, such as code generation, and addressing challenges in engineering and medicine [4].
LLMs are pattern-learning machines that predict the next token in a sequence [2].
They use key, query, and value vectors in their attention mechanism to understand the relationships between words in a sentence [2].
Tokenization:
LLMs process text by breaking it down into tokens, which are then mapped to numeric IDs [4].
Tokenization aims to create linguistically or statistically meaningful units [5].
Common words are typically represented by single tokens, while uncommon words are broken down into subwords using byte pair encoding [5].
The tokenizer dictionary is fit to the entire training dataset and determines the model’s vocabulary [5].
The number of tokens for a given input is about three-fourths of the number of words [6].
Embeddings:
An embedding is a vector (an array of numbers) that represents the model’s understanding of a word, with each value in the vector signifying a dimension of that understanding [6, 7].
Similar words, used in similar contexts, have similar embeddings, forming clusters of related words [7].
Embeddings can be visualized in two dimensions, using color-coding [7].
Embeddings can be used for semantic search and to capture the semantic relevance of text [8].
Pre-training and Fine-tuning:
Pre-training is a computationally expensive process of capturing the meaning of the pre-training data [9].
During pre-training, the model tries to predict the next token in a sequence and adjusts its parameters through backpropagation and gradient descent [9].
The result is a base model, which is essentially a document generator [10].
Fine-tuning adapts the base model to specific tasks using smaller, labeled datasets [11].
Key Mechanisms:
LLMs use self-attention to determine the relevance of every word in a sentence, enabling a contextual understanding [12].
LLMs use key, query, and value vectors in their attention mechanism to understand the relationships between words in a sentence [2].
They use beam search to generate sequences of tokens, comparing multiple pathways [13].
Limitations and Challenges:
LLMs can “hallucinate,” generating factually incorrect information because they are predictive engines, not knowledge stores [14].
They are not search engines and do not pull information from databases [15].
There are concerns about biases in the pre-training data, as well as the environmental and financial costs of training [11, 16].
Deploying LLMs involves software engineering challenges, such as testing, version control, latency, and maintainability [17].
Prompting:
Prompting is a core skill for guiding LLMs, using conditional generation to produce the desired output [15, 18].
Effective prompts include a goal, a role, and an output format and can include additional context, persona, and process guidance [19].
Prompting is iterative, and the starting point is less important than the process for improvement [20].
Prompts can be broken down into modular components [21].
Various prompting strategies can be used to improve responses, such as setting personas, using mimic proxies, few-shot prompting, and rephrasing and responding [22, 23].
LLMs can also use external tools such as web search and code editors with frameworks like “react” (reason and act) [24].
Evaluation:
Evaluation of LLM outputs is critical, and methods such as ground truth datasets, user feedback, and testing are important [25, 26].
In summary, LLMs are powerful tools with a wide range of capabilities, but they also come with their limitations and challenges. Effective prompting and a strong software engineering mindset are crucial to successfully using and deploying LLMs.
Large Language Model Understanding
Model understanding in large language models (LLMs) refers to how these models process and interpret input data, especially text, and how they use this interpretation to generate new outputs [1]. The sources discuss several key aspects of this understanding:
1. Tokenization and Vocabulary:
LLMs process text by breaking it down into smaller units called tokens [2]. These tokens can be whole words, parts of words, or even punctuation [2, 3].
The goal of tokenization is to create units that are either linguistically meaningful or statistically meaningful to the model [3].
Common words are typically represented by single tokens, while uncommon words are broken down into subwords using byte pair encoding [3].
Each token is then mapped to a numeric ID, allowing the model to process the text mathematically [2].
The model’s vocabulary is the complete list of words or tokens it can understand, which is determined by the training data set [3].
2. Embeddings:
An embedding is a vector (an array of numbers) that represents the model’s understanding of a word or token [4, 5]. Each number in the array signifies a dimension of the model’s understanding [4].
Similar words, used in similar contexts, have similar embeddings, forming clusters of related words [5]. For example, the embeddings for “woman” and “girl” might be similar, reflecting their semantic relationship [6].
These embeddings capture not only the meaning of words but also their relationships [7]. They do not distinguish between semantic knowledge and world knowledge [7].
Embeddings are a flattened representation of the information that is contained in a large language model [4].
3. Self-Attention:
LLMs use a mechanism called self-attention to understand the context of a word within a sentence [8].
Self-attention allows the model to determine the relevance of every other word in the sentence to the current word being processed [8]. This contextual understanding is essential for processing language effectively [8].
The model uses key, query, and value vectors in the attention mechanism [7]. The value vector represents the meaning of a word; the key vector represents what contextual meaning that word has to offer to other words in the sentence; and the query vector represents what meaning other words in the sentence have to offer the current word [7].
4. Pattern Learning:
LLMs are fundamentally pattern-learning machines [7]. They learn from the massive amounts of training data by identifying patterns and relationships between words and tokens [1].
During pre-training, the model tries to predict the next token in a sequence and adjusts its parameters based on its success or failure [9]. This iterative process allows it to develop an understanding of the data [9, 10].
The model’s understanding of the dataset is captured in its parameters, specifically in the model’s weights which are mathematically adjusted through backpropagation [10].
5. Pre-training and Fine-tuning:
The pre-training process is about capturing the meaning of the pre-training data [9].
The result of pre-training is a base model that is only capable of generating documents [10].
Fine-tuning is the process of adapting a base model to a variety of tasks by training it on smaller, more specific datasets [11].
6. Limitations:
LLMs do not have a true understanding of facts or the world [7, 12]. They have an embedded representation of words and their relationships, which is not the same as knowing facts [7].
Because they are predictive engines, they may produce factually incorrect information, known as “hallucinations” [12].
LLMs also do not have “system two” or deliberate thinking, and instead operate on a word association basis responding instinctively [13].
In summary, model understanding in LLMs involves a complex interplay of tokenization, embeddings, self-attention mechanisms, and pattern learning. These models don’t have human-like understanding but are capable of sophisticated language processing and generation by learning from massive amounts of data.
Large Language Model Self-Improvement
Self-improvement in the context of large language models (LLMs) refers to the mechanisms and processes that enable these models to enhance their performance and adapt to new tasks. The sources describe several key aspects of this self-improvement, particularly focusing on how these models learn and refine their abilities through training and other means:
Self-Supervised Learning: One of the most significant innovations in LLM development is the use of self-supervised learning [1]. Unlike supervised learning, which requires manually labeled data, self-supervised learning allows models to create their own labels directly from the pre-training data [1]. For example, in text-based LLMs, the input is a sequence of tokens, and the label is simply the following token. This approach enables models to be trained on massive unlabeled datasets [2].
Iterative Training: During the training process, LLMs go through multiple rounds, or epochs, of learning [1]. In each epoch, the model processes batches of the pre-training data and attempts to predict the next token in the sequence. After each attempt, the model evaluates how close it was to the correct answer and adjusts its parameters through backpropagation and stochastic gradient descent to improve its predictive ability [1].
Fine-Tuning: After pre-training, LLMs can be further improved through fine-tuning [3]. This involves training the model on smaller, task-specific datasets to adapt it for particular applications, such as question answering or acting as a helpful assistant. Fine-tuning allows LLMs to go beyond simply generating documents and instead perform specific, defined tasks [2, 3].
Reinforcement Learning: Models like AlphaGo demonstrate the power of reinforcement learning in self-improvement [4]. Version 1.0 of AlphaGo was trained by imitating human players, but version 2.0 was given a simple reward function for winning games and allowed to play millions of games, reinforcing the decisions that led to victory. This approach allowed the model to surpass human-level performance [4]. This same thread of self-improvement through reinforcement is seen in large language models as well [4].
Contextual Understanding: LLMs use mechanisms like self-attention to understand the context of words within a sentence [5]. By determining the relevance of every other word to the current word, the model develops a contextual understanding of language, which significantly improves its ability to generate meaningful text [5].
Continuous Iteration: The development and improvement of LLMs are iterative processes. For example, tokenizers are continuously modified to develop a more fine-grained system of representation [6]. Similarly, models are continuously refined through ongoing data collection and model improvement [7].
Prompt Engineering: LLMs improve through iteration of prompts, where models are better able to produce desired responses by changing the way that they are prompted [8, 9].
Key shifts:
LLMs have shifted from specialized models trained for one specific task to models that can do many things well [4].
The models are capable of self-improvement and can be adapted to different tasks using fine-tuning [3, 4].
In summary, self-improvement in LLMs is a multifaceted process that involves self-supervised learning, iterative training, fine-tuning, and reinforcement learning. These mechanisms enable LLMs to learn from data, refine their understanding of language, and adapt to perform a variety of tasks more effectively [1, 4].
Prompt Engineering: A Comprehensive Guide
Prompt engineering is the practice of designing and refining prompts to effectively guide large language models (LLMs) to produce desired outputs [1, 2]. It involves understanding how LLMs interpret natural language and using that understanding to craft inputs that elicit specific, intended responses [3]. The sources emphasize that prompt engineering is a crucial skill for working with LLMs due to their versatility and the need to condition them for specific tasks [2].
Key aspects of prompt engineering:
Conditional Generation: Prompting is fundamentally about conditional generation [3]. An LLM generates output conditioned on the input it receives [3]. The prompt is the condition that guides the model toward a particular kind of response [3].
Subtractive Process: Effective prompting involves narrowing down the vast range of possible responses to a more specific set [3]. It is a subtractive process where the goal is to produce prompts that elicit desired outputs and avoid undesired ones [3].
Components of a Prompt:
Goal: Defines what the model should do [4].
Role/Persona: Specifies how the model should approach the task [4, 5]. Using a persona can guide the model to emulate real-world or fictional characters to condition the response [5, 6].
Format: Dictates how the output should look [4].
Process Guidance: Provides instructions on how the model should reason through the task [6].
Additional Context: Includes any external information that the model should reference [6].
Prompting Strategies:
Clear Instructions: Prompts should have clear, itemized instructions that define the primary task, key terms, and any additional tasks [7]. The less the model is asked to do at one time, the better it tends to perform [7, 8].
Delimiters: Formatting and delimiters (like markdown or XML tags) provide structure that LLMs respond well to [7]. These are not universal and vary by model [7, 9].
Structured Output: Specifying the format, length, and structure of the output improves reliability [10].
Mimic Proxy: Using an element of culture or behavior that’s learned by imitation can help the model draw on archetypes [5]. For example, having a model engage in a student-teacher dialogue [5].
Few-Shot Prompting: Providing examples of the desired input-output pairs can be effective when examples are more instructive than descriptions [11].
Chain of Thought (CoT): Encouraging the model to think step-by-step is a powerful way to make implicit assumptions explicit. Zero-shot CoT involves simply adding “Let’s think step by step” [12, 13]. Few-shot CoT provides examples of reasoning steps [13].
Access to External Tools: Providing the model with tools such as a web search, code editor, or function calling can enhance its ability to respond effectively [10, 14]. The model should be guided to use the tools as needed through a process of thought, action, and observation [15].
Rephrase and Respond: A strategy where the model improves upon the user’s input by rephrasing it [16].
Self-Consistency: Generating multiple responses from the model and selecting the most common response [17].
Decomposition: Breaking a complex problem into smaller subproblems to allow the model to address each piece separately [18].
Emotional Appeals: Using emotional appeals can condition a particular response [10].
Prompt Engineering for User Input:
Scaffolding: Developers must provide context and structure to user input, as users likely haven’t studied prompt engineering [19].
Guardrails: Prompts must be designed to mitigate risks, validate user inputs, and screen outputs [20]. Since LLMs can be used to run user code, protecting against malicious actors is important [20].
Iterative Process: Prompt engineering is not about landing on the perfect prompt immediately; it is an iterative process of methodical improvement [21, 22].
Importance of Maintainability:
Modular Design: Prompts should be split into modular components to make them readable, maintainable, and flexible [21].
Version Control: Versioning and logging are important to track progress [22, 23].
Testing: It is important to test prompts with a ground truth dataset to confirm that a model is working as intended [20, 24].
Evaluation and Optimization:
Ground Truth Data Set: Establishing a ground truth data set of inputs and acceptable outputs is critical for both development and production [20].
Monitoring: Regularly monitoring the model in production and collecting user feedback is critical for maintaining and improving performance [25, 26].
Future Trends:
LLMs may become more adept at interpreting prompts, but use case specific prompting will likely remain valuable [17, 27].
Focus will be on readability, tone, prompt design patterns, and versatility across models [27]. Multimodality will also become an area of focus as models process more diverse input types [28].
In summary, prompt engineering is the art and science of crafting effective instructions for LLMs, combining clear communication with an understanding of how these models process language, make inferences, and provide responses [12]. It requires a methodical approach, focusing on both the structure of the prompt and the intended reasoning process [12].
How Large Language Models Actually Work | Full course lecture | James Laff
Affiliate Disclosure: This blog may contain affiliate links, which means I may earn a small commission if you click on the link and make a purchase. This comes at no additional cost to you. I only recommend products or services that I believe will add value to my readers. Your support helps keep this blog running and allows me to continue providing you with quality content. Thank you for your support!
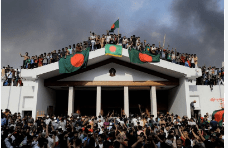
This interview features Abdul Quader Siddiqui, a Bangladeshi freedom fighter, reflecting on the country’s history since its liberation war. He critiques the dominant narrative surrounding the war, particularly the portrayal of Sheikh Mujibur Rahman, and challenges the current political climate, expressing concerns about corruption and a lack of genuine democracy. Siddiqui also discusses the roles of India and Pakistan in the war and advocates for a more inclusive and accurate historical understanding of Bangladesh’s independence. Finally, he offers his perspective on the political activism of young people and the future of the country.
Bangladesh Liberation War: A Study Guide
Short Answer Quiz
According to the speaker, what was the primary goal of the Liberation War, and has it been achieved?
What is the speaker’s view on the claim that only the Awami League represents the pro-liberation forces?
What is the speaker’s opinion of Sheikh Mujibur Rahman and his role in the independence movement?
According to the speaker, what is the significance of the destruction of Bangabandhu’s portrait and house?
How does the speaker view the actions of Jamaat-e-Islami during the Liberation War, and how does he see their role in current Bangladeshi society?
What is the speaker’s perspective on India’s role in the Liberation War?
What does the speaker think about the declaration of independence and the role of Sheikh Mujibur Rahman and Ziaur Rahman?
What is the speaker’s critique of Sheikh Hasina’s leadership of the Awami League?
How does the speaker view the idea of family-based political leadership in Bangladesh?
What does the speaker think of the young generation’s role as a pressure group in politics and their call for reforms?
Answer Key
The speaker states the primary goal was freedom from the deprivation imposed by Pakistan, but he believes the dreams of a free country have not been fully realized even after more than 50 years.
The speaker disagrees, arguing that it is a false narrative and that the claim that all who are not Awami League are Razakars is incorrect.
The speaker acknowledges Mujibur Rahman’s significant contributions, but also suggests he is not the sole hero and that he was not without faults.
The speaker condemns it as a heinous crime and says that it is a sign of the current political problems, noting it should not have happened if the country was true to the values of the liberation war.
The speaker condemns Jamaat-e-Islami for their direct involvement in atrocities during the war. However, he also says that current members who weren’t involved in the war deserve the same rights as everyone else while he says that the organization will never be able to atone for the past actions of their predecessors.
The speaker acknowledges India’s help but states it was primarily for India’s own strategic reasons. He also points out the important role played by Bangladeshi freedom fighters in the victory.
The speaker values the declaration of independence and acknowledges that both Sheikh Mujibur Rahman and Ziaur Rahman played important roles, noting that even if Ziaur Rahman declared on behalf of Sheikh Mujibur Rahman it was still a valid declaration.
The speaker criticizes Sheikh Hasina for straying from the original ideals of the Awami League, for holding two positions of power, and for her corrupt practices.
The speaker is against family-based political leadership, expressing that it has no place in Bangladesh and should not continue to be the norm.
The speaker is positive about the young generation’s activism and believes that they need to win people’s hearts to run the state successfully instead of using pressure tactics.
Essay Questions
Analyze the speaker’s critique of the current political landscape in Bangladesh, focusing on how it relates to the legacy of the Liberation War.
Compare and contrast the speaker’s views on Sheikh Mujibur Rahman and Sheikh Hasina, discussing how their leadership has shaped the post-independence trajectory of Bangladesh.
Evaluate the speaker’s stance on the role of India in the Liberation War. Is he appreciative, critical, or both? Provide evidence from the text.
Explore the complex relationship between historical memory and political narratives in the context of the Bangladesh Liberation War. How does the speaker challenge the official narrative?
Discuss the speaker’s vision for the future of Bangladesh, based on his comments regarding democracy, leadership, and the role of the younger generation.
Glossary of Key Terms
Assalamu Alaikum: A common greeting in Islam, meaning “peace be upon you.” Bangabandhu: An honorific title, meaning “Friend of Bengal,” referring to Sheikh Mujibur Rahman. Bangbir: A term meaning “Hero of Bengal,” used to address Abdul Quader Siddiqui in the provided text. Bakshal: The Bangladesh Krishak Sramik Awami League, a political party formed by Sheikh Mujibur Rahman in 1975, which restructured the nation into a one-party system. Freedom Fighter: An individual who participated in the Bangladesh Liberation War of 1971. Jamaat-e-Islami: A religious political party in Bangladesh that opposed the Liberation War and is accused of collaboration with Pakistani forces. Liberation War: The war fought in 1971 for the independence of Bangladesh from Pakistan. Razakar: A derogatory term used to refer to collaborators of the Pakistani army during the 1971 Liberation War, particularly those who were against the independence of Bangladesh. Sheikh Hasina: The current Prime Minister of Bangladesh and daughter of Sheikh Mujibur Rahman. Sheikh Mujibur Rahman: The founding leader of Bangladesh, also known as Bangabandhu, who led the country during its Liberation War and early years of independence. Shramik Janata Party: The name of the political party founded by Abdul Quader Siddiqui, as mentioned in the text. Tikka Khan: A Pakistani Army General known for his brutal actions during the 1971 Liberation War in Bangladesh. Yahya Khan: The President of Pakistan during the 1971 Liberation War. Ziaur Rahman: A former President of Bangladesh and a military leader in the Liberation War who declared the independence of Bangladesh on behalf of Sheikh Mujibur Rahman.
Siddiqui on Bangladesh: A Critical Perspective
Okay, here’s a detailed briefing document based on the provided text, which appears to be an interview with Abdul Quader Siddiqui, a freedom fighter and political figure in Bangladesh:
Briefing Document: Analysis of Abdul Quader Siddiqui Interview
Date: October 26, 2023 (Assumed, as no date given in source)
Subject: Key themes and critical perspectives from an interview with Abdul Quader Siddiqui regarding Bangladesh’s history, politics, and current state.
Source: Excerpts from an Interview on RICL TMA Straight Cut, featuring Deepti Chowdhury and Abdul Quader Siddiqui.
Overview:
This interview provides a critical and often contentious view of Bangladesh’s history, particularly its liberation war and subsequent political landscape. Siddiqui, a prominent figure in the liberation war, expresses deep disappointment with the country’s trajectory, criticizing the current government, and highlighting what he sees as significant historical inaccuracies and ongoing injustices. He challenges the dominant narrative of the Awami League and its leader, Sheikh Hasina, while also giving nuanced perspectives on other key figures like Sheikh Mujibur Rahman and Ziaur Rahman.
Key Themes and Ideas:
Disillusionment with Post-Liberation Bangladesh:
Siddiqui expresses profound disappointment with the state of Bangladesh since its independence. He states bluntly, “Bangladesh is not good at all.” He suggests the sacrifices made during the liberation war have not yielded the desired outcomes of a truly free and prosperous nation. He criticizes the claim that the country was completely liberated, stating that “it will be a lie if we say that we freed Bangladesh from the hands of Pakistanis with our lives.” He implies that the ideals of the liberation war have not been met, and there’s a lack of the desired progress.
Critique of the Awami League and Sheikh Hasina:
Siddiqui is highly critical of the Awami League and its current leader, Sheikh Hasina. He accuses her of not upholding the ideals of the party’s founders and for engaging in corruption and vote-rigging. He argues that “Sheikh Hasina led Awami League I usually call it Hasina League no leadership developed here no personality developed here.” He believes that she has turned the party into an autocracy. He contrasts her actions with the party’s early ideals stating that “Sheikh Hasina was the president of Awami League for 16 years and 15 and a half years, she was the prime minister, then she acted against her father’s ideals.”
Re-evaluation of Sheikh Mujibur Rahman’s Legacy:
While acknowledging Sheikh Mujibur Rahman’s significant contributions to the nation’s liberation, Siddiqui contests the notion that he was the sole hero of the liberation war, “It is also not true that Mujib has been singled out as a hero and we have not been able to highlight Sheikh Mujib as much as it should have been.” He criticizes the portrayal of Mujibur Rahman by the Awami League, which he feels has been exaggerated, and believes that Mujib was unable to fulfill the promises of the country’s freedom. He also says that “the way the Awami League has tried to call Sheikh Mujib Bangabandhu is not Bangabandhu.” He also believes that the second revolution of Bangabandhu was tarnished and not fully understood.
Siddiqui highlights that Mujib himself recognized some shortcomings in his leadership, “Sheikh Mujibur Rahman has to admit that he could not do it to some extent…“
Recognition of Ziaur Rahman’s Role:
Siddiqui acknowledges Ziaur Rahman’s importance, stating, “Ziaur Rahman is a great leader and it must be accepted.” He notes Ziaur Rahman’s declaration of independence as valuable and significant to the people during the war. He seems to argue that while Mujibur Rahman made the initial call, it was Ziaur Rahman who actively participated. He also contends that historical narratives have unfairly undermined Zia’s contribution.
The Nature of the Liberation War:
Siddiqui points out the complexity of the war and how it was not solely the Awami League that contributed. He suggests that the narrative promoted by the current government is one-sided, where, “only those who make Awami League are the pro-independence forces, the pro-liberation forces, and all the rest are the forces of Razaka, the rest are the opposition forces.“
He emphasizes that many individuals and groups participated in the liberation, and their contributions should not be ignored.
He emphasizes the role of the freedom fighters in the victory, arguing that Indian Army’s victory is not the only contributing factor, noting that “lakhs of freedom fighters have stayed with the Indian forces like the shadow of the Indian forces, they have stayed ahead, they have stayed behind, that is why the Indian forces have won.“
Critique of the Anti-Discrimination Movement & Violence:
Siddiqui is critical of those who have vandalized Bangabandhu’s portraits and home, calling it a “heinous crime in the judgment of history“, emphasizing that disrespecting Bangabandhu means disrespecting freedom. He suggests that while he disagrees with many of his policies, respect is due to him and to any human being. He hopes those involved will express regret, while also stating that, “I believe in my heart that they did not do this.”
He states that those who oppose the government should be thankful to the Jamaat-e-Islam, despite their negative actions during the war.
Rejection of Family Politics:
Siddiqui rejects the idea of family-based politics and leadership, noting that “there is no place for the family system in Bangladesh.” He highlights that a system where leadership is passed down through family ties is not sustainable or good for democracy. He also mentions how the present system has continued for years.
The Role of the Young Generation:
Siddiqui views the new generation as important to the future, emphasizing that they “will run the state and the country“. He suggests that the current generation should focus on people’s will and should strive to win people’s hearts instead of resorting to pressure.
Relationship with India:
Siddiqui stresses the importance of Bangladesh having an equal relationship with India and does not want to be treated as a younger brother. He highlights that the Indian Army did not win any wars except for the 71 liberation war because of the freedom fighters from Bangladesh and their support.
Key Quotes:
“Bangladesh is not good at all.”
“It will be a lie if we say that we freed Bangladesh from the hands of Pakistanis with our lives.”
“only those who make Awami League are the pro-independence forces, the pro-liberation forces, and all the rest are the forces of Razaka, the rest are the opposition forces.”
“Sheikh Hasina led Awami League I usually call it Hasina League no leadership developed here no personality developed here.”
“Ziaur Rahman is a great leader and it must be accepted.”
“It is also not true that Mujib has been singled out as a hero and we have not been able to highlight Sheikh Mujib as much as it should have been.”
“the way the Awami League has tried to call Sheikh Mujib Bangabandhu is not Bangabandhu.”
“There is no place for the family system in Bangladesh”
“If you abuse Bangabandhu, you also abuse eat your parents will also be abused”
Analysis & Implications:
This interview reveals deep-seated dissatisfaction with the current political situation in Bangladesh and a strong desire for change. Siddiqui’s comments challenge the official narrative surrounding the liberation war and its heroes. He believes that the country has strayed from its founding principles and is currently plagued by corruption and authoritarianism. His critical perspectives have the potential to resonate with many in Bangladesh who are similarly disillusioned. His commentary also highlights the deep political divisions that persist in the country. The interview also raises the question of how the country should move forward after a contentious political history. Siddiqui seems to emphasize the need for a new generation of leadership and for a more equitable system of governance.
Conclusion:
This interview with Abdul Quader Siddiqui provides valuable insight into the complexities and challenges facing Bangladesh. His perspectives highlight the need for a more inclusive and accurate historical narrative, a reevaluation of leadership, and a commitment to upholding the democratic values for which the country fought. It is imperative to understand these viewpoints in order to properly assess the current state of the country and its future trajectory.
Bangladesh: Liberation, Legacy, and Future
Frequently Asked Questions: Bangladesh Liberation War and Politics
What is the speaker’s overall assessment of Bangladesh’s current state since the Liberation War, and what is the basis of this assessment? The speaker expresses deep dissatisfaction with the current state of Bangladesh, stating that it is “not good at all” even 53-54 years after independence. He believes that while the country gained freedom from Pakistan, the initial goals and dreams of the Liberation War have not been realized. He criticizes the lack of progress in the country, stating it would be a “lie” to say that Bangladesh is in a good place since the war and that the war was not about a complete victory over all the opposing ideas and ideals. The speaker also points out that there was the aim for a country free from discrimination which has not been achieved.
How does the speaker view the role of Sheikh Mujibur Rahman in Bangladesh’s history and his legacy? While acknowledging Sheikh Mujibur Rahman’s significant contribution to the liberation struggle, the speaker doesn’t portray him as the sole hero of the independence movement. He argues that while Mujib did a lot, he didn’t do it alone and the idea of a single hero is a distortion of history, and there are many who contributed to the freedom of Bangladesh. The speaker criticizes the attempts to focus only on him and to brand him “Bangabandhu” in the way that he has been. He also admits that there are ways in which Mujibur Rahman’s government failed and suggests that the attempt to tarnish the second revolution is detrimental to a full understanding of history. He also condemns the destruction of Bangabandhu’s portraits and house as heinous acts.
What is the speaker’s opinion of the Awami League and Sheikh Hasina’s leadership? The speaker is critical of the Awami League under Sheikh Hasina’s leadership, stating that the party is not living up to its ideals and has become corrupt. He points out that under Sheikh Hasina’s leadership, no other leader within the party has developed and that her leadership is the final word. He notes that there is a focus on authority rather than ideals. He also accuses the government of stealing votes and not conducting fair elections. Furthermore, the speaker criticizes her for acting against her father’s ideals as she is both the head of the party and the government. The speaker says the party cannot use Sheikh Hasina as a means to facilitate the freedom war and will benefit without her involvement.
What is the speaker’s perspective on the role of Ziaur Rahman and his declaration of independence? The speaker recognizes Ziaur Rahman as a great leader and acknowledges his declaration of independence as extremely valuable, particularly when broadcast on the radio during the war. He acknowledges that there was a lot of radio broadcasting of his message in the BBC. He seems to suggest that the declaration was valid at the time, given that he held the relevant authority, and that all actions taken during a movement are valid as long as people support them. He contrasts the legitimacy of Ziaur Rahman’s declaration to a hypothetical declaration from a professor who has been sacked, and he suggests that to leave Bangabandhu out of the declaration lessens it’s value.
How does the speaker view the current youth movements and their demands for reforms? The speaker supports the youth movements, highlighting their efforts and the need for a complete overhaul of the system. He sees the youth as the future of the country and believes that winning the hearts of the people is the only way to govern effectively. He does not believe that reform should be achieved through a pressure system. He views the youth as having the energy and the ability to move the country forward.
What is the speaker’s view on the role of India in Bangladesh’s liberation war? The speaker acknowledges India’s assistance during the Liberation War and believes that Bangladesh should be grateful. However, he insists that the victory was not solely India’s but a shared effort with the Bangladeshi freedom fighters. He points out that the Indian army did not win many wars and that the liberation of Bangladesh was exceptional because of the sacrifices of Bengalis alongside the Indian forces. The speaker does not believe Bangladesh should be subservient to India but be considered on equal status as a neighboring country.
How does the speaker view the Jamaat-e-Islami and its members today? The speaker is critical of Jamaat-e-Islami’s actions during the Liberation War but believes that the current members who were born in an independent Bangladesh should be considered equal citizens with equal rights. He makes a distinction between the past crimes of the party and the current membership. However, he does say that until the crimes of the party are absolved, those in the party cannot be completely free from being associated with those crimes. He believes that if people are anti-independence, they should not be living in the country.
What are the key issues that the speaker believes need to be addressed in Bangladesh’s political landscape? The speaker identifies several key issues: the distortion of history regarding the Liberation War, the lack of development within political leadership and the corruption of the Awami League, the need for fair elections and political reform, the necessity to address historical injustices committed by groups like Jamaat-e-Islami while acknowledging the rights of present members, and finally the need to move beyond hero-worship towards collective appreciation of all who contributed to independence, and most importantly to build a country that reflects the original aims of the war of liberation.
Bangladesh: Liberation, Legacy, and the Struggle for Democracy
Okay, here’s a detailed timeline and cast of characters based on the provided text:
Timeline of Main Events
Pre-1970: The text refers to the discrimination faced by Bengalis in Pakistan, leading to the 1970 election.
1970: Pakistan does not accept the results of the 1970 election where Bengalis had a major victory.
1971 (March 7): Sheikh Mujibur Rahman’s speech where he urges people to resist with whatever they have.
1971 (March 25): The text suggests that if the movement hadn’t continued, they may not have heard of Ziaur Rahman. This is generally considered the start of the Liberation War.
1971: The Liberation War of Bangladesh takes place. The text refers to the Pakistani Army having 300,000 soldiers, and the Bengalis having 16-17,000, and the war as having been against the “deprivation of Pakistan”. The Liberation war is described as a time when “every hour on the hour, it was played Bangladesh was saved from the radio.”
1971 (December 16): Victory Day. The text mentions that the allied forces (Indian and Bangladeshi) enter Niazi Cave. It states that Abdul Quader Siddiqui was the only Bengali and the other three were Indian: two brigadiers and one major general (Major General Nagra.)
Post-Liberation War: The text suggests that the country was not run properly after the war.
Post-Liberation War: Refers to a period when Sheikh Mujibur Rahman had “vanquished” the Awami League, and it had reemerged from the Bakshal, and that this proved Bakshal’s decision was wrong.
Unknown Date (Post-Liberation War): Sheikh Mujibur Rahman is killed by Bengalis. The text notes a “second revolution” was tarnished by this killing.
Later: The text mentions that the house and museum of Bangabandhu Sheikh Mujibur Rahman were vandalized and set on fire. The text suggests this is a “heinous crime.”
Unknown Date: There was a time when the declaration of independence in Ziaur Rahman’s voice was “broadcasted many times on BBC.”
Current (as of the interview): There is an anti-discrimination movement, and students are agitating and calling for an overhaul of the state system followed by elections. There is criticism of the current government under Sheikh Hasina, with claims of corruption, and criticisms that the “Hasina League” lacks proper leadership development. There are questions about election integrity, with the statement that “the previous governments have ruined” it.
Recent: There are criticisms of the ruling party, the Awami League for trying to make Sheikh Mujibur Rahman into a single hero of the independence, rather than an important figure in a broader struggle.
Cast of Characters
Abdul Quader Siddiqui: The interviewee. Described as a “hero freedom fighter” and “Bangbir” (Hero of Bengal) who worked as an organizer during the Liberation War. He is also the Founder President of Shramik Janata Party. He seems to have been present at the surrender in “Niazi’s Cave.”
Deepti Chowdhury: The interviewer. She is with RICL TMA Straight Cut organization.
Sheikh Mujibur Rahman (Bangabandhu): A central figure in the text. Described as a key leader of the liberation movement, and “father” of the Awami League, the text indicates a debate whether he should be elevated as the hero of the war. There is criticism that the government has not “highlighted him as much as it should have been.” His house and museum were vandalized.
Sheikh Hasina: Current leader of the Awami League and Prime Minister. Criticized for her leadership style, described as making the Awami League into “Hasina League.” Her leadership is described as “the last word,” with little room for others. She is also criticized for corruption. She is mentioned as having been “the president of Awami League for 16 years and 15 1/2 years the prime minister” which is said to be against her father’s ideals. The text implies she has taken power through vote stealing.
Ziaur Rahman: Presented as a significant figure during the Liberation War, who was “in the barracks” on March 7th. His declaration of independence is described as “very valuable,” and was broadcast “many times on BBC.” The text notes that his existence might not have been known “if we could not hold the movement till March 25th.”
Maulana Abdul Hamid Khan Bhashani: Described as the “father” who gave birth to the Awami League before Bangabandhu, he is mentioned as having argued against leaders holding two positions at the same time.
Hossain Shaheed Sarwardi: Mentioned as having led the Awami League after Maulana Abdul Hamid Khan Bhashani.
Obaidul Quader: Described as a “bridge minister.” He is mentioned as not having “carried the ideals of Bangabandhu politically” and as someone who wanted to take “leadership and authority” himself.
Tajuddin Ahmed: Mentioned as someone whose daughter has written a book stating that Sheikh Mujibur Rahman did not agree to declare independence at the time.
Tikka Khan and Yahya: Their rule was described as “not at all the contribution of Bangabandhu’s daughter incompetent leader Sheikh Hasina.”
Murarji Desai, Atal Bihari Vajpayee, Narendra Modi: Leaders from India who are mentioned as examples of political transitions, in contrast with the veneration of Sheikh Mujibur Rahman, they are all meant to show that “no one could destroy anyone’s museum.”
Pandit Jawaharlal Nehru: Indian leader mentioned in the context of the 1962 war with China and the war with Pakistan in 1965.
Niazi: Pakistani army general who was in command during the surrender at the end of the war.
Major General Nagra: Indian army officer who was with Abdul Quader Siddiqui in the surrender at Niazi Cave.
Brigadier Sunsin Clear: Indian army officer who was with Abdul Quader Siddiqui in the surrender at Niazi Cave.
Prof. Yunus: Mentioned as having been sacked.
Students: Described as leading the current agitation and demanding reforms to the state system.
Key Themes and Conflicts
The Legacy of the Liberation War: The text highlights the ongoing debate about who should be credited for the independence of Bangladesh. There is conflict over the role of Sheikh Mujibur Rahman versus others, including freedom fighters and Ziaur Rahman. There are statements that suggest an attempt to rewrite the history by “making Sheikh Mujibur Rahman a single hero.”
Criticism of the Current Government: There is strong criticism of Sheikh Hasina’s leadership, with accusations of corruption, authoritarian tendencies, and election rigging. The text implies the current government is not adhering to the ideals of the liberation movement.
Political Polarization: The text highlights the deep divisions within the country, with a clear distinction between those who are pro-Awami League and those who are opposed, and that those opposed are labeled as “forces of Razaka.”
Ongoing Struggle for Democracy: The interviews makes clear the desire for democratic reform and fair elections, with student agitation being seen as an important movement for change.
Let me know if you have any other questions or sources you’d like me to analyze!
Bangladesh Liberation War: Politics and Legacy
The sources discuss the Liberation War of Bangladesh, its aftermath, and its continuing impact on the country’s politics and identity. Here’s a breakdown of key points:
The War and its Goals: The war was fought against the deprivation imposed by Pakistan [1]. The aim was to achieve freedom and independence for Bangladesh [1]. It is stated that the war was not a complete victory for the freedom fighters as the dream of a free country is still not fully realized even 53-54 years later [1].
The Role of Different Groups:Bengalis in the Pakistan Army: At the time of the war, there were around 300,000 members in the Pakistan Army, with 16-17,000 of them being Bengalis [1].
Freedom Fighters: The freedom fighters played a crucial role in the war and fought alongside Indian forces [2]. They are described as being like “the shadow of the Indian forces” [2].
Jamaat-e-Islami: The Jamaat-e-Islami is criticized for not only supporting Pakistan politically but also forming armed groups that committed atrocities [3]. However, it is also mentioned that the current members of Jamaat-e-Islami were mostly born in an independent Bangladesh and have the same rights as other citizens, as long as they atone for the crimes of their predecessors [3].
Awami League: The Awami League is viewed as the pro-independence force [4]. The party’s history and the roles of its leaders, including Sheikh Mujibur Rahman and Sheikh Hasina, are discussed in detail [2, 4].
Sheikh Mujibur Rahman’s Role: Sheikh Mujibur Rahman is considered a key figure in the liberation movement [4]. While some acknowledge his significant contributions, there is also a view that he was not the sole hero of the war [4, 5]. It is mentioned that he may have not agreed to declare independence at a certain time [6]. The sources note that the Awami League has, at times, presented him as the single hero of the war [4]. It is also stated that Bangabandhu’s house and portrait were vandalized which is considered a “heinous crime” [4, 5].
Ziaur Rahman’s Role: Ziaur Rahman’s declaration of independence is deemed very valuable [6]. It is mentioned that while Bangabandhu called for resistance, Ziaur Rahman did not come out to face the enemy but remained in the barracks [5]. However, Ziaur Rahman is also acknowledged as a great leader [5].
India’s Involvement: India’s role in the war is acknowledged, but it is clarified that it was not a victory solely for the Indian army [2, 7]. The victory was possible because of the sacrifices of the Bangladeshi people [2]. India’s strategic goals were to squeeze Dhaka and negotiate the Pakistani army’s return, rather than occupying Dhaka [7].
Post-War Issues:The country’s inability to be run properly after the war is acknowledged, even by Sheikh Mujibur Rahman [4].
The political landscape has been shaped by the war, with the Awami League often claiming to be the sole pro-liberation force, while other parties are considered to be the opposition [4].
The need for reforms in the election process is highlighted [3].
The current political climate is seen as problematic, with a focus on individuals rather than ideals [2].
The Current Political Situation: There are concerns about the current state of democracy and the need for genuine representation of the people [8]. The youth is seen as a pressure group demanding reforms [8]. It is suggested that winning the hearts of the people is crucial for a better future for the country [8]. The interview concludes with hope for a “golden sun” and a beautiful Bangladesh [8].
The sources emphasize that the Liberation War was a complex event with multiple actors and various interpretations of its history and impact. It continues to influence the political landscape and the identity of Bangladesh [4].
Bangladesh’s Political Crossroads
The sources provide a detailed look at the political future of Bangladesh, particularly concerning the Awami League and the role of the younger generation. Here’s a breakdown of key points:
Awami League’s Future: The Awami League is described as a party born through struggle, with its leadership evolving from Maulana Abdul Hamid Khan Bhashani and Hossain Shaheed Sarwardi to Bangabandhu Sheikh Mujibur Rahman [1]. However, it is argued that current leaders like Sheikh Hasina and Obaidul Quader have deviated from the ideals of Bangabandhu [1]. The party is seen as facing challenges, with some suggesting it is currently in a weakened state and on the streets [1, 2]. There’s a view that the party’s reliance on Sheikh Hasina’s leadership has stifled the development of new leaders and personalities within the party [3].
Sheikh Hasina’s Role: Sheikh Hasina’s leadership is criticized for not adhering to her father’s ideals, particularly concerning holding multiple positions in the government and the party [1]. It’s argued that her leadership has become overly centralized and authoritarian [3]. The sources also mention that she came to power by stealing votes and that her government has failed to implement necessary reforms [3]. The sources suggest that the Awami League’s association with Sheikh Hasina may be a hindrance to its political future [2]. It is stated that Sheikh Hasina might need to struggle for 15 years to regain political strength [2].
Need for Reforms: The sources emphasize the need for significant reforms, particularly in the electoral process [3]. The current system is seen as flawed, with allegations of vote-stealing and a lack of genuine voter participation [3]. There’s a call for creating an environment where people can vote freely and the right voter can go to the polling station [3]. It’s suggested that the previous governments have ruined the election process and that reforms are necessary to ensure fair elections [3].
Role of the Younger Generation: The younger generation is portrayed as a pressure group that is actively involved in politics and demanding reforms [2]. They are seen as being present in the interim government and on the streets, advocating for change [2]. The sources suggest that they will play a crucial role in shaping the future of the country [2]. It’s emphasized that the future of the state and the country will be determined by the new generation, and not by pressure tactics [2]. The need to win the hearts of the people is highlighted as crucial for the success of any political movement [2].
Political Instability and Change: The sources suggest that the political landscape is unstable and that change is inevitable. The idea that “the beggar on the street will be the king tomorrow” indicates a belief in the potential for significant shifts in power [2]. There’s a call for letting “people’s democracy continue” [2]. The sources express hope that the country will overcome its current challenges and move towards a better future [2]. The idea of a “golden sun” rising is used as a symbol of this hopeful future [2].
Family System: It is stated that there is no place for the family system in Bangladesh [2].
Importance of Ideals: There is a concern that current politics are focused on individuals rather than ideals [1, 3]. There’s a call for sincerity in making reforms and a focus on genuine representation of the people [3].
In conclusion, the sources suggest that the political future of Bangladesh is uncertain, with potential for significant changes. The Awami League faces challenges due to its leadership and lack of adherence to its founding ideals. The younger generation is expected to play a key role in demanding reforms and shaping a better future for the country.
The Awami League: History, Leadership, and Future Prospects
The sources discuss the Awami League extensively, covering its history, leadership, current state, and future prospects. Here’s a breakdown of key points:
Historical Roots: The Awami League was not founded by Sheikh Hasina, but rather emerged through struggle, with early leadership from Maulana Abdul Hamid Khan Bhashani and Hossain Shaheed Sarwardi [1]. Later, Bangabandhu Sheikh Mujibur Rahman became a key leader [1]. There were disputes in the party as early as 1957 regarding leaders holding multiple positions in government and party, which led to Sheikh Mujibur Rahman resigning his ministerial position to be only the secretary general of the Awami League [1].
Sheikh Mujibur Rahman’s Leadership: Bangabandhu Sheikh Mujibur Rahman is recognized as an important leader in the history of the Awami League [1]. However, it is noted that the Awami League has, at times, presented him as the single hero of the liberation war, which is not entirely accurate [2]. The sources also indicate that the Awami League has not highlighted Sheikh Mujib as much as it should have [2]. His ideals are referenced as a standard against which the current leaders of the Awami League are judged [1]. It is also noted that Bangabandhu’s house and portrait were vandalized, which is considered a “heinous crime” [2].
Sheikh Hasina’s Leadership: Sheikh Hasina’s leadership is heavily critiqued in the sources. It is argued that she has deviated from her father’s ideals, particularly regarding holding multiple positions in the government and the party [1]. She has been the president of the Awami League for 16 years and the prime minister for 15 and a half years, which is seen as a violation of the principle that no leader should hold two positions at the same time [1]. It’s argued that her leadership has become overly centralized and authoritarian [1, 3]. The sources also mention that she came to power by stealing votes [3] and that her government has failed to implement necessary reforms [3]. The Awami League’s association with Sheikh Hasina may be a hindrance to its political future [4]. The sources suggest that Sheikh Hasina might need to struggle for 15 years to regain political strength [4]. There is a view that the party’s reliance on Sheikh Hasina’s leadership has stifled the development of new leaders and personalities within the party [3].
Current State: The Awami League is described as a party that is currently facing challenges and is on the streets [4]. The sources indicate that the party is in a weakened state [4]. There is a concern that current politics are focused on individuals rather than ideals [1]. It is stated that the Awami League, along with Sheikh Hasina, is “not doing well” [1].
Ideological Deviation: The sources argue that current leaders like Sheikh Hasina and Obaidul Quader have deviated from the ideals of Bangabandhu [1]. It’s stated that they are more focused on leadership and authority for themselves rather than the ideals of the party [1]. The party is seen as not having a clear set of ideals after Sheikh Hasina came to power [3].
Political Future: The political future of the Awami League is uncertain [4]. There is a suggestion that the party’s reliance on Sheikh Hasina is not helping its future prospects [4]. It is also suggested that the party may be able to recover if it has stamina [4]. It is thought that the Awami League will not be able to facilitate the freedom war by involving Sheikh Hasina [4].
Connection to Liberation War: The Awami League is viewed as the pro-independence force in Bangladesh [2, 5]. However, there is a view that the Awami League has tried to monopolize the narrative of the liberation war, and that it has not given due credit to all those who contributed to the independence of Bangladesh [2].
In conclusion, the sources present a complex and critical view of the Awami League. While acknowledging its historical significance and role in the liberation war, the sources raise significant concerns about its current leadership, ideological direction, and political future. The party’s reliance on Sheikh Hasina’s leadership is seen as a weakness, and there’s a call for a return to its founding ideals.
Sheikh Hasina’s Leadership: A Critical Analysis
The sources offer a critical perspective on Sheikh Hasina’s leadership and her role within the Awami League. Here’s a breakdown of key points regarding Sheikh Hasina, drawing from the sources:
Deviation from Ideals: The sources argue that Sheikh Hasina has deviated from the ideals of her father, Bangabandhu Sheikh Mujibur Rahman [1]. A key example cited is that she has held multiple positions in the government and the party, whereas her father resigned from his ministerial position to avoid doing so [1]. It’s suggested that current leaders like Sheikh Hasina and Obaidul Quader are more focused on leadership and authority for themselves rather than the ideals of the party [1].
Authoritarian Leadership: Sheikh Hasina’s leadership is described as overly centralized and authoritarian [1, 2]. The sources suggest that the party’s reliance on Sheikh Hasina’s leadership has stifled the development of new leaders and personalities within the party [3].
Illegitimate Rise to Power: The sources mention that Sheikh Hasina came to power by “stealing votes” [3]. This suggests that her legitimacy as a leader is questioned. It’s stated that she did not have a clear set of ideals when she came to power [3].
Failure to Implement Reforms: The sources criticize Sheikh Hasina’s government for failing to implement necessary reforms [3]. The sources indicate that her government has tried to deviate from the fact that no reform is possible [3].
Negative Impact on Awami League: The Awami League’s association with Sheikh Hasina is seen as a potential hindrance to its political future [2]. It’s argued that involving Sheikh Hasina will not benefit the party in the context of the liberation war and that this is what they have done for the past 16 years [4].
Weakened State of the Party: The sources indicate that the Awami League is currently in a weakened state and is “on the streets” [2, 4]. This is seen as a consequence of the current leadership and policies [4].
Need for Struggle: It’s suggested that if Sheikh Hasina wants to regain political strength, she will have to struggle for 15 years [4]. This implies that her current position is precarious and she faces significant challenges.
Not the Founder of Awami League: The sources emphasize that Sheikh Hasina did not found the Awami League, but that the party emerged through struggle [1]. The founders of the Awami League were Maulana Abdul Hamid Khan Bhashani, Hossain Shaheed Sarwardi and then Bangabandhu Sheikh Mujibur Rahman became the leader [1].
Comparison to her Father: Sheikh Hasina’s actions are often compared to those of her father. It’s noted that she has acted against her father’s ideals [1]. It’s also stated that Sheikh Mujib has not been highlighted as much as he should have been [2].
Criticism of Her Government: The sources say that Sheikh Hasina’s government has ruined the election process and failed to make necessary reforms [3].
Public Disconnect: It is noted that when Sheikh Hasina called for people to go to the polling station, no one went, including members of the Awami League [3].
In conclusion, the sources portray Sheikh Hasina as a leader who has deviated from the ideals of her father and has become overly authoritarian. Her leadership is seen as detrimental to the Awami League, and her government is criticized for failing to implement reforms and stealing votes. The sources suggest that her political future is uncertain, and she faces significant challenges in regaining political strength.
Bangladesh’s Liberation War: Contested Narratives and Unfinished Dreams
The sources provide several perspectives on the history of Bangladesh’s independence, with a focus on the roles of key figures, the liberation war, and its aftermath. Here’s a detailed discussion:
The Liberation War: The sources emphasize that the liberation war was a crucial event in the history of Bangladesh [1-3]. It’s noted that the war was fought against the deprivation imposed by Pakistan [1]. The war resulted in Bangladesh’s freedom, but it is argued that the dream of a free country has not been fully realized [1]. The war was not just a military conflict but also a struggle for the recognition of the Bengali people’s rights [1]. The war is seen as a defining moment in the country’s history, and it is asserted that it only happens once in a country [2].
Role of Key Figures:Sheikh Mujibur Rahman: Bangabandhu Sheikh Mujibur Rahman is acknowledged as a key figure in the independence movement. However, it is argued that the Awami League has, at times, presented him as the single hero of the liberation war, which is not entirely accurate [2, 4]. It’s also stated that the Awami League has not highlighted Sheikh Mujib as much as it should have [2]. He gave a speech on March 7, calling people to face the enemy with whatever they have [4].
Ziaur Rahman: Ziaur Rahman’s role in the declaration of independence is highlighted. It is mentioned that the declaration of independence in his voice was broadcasted on the radio [5]. It is also noted that while Bangabandhu called on people to face the enemy, Ziaur Rahman was in the barracks at the time [4]. It is further stated that it was valuable that the declaration of independence was made in his voice [5].
Declaration of Independence: The declaration of independence is considered a precious moment and was broadcasted during the war [5]. It is mentioned that Tajuddin Ahmed’s daughter wrote that Bangabandhu Sheikh Mujibur Rahman did not agree to declare independence at that time [5]. The declaration of independence in Ziaur Rahman’s voice is also mentioned as being broadcasted multiple times on BBC [5]. The importance of this declaration is emphasized, stating that the country was saved from the radio and airwaves through it [5].
The Pakistani Army: It is mentioned that there were about 3 lakh members in the Pakistan Army, and Bengalis were among them [1]. The source indicates that the Pakistanis did not accept the election results of the 70s, which led to Bengalis standing against them [1]. It’s noted that Bengalis got rid of Pakistan because they did not obey the vote verdict [1]. December 16th is referred to as the day of victory of the Pakistani army by some, where the word Bangladesh was not even uttered [6].
India’s Role: India’s participation in the liberation war is acknowledged, but the sources also note that it was not in India’s plan to occupy Dhaka [6]. It is mentioned that India’s goal was to squeeze Dhaka from all sides and negotiate the exit of the Pakistani army [6]. It’s emphasized that the Indian army won because of the support of the freedom fighters [7]. One source indicates that there is no history of the Indian army winning any war other than the Liberation War of 71 [7].
Post-Independence Challenges: The sources mention that the country could not be run properly after the war of independence [2]. It’s also noted that there has been a lack of progress in the 53-54 years since independence, and the country is not in good condition [1]. There’s a concern that the dreams of the liberation war have not been fully realized [1]. There is also concern that those who lost in the war were not totally defeated [1].
Contested Narratives: The sources highlight that there are different narratives about the liberation war. The Awami League is seen as trying to monopolize the narrative, with some arguing that this is not accurate. There are disagreements about who played the most crucial roles and how the events unfolded [2]. For example, it’s questioned whether Sheikh Mujibur Rahman should be considered the single hero of the war and whether Ziaur Rahman’s contribution to the war is acknowledged enough [2, 4].
Anti-Discrimination Movement: The sources discuss the anti-discrimination movement in the context of the independence war. It is mentioned that the anti-discrimination movement in 2024 is not a good sign for the country [1]. The anti-discrimination movement is seen as a continuation of the struggle for equal rights, which was also a key goal of the liberation war [1].
The Legacy of the War: The sources emphasize that the war is still relevant and the freedom gained from the war needs to be studied, seen, and understood. It’s also said that many people contributed to freedom [2]. The burning of Bangabandhu’s house and museum is considered a “heinous crime in the judgment of history” [4].
In conclusion, the sources present a multi-faceted view of Bangladesh’s independence history, highlighting the significance of the liberation war, the roles of key figures, the challenges faced after independence, and the contested narratives surrounding these events. The sources suggest that while the country has achieved independence, it is still grappling with many issues and that the ideals of the liberation war have yet to be fully realized.
Affiliate Disclosure: This blog may contain affiliate links, which means I may earn a small commission if you click on the link and make a purchase. This comes at no additional cost to you. I only recommend products or services that I believe will add value to my readers. Your support helps keep this blog running and allows me to continue providing you with quality content. Thank you for your support!
The text provides a series of tutorials on C++ programming, covering introductory to intermediate concepts. The tutorials guide users through setting up a development environment and understanding basic syntax. It explains variables, data types, functions, classes, and object-oriented programming principles. Additionally, it shows how to handle multifile compilation and incorporates best practices like coding style and design patterns. The tutorial series also discusses advanced features like templates, namespaces, and operator overloading. It illustrates writing and refactoring code by solving problems using C++ features.
C++ Fundamentals Study Guide
Quiz
1. What is the purpose of a function in C++? Functions allow you to encapsulate a block of code that performs a specific task, making your program more modular, reusable, and easier to understand. They help avoid code duplication and promote organization.
2. Explain the difference between parameters and arguments in the context of a function. Parameters are variables declared in the function definition’s parentheses, acting as placeholders for input values. Arguments are the actual values passed into the function when it is called; they are assigned to the parameters.
3. What is a “void” function, and how does it differ from a function with a return type? A “void” function is a function that does not return any value; it performs a task or a series of actions but does not produce a specific output. In contrast, a function with a return type must return a value of the specified type using the return statement.
4. Define “data type” in C++, and give three examples. A data type specifies the kind of value that a variable can hold and the operations that can be performed on it. Examples include int (integers), double (floating-point numbers), and char (characters).
5. What does it mean for C++ to be a “statically typed” language? In C++, being statically typed means that the data type of a variable is known at compile time and cannot be changed during runtime. This allows the compiler to perform type checking and catch errors before the program is executed.
6. Explain the difference between a “signed” and an “unsigned” integer. A signed integer can represent both positive and negative values, while an unsigned integer can only represent non-negative (positive and zero) values. Using an unsigned type effectively doubles the maximum positive value that can be stored compared to a signed type of the same size.
7. What is an “escape sequence” in C++, and give two examples. An escape sequence is a special character combination used to represent characters that are difficult or impossible to type directly. Examples include \n (newline) and \t (horizontal tab).
8. What is the purpose of the bool data type, and what values can it hold? The bool data type represents a boolean value, which can be either true or false. It is commonly used in conditional statements and logical expressions to control program flow.
9. What are “floating-point” data types, and what are the three types available in C++? Floating-point data types are used to represent numbers with fractional parts. The three floating-point types in C++ are float, double, and long double, differing in their precision and memory usage.
10. What are “operators” and “operands” in C++, and give an example. Operators are symbols that perform operations on one or more operands. Operands are the values or variables that the operators act upon. In the expression 5 + x, + is the operator, and 5 and x are the operands.
Quiz Answer Key
Functions allow you to encapsulate a block of code that performs a specific task, making your program more modular, reusable, and easier to understand. They help avoid code duplication and promote organization.
Parameters are variables declared in the function definition’s parentheses, acting as placeholders for input values. Arguments are the actual values passed into the function when it is called; they are assigned to the parameters.
A “void” function is a function that does not return any value; it performs a task or a series of actions but does not produce a specific output. In contrast, a function with a return type must return a value of the specified type using the return statement.
A data type specifies the kind of value that a variable can hold and the operations that can be performed on it. Examples include int (integers), double (floating-point numbers), and char (characters).
In C++, being statically typed means that the data type of a variable is known at compile time and cannot be changed during runtime. This allows the compiler to perform type checking and catch errors before the program is executed.
A signed integer can represent both positive and negative values, while an unsigned integer can only represent non-negative (positive and zero) values. Using an unsigned type effectively doubles the maximum positive value that can be stored compared to a signed type of the same size.
An escape sequence is a special character combination used to represent characters that are difficult or impossible to type directly. Examples include \n (newline) and \t (horizontal tab).
The bool data type represents a boolean value, which can be either true or false. It is commonly used in conditional statements and logical expressions to control program flow.
Floating-point data types are used to represent numbers with fractional parts. The three floating-point types in C++ are float, double, and long double, differing in their precision and memory usage.
Operators are symbols that perform operations on one or more operands. Operands are the values or variables that the operators act upon. In the expression 5 + x, + is the operator, and 5 and x are the operands.
Essay Questions
Discuss the benefits and drawbacks of using statically typed languages like C++. In what scenarios might a dynamically typed language be more appropriate?
Explain the importance of data types in C++, and how the choice of data type can impact memory usage, program performance, and the range of values that can be represented.
Describe the different types of loops available in C++, and provide examples of situations where each type of loop would be most suitable.
Explain the concept of function overloading in C++. What are the benefits of using function overloading, and what are the limitations? Provide examples to illustrate your explanation.
Explain the key principles of object-oriented programming (OOP) and how they are implemented in C++ using classes.
Glossary of Key Terms
Argument: The actual value passed to a function when it is called.
Bit: The smallest unit of data in a computer, representing a binary value of 0 or 1.
Bool: A data type representing a boolean value, either true or false.
Char: A data type representing a single character.
Class: A blueprint for creating objects, defining their data (attributes) and behavior (methods).
Compiler: A program that translates source code written in a high-level language into machine code that can be executed by a computer.
Constructor: A special method within a class that is automatically called when an object of that class is created.
Data Type: Specifies the type of value a variable can hold and the operations that can be performed on it.
Double: A data type representing a double-precision floating-point number.
Escape Sequence: A sequence of characters that represents a special character (e.g., \n for newline).
Expression: A combination of operators and operands that evaluates to a single value.
Float: A data type representing a single-precision floating-point number.
Function: A block of code that performs a specific task.
Integral Data Types: Represents whole numbers, either signed or unsigned (e.g., int, short, long, char).
Long Double: A data type representing an extended precision floating-point number.
Method: A function that is associated with an object or a class.
Namespace: A declarative region that provides a scope to the identifiers (names of types, functions, variables, etc.) inside it.
Object: An instance of a class, containing data and methods.
Operand: A value or variable on which an operator performs an operation.
Operator: A symbol that performs a specific operation.
Overloading: Defining multiple functions with the same name but different parameters.
Parameter: A variable in the function definition that receives an argument value.
Return Type: The data type of the value returned by a function.
Signed Integer: An integer that can represent both positive and negative values.
Static Typing: Type checking is performed at compile time.
String: A sequence of characters.
Templates: Allow functions and classes to operate with generic types.
Unsigned Integer: An integer that can only represent non-negative values.
Void: A keyword indicating that a function does not return a value.
C++ Programming Fundamentals: A Comprehensive Overview
Okay, here’s a detailed briefing document summarizing the key themes and ideas from the provided excerpts from “01.pdf”.
Briefing Document: C++ Programming Fundamentals
I. Overview
This document summarizes excerpts from a series of C++ programming tutorials. The central themes revolve around:
Functions: Defining, calling, and understanding different types of functions (returning values vs. void functions).
Data Types: Introduction to and in-depth exploration of various C++ data types (int, double, char, bool, float), their properties (size, signed/unsigned), and how to work with them.
Control Flow: Using conditional statements (if, else if, else, switch) and loops (for, while, do-while) to control program execution.
Operators: Understanding operators, operator precedence, and how to overload operators for custom classes.
Data Structures: Introduction to the vector container and file input/output operations.
Code Organization: Using namespaces and function templates for better code structure and reusability.
Object-Oriented Programming (OOP): Introduction to classes and objects, including concepts such as constructors, methods, and operator overloading.
II. Key Themes and Ideas
Functions: Building Blocks of ProgramsDefining Functions: The core structure of a function involves a return type, identifier (name), parameters, and a body.
“To summarize we create a function by giving it a return type an identifier parameters and then a body”
Parameters vs. Arguments: Parameters are defined in the function definition, while arguments are the actual values passed when the function is called. The names don’t have to match.
“These here are known as parameters and when we pass in values these are known as arguments they are two separate variables that means they don’t have to be named the same”
Return Values: Functions can return a value of a specific type. This value must be used in the calling program.
“At the end we need to return a value that is of the type that we’re putting as the return type here and then we need to use that value in the calling program”
Void Functions: Functions that perform actions but don’t return a value. Common uses include logging or outputting to the console. They are called by simply stating their name and arguments; there’s no assignment.
“We can actually create functions that don’t return values and those are called void functions they’re void of a return essentially”
“When you have a void function you just call it by itself and you don’t do anything in the calling part of it”
Data Types: Specifying the Kind of DataStatic Typing: C++ is statically typed, meaning variables have a specific data type that is fixed at compile time.
“C++ is what’s known as a statically typed programming language and what that means is that variables such as X in this case has a data type when you declare the variable and it’s always going to store an integer in this case”
Integer Types: int, short, long, long long, and their unsigned counterparts. Size (memory allocation) varies but has minimum guarantees (e.g., int is at least 16 bits). Using unsigned extends the maximum positive value.
Character Type: char is used to store small numbers or individual characters (8 bits). Characters are enclosed in single quotes (e.g., char myChar = ‘A’;).
Boolean Type: bool represents true or false values. Can be implicitly converted to numbers (0 for false, 1 for true).
“This video we are going to be talking about the bull data type bu is short for Boolean which really is just true or false”
Floating-Point Types: float, double, long double are used to represent numbers with decimal points. They use scientific notation internally (significant digits and a multiplier). There are special values like NaN (Not a Number), Infinity, and negative Infinity.
Literals: Ways to represent values of a data type directly in the code. Can be decimal, hexadecimal (prefix 0x), or octal (prefix 0). Floating-point literals can use scientific notation (e.g., 7.7E4).
Controlling Program FlowConditional Statements: if, else if, else are used to execute different blocks of code based on conditions.
Switch Statements: Provide a multi-way branching mechanism based on the value of an integral variable. Limited to exact values.
Loops: for, while, do-while are used to repeat blocks of code.
for loops are typically used when the number of iterations is known beforehand.
while loops are useful for indefinite loops that continue until a condition is met.
do-while loops execute the code block at least once.
break and continue: break exits the innermost loop. continue skips the current iteration and proceeds to the next.
“The break keyword is used to break out of the closest Loop that you’re in”
Operator Precedence: Determines the order in which operators are evaluated.
Operator Overloading: Allows you to redefine the behavior of operators for custom classes.
Data Structures: Organizing DataArrays: Fixed-size, contiguous blocks of memory to store elements of the same type.
Vectors: Dynamic arrays that can grow or shrink in size. They provide methods like push_back (add an element), size (get the number of elements), and indexing (access elements using []).
“The data here is actually copied into this variable here that means any changes we do to the vector inside of this function do not exist inside of main”
File Input/Output: Using fstream (specifically ifstream for input and ofstream for output) to read from and write to files. getline is used to read a line from a file.
Code Organization and ReusabilityNamespaces: Used to group related code and prevent naming conflicts.
Function Templates: Allow you to create generic functions that work with different data types without having to write separate overloads for each type.
“Function templates are a way to tell the compiler that you want to generate these different overloads you’re essentially saying hey compiler make some overloads for me I don’t feel like it and it’s going to do it for you”
Object-Oriented Programming (OOP)Classes and Objects: A class is a blueprint for creating objects. Objects are instances of a class.
“This is known as instantiation it’s a pretty cool word you can use it at the the local hangout spot to pick up chicks just start talking about classes and objects and instantiation and you’ll be like the ladies man all right trust me”
Methods: Functions associated with objects.
Constructors: Special methods that are called when an object is created.
Operator Overloading: Allows you to redefine the behavior of operators for custom classes.
III. Potential Issues/Gotchas
Data Type Sizes: Be aware that the actual size of data types (especially int) can vary depending on the system or compiler. Rely on minimum size guarantees for portability.
Scope: Variables declared within a block (e.g., inside a function or loop) are only accessible within that block.
Infinite Loops: Ensure that loop conditions eventually become false to avoid infinite loops.
Array/Vector Bounds: Be careful not to access elements outside the valid range of an array or vector (e.g., accessing index -1 or an index greater than or equal to the size).
IV. Further Study
The excerpts suggest the following topics for further study:
This briefing doc provides a strong foundation for understanding the C++ language. Good luck with your continued learning!
C++ Functions, Data Types, and Namespaces Explained
FAQ
What is a function in C++, and what are its key components?
In C++, a function is a block of code that performs a specific task. Key components include:
Return Type: Specifies the type of data the function will return (e.g., int, double, void). void means the function does not return a value.
Identifier (Name): The name of the function.
Parameters: Input values the function receives, declared with their types (e.g., double base, int exponent).
Body: The code block within curly braces {} that contains the instructions the function executes.
Return Statement: If the return type is not void, the function must have a return statement to provide a value of the specified type.
What’s the difference between parameters and arguments in the context of functions?
Parameters are variables declared within the function’s parentheses in the function definition (e.g., double base, int exponent). Arguments are the actual values or variables passed into the function when it’s called (e.g., 10, 3, myBase, myExponent). The names of arguments don’t have to match the names of parameters, but their types must be compatible.
What is a void function, and when would you use it?
A void function is a function that does not return a value. You would use it when you want to perform an action or a series of actions (like printing to the console, writing to a file, or modifying data) without needing to calculate and return a specific result.
What are data types in C++, and why are they important?
Data types define the type of data a variable can hold (e.g., integer, floating-point number, character, boolean). C++ is a statically typed language, meaning variables have a fixed data type that’s known at compile time. This offers advantages like:
Knowing what kind of data should be expected, which provides information on how to use this data appropriately
Catching type-related errors during compilation.
Optimizing memory usage because the compiler knows how much memory to allocate for each variable.
More restrictive, as variables can only store data of their declared type.
What is the difference between int, short, long, and long long integral data types?
These are all integer data types, but they differ in the amount of memory they allocate and, therefore, the range of values they can store.
short: Guaranteed to be at least 16 bits.
int: Guaranteed to be at least 16 bits, but typically 32 bits.
long: Guaranteed to be at least 32 bits.
long long: Guaranteed to be at least 64 bits.
The larger the data type, the wider the range of numbers it can represent. You can use sizeof() to determine the size (in bytes) of these types on your system, and <climits> provides macros (e.g., SHRT_MAX, INT_MIN, LLONG_MAX) that define the minimum and maximum values for each type.
How do escape sequences work in C++, and what are some common examples?
Escape sequences are special character combinations, beginning with a backslash \, that represent characters that are difficult or impossible to type directly into a string or character literal. Common examples include:
\n: Newline (moves the cursor to the next line).
\t: Horizontal tab.
\\: Backslash (allows you to include a literal backslash).
\”: Double quote (allows you to include a double quote within a string).
\’: Single quote (allows you to include a single quote within a character literal).
\0: Null terminator (used to mark the end of a C-style string).
What is the bool data type, and how is it used in C++?
The bool data type represents Boolean values, which can be either true or false. It is often used as a flag or indicator to represent the state of a condition. bool values are often used in conditional statements (if, else) and loops to control program flow. Internally, true is often represented by the integer 1, and false by 0.
What are namespaces in C++, and why are they used?
Namespaces are used to organize code and prevent naming conflicts, especially in large projects or when using external libraries. They create a distinct scope for identifiers (like function and variable names).
C++ Programming: An Introductory Tutorial Series
The all-in-one C++ video combines a 100-part video series that introduces the C++ programming language. The goal of the series is to help viewers enjoy programming while gaining a good understanding of the technical details of C++ and programming in general.
Key concepts and features covered in the C++ tutorial series:
Compiled Language C++ is a compiled language, meaning that human-readable code is converted into machine-readable code through compilation and linking.
Object-Oriented and Generic Programming C++ introduced object-oriented programming, which structures code around classes and instances (objects), and generic programming, which uses structures that work with different data types.
Comparison with Other Languages C++ is distinct from C, Java, Python, and JavaScript. While modern languages have object-oriented programming, C++ allows for program optimization but requires more knowledge and can be more complex. C++ is often used for game engines, video editing software, and modeling programs.
Tools For Windows, Embarcadero C++ Builder is recommended, which provides code editing and a compiler, along with debugging and deployment capabilities for various platforms. On a Mac, the terminal can be used with g++, along with a text editor like Visual Studio Code.
Basic Program Structure A basic C++ program includes the iostream library, a main function int main(), and a return statement return 0. The std::cout object is used for outputting text to the console.
Namespaces Using namespace directives (e.g., using namespace std;) can simplify code but may lead to naming conflicts. Using declarations (e.g., using std::cout;) can reduce conflicts by specifically declaring which objects to use.
Variables Variables store values and have a data type (e.g., int slices = 5;). They can be declared and initialized separately.
Output Formatting Complex strings can be created using the << operator, and manipulators like std::endl can insert new lines.
Coding Style Descriptive variable names and adherence to style guides like the C++ Core Guidelines are recommended for better code maintainability.
Functions Functions are reusable blocks of code. The main function is the entry point of a program. Functions can accept arguments and return values.
Strings The string class in C++ is used to manipulate strings. String manipulation includes concatenation and appending.
Data Types The series covers integral types, floating-point types, characters, and strings. Floating-point numbers (float, double, long double) have limited precision.
Constants Different types of constants include literal, symbolic (const), and macro constants.
Control Flow Control flow includes branching (if/else statements, switch statements) and looping (while loops, for loops, do-while loops).
Loops Loops repeat a section of code. While loops, for loops, and do-while loops are common types.
Arrays Arrays are collections of elements of the same type.
Vectors Vectors are similar to arrays but have a dynamic size. Vectors can be expanded using the push_back method.
Collections Key differences exist among arrays, templatized arrays, and vectors, especially in sizing (static vs. dynamic) and how they are passed to functions.
Range-Based For Loops These loops simplify iterating through collections.
Input/Output Streams Input streams bring data into a program, and output streams send data out. Data is often buffered.
File Streams Data can be read from and written to files using ifstream and ofstream objects.
Structs Structs are used to store data and can contain data members and methods.
Classes and Objects Classes define the structure of data, and objects are instances of classes.
Makefiles Makefiles automate the build process, especially for large projects.
The series also mentions that the content is sponsored by Embarcadero C++ Builder, which provides tools for developing and deploying C++ applications across multiple platforms. C++ Builder has features for designing apps, working with databases, debugging, and deploying to various platforms.
C++ Main Function: Program Entry Point and Execution
The C++ tutorial series emphasizes the significance of the main function in a program’s execution. Here’s a breakdown:
Entry Point: The main function serves as the primary entry point; it is the first function that is automatically executed when a C++ program runs. The execution of the program begins at the first line of code inside the main function.
Return Type: The main function has a return type of int (integer). It returns an integer value to indicate whether the program ran successfully. A return value of zero typically means the program executed without errors.
Optional Return: Although the main function has an integer return type, the return statement is technically optional. If it is omitted, the compiler will implicitly insert a return 0; at the end of the function.
Function Definition: The code within the curly braces {} of the main function defines what the function does. This is where the program’s logic is written.
Calling Other Functions: The main function often serves as a starting point from which other functions within the program are called. It can call other functions to perform specific tasks or operations.
Multiple Files: In a multi-file project, the main function typically resides in its own separate file. This file includes the necessary header files for any functions or classes used in the main function.
Namespace std: Usage, Implications, and Best Practices
The C++ tutorial series addresses the use of using namespace std; and its implications. Here’s a breakdown:
Purpose The using namespace std; directive is used to make all items within the standard namespace (std) directly available in your code. This means you don’t have to prefix standard library elements like cout or string with std::.
Naming Conflicts The tutorial cautions that using using namespace std; is generally considered bad practice, especially in larger projects or when including multiple libraries. The reason for this is that it can lead to naming conflicts. If two namespaces (including std) define the same name (e.g., a function or a variable), the compiler will not know which one you intend to use, resulting in an error.
Good Practices
Using declarations: A more selective approach is to use using declarations. Instead of importing the entire std namespace, you can specifically declare which items you want to use directly, like using std::cout;. This reduces the risk of naming conflicts while still making your code more readable.
Explicit prefixing: The most explicit and safest approach is to always prefix standard library elements with std::. This ensures that there is no ambiguity about which namespace an item belongs to.
When to Use While generally discouraged for large projects, the tutorial acknowledges that using using namespace std; may be acceptable for small, simple programs or when first starting out. In these cases, the risk of naming conflicts is low, and it can make the code easier to write and understand.
Embarcadero C++ Builder: Cross-Platform IDE for C++ Development
The C++ tutorial series mentions Embarcadero C++ Builder as a recommended tool, especially for those using Windows. It’s described as an IDE (Integrated Development Environment) that provides everything needed to write C++ applications.
Here’s what the tutorial series says about the C++ Builder:
Capabilities: C++ Builder offers capabilities for designing apps, debugging, and deploying to multiple platforms. Specifically, it supports deployment to Windows, Android, Mac, and iOS.
Community Edition: The tutorial highlights the availability of a Community Edition, which is a free version that you can use if you are earning less than $5,000 a year from your software projects. The Community Edition is a fully featured IDE. The Community Edition has limited use for commercial purposes, meaning that you can build and sell applications until you need to upgrade to the professional version.
Features: C++ Builder includes a visual UI designer with drag-and-drop capabilities for creating platform-specific styling.
Recommendation: The tutorial recommends considering C++ Builder for building and deploying applications, particularly when aiming to deploy to multiple platforms.
C++ Variables: Declaration, Types, and Usage
The C++ tutorial series emphasizes the role and characteristics of variables.
Key aspects of variables in C++ programs:
Purpose: Variables are fundamental for storing values that can be used throughout a program. The main point of variables is to store some value for later use.
Definition: When creating a variable, there are five key pieces: the data type, the identifier, the assignment operator, the value, and the semicolon.
Data Type: When a variable is created in C++, a type must be defined. The data type specifies the kind of value that the variable can hold (e.g., integer, floating-point number, character). C++ is a statically typed language, where variables are assigned a data type at declaration that remains fixed.
Examples of data types include int (integer), double (double-precision floating point), char (character), and others. int restricts variables to whole numbers, while double allows for decimal points.
The data type determines the amount of memory allocated for the variable. The size of an int is typically 32 bits but is guaranteed to be at least 16 bits.
Declaration and Initialization: A variable can be declared (named and typed) and initialized (assigned a value) in separate steps or in a single statement.
Declaration indicates that a variable exists. For example, int slices; declares an integer variable named slices.
Initialization assigns a value to the variable. For example, slices = 5; initializes the slices variable with the value 5.
Combined, a single statement looks like this: int slices = 5;.
Assignment Operator: The = symbol is used to assign a value to a variable.
Literal Values: A literal value is a value that is directly typed into the code. For example, int slices = 5; assigns the literal value 5 to the slices variable.
Expressions: Variables can also be assigned the result of an expression. For example, int slices = 5 + 1; assigns the value 6 to the slices variable.
Variable Assignment: The value of one variable can be assigned to another. For example, int children = slices; copies the value of slices into the children variable. Changing the original variable (slices) after assignment does not affect the value of the copied variable (children).
Outputting Variables: The value of a variable can be displayed on the console using std::cout. For example, std::cout << slices; will print the value of the slices variable. When outputting variables, you can insert them directly into strings. For example, std::cout << “You have ” << slices << ” slices of pizza”;.
Input: Variables can also be assigned a value using user input with std::cin. For example, std::cin >> slices; reads an integer value from the console and stores it in the slices variable.
C++ Programming All-in-One Tutorial Series (10 HOURS!)
Affiliate Disclosure: This blog may contain affiliate links, which means I may earn a small commission if you click on the link and make a purchase. This comes at no additional cost to you. I only recommend products or services that I believe will add value to my readers. Your support helps keep this blog running and allows me to continue providing you with quality content. Thank you for your support!
A great breakfast sets the tone for the rest of the day, yet too often, we fall into monotonous routines, reaching for the same uninspiring choices. Whether it’s a rushed slice of toast or a bland bowl of cereal, mornings can quickly become predictable. But what if breakfast could be something to look forward to—an experience that excites the senses and fuels the body with real energy? With a few simple tricks and fresh ideas, you can transform your morning meal into something extraordinary.
Breakfast isn’t just about sustenance; it’s a daily opportunity to nourish both body and mind. Studies have shown that a well-balanced breakfast can improve concentration, boost metabolism, and enhance overall well-being. According to Dr. Tim Spector, a professor of genetic epidemiology at King’s College London, “The right breakfast can help regulate blood sugar levels, sustain energy, and even support gut health.” By making small but meaningful changes to your breakfast routine, you can create meals that are not only nutritious but also satisfying and enjoyable. If you’re ready to move beyond the mundane and elevate your breakfast game, this guide is for you. We’ve compiled 43 expert-backed tips that will make your mornings more delicious, efficient, and exciting. From creative cooking techniques to smart shortcuts, these ideas will revolutionize your breakfast experience—so let’s dive in!
1 – Breakfast, but better
A well-prepared breakfast is more than just a meal—it’s a foundation for the day ahead. Research suggests that those who eat a balanced breakfast tend to have better cognitive function and a lower risk of chronic diseases. However, many people stick to the same routine out of habit or convenience. To break this cycle, try incorporating diverse ingredients that offer a mix of protein, fiber, and healthy fats. Swap out refined carbs for whole grains, add nutrient-dense toppings to your meals, and experiment with global breakfast traditions for variety. Small changes can make a big difference. Instead of reaching for processed cereal, consider a bowl of Greek yogurt topped with nuts and fresh berries for a protein-packed start. If you love toast, opt for whole grain with avocado and poached eggs rather than butter and jam. Author and nutritionist Marion Nestle emphasizes, “The key to a good breakfast is balance—protein, fiber, and healthy fats help keep you full and energized.” By prioritizing quality ingredients and mindful preparation, you’ll transform breakfast from a dull obligation into a daily delight.
2 – Try French toast in your slow cooker
If you think French toast is only for rushed stovetop cooking, think again. Using a slow cooker allows you to prepare a warm, indulgent breakfast with minimal effort. By layering slices of bread with an egg-based mixture and letting the slow cooker do the work, you’ll achieve a custardy, flavor-infused dish that’s perfect for a weekend treat or meal prep. Slow cooking also enhances flavors, making every bite rich and satisfying. To take your slow-cooked French toast to the next level, experiment with different bread types—brioche, challah, or whole grain for a heartier option. Infuse the mixture with vanilla, nutmeg, or even a splash of orange zest for added depth. Nutrition expert Dr. Lisa Young recommends using natural sweeteners like honey or maple syrup instead of refined sugar to maintain a balance of flavor and health benefits. Once done, top your creation with fresh fruits, nuts, or even a dollop of Greek yogurt for a wholesome finish.
3 – Use cookie cutters to get the perfect pancake shape
Breakfast should be fun, and one of the easiest ways to bring creativity to the table is by making beautifully shaped pancakes. Whether you’re cooking for kids or just want to brighten your morning, cookie cutters can turn ordinary pancakes into delightful works of art. Using sturdy metal cutters as molds, you can create everything from classic hearts to intricate animal shapes. This technique not only adds visual appeal but also ensures a consistent size and even cooking.
Beyond aesthetics, this method also allows you to experiment with different batters. Thick American-style pancakes hold their shape best, but you can also try oat-based or protein pancakes for a nutritious twist. For an extra touch of flavor, mix ingredients like cinnamon, cocoa powder, or mashed banana into the batter. Food scientist Harold McGee, author of On Food and Cooking, suggests that letting the batter rest for a few minutes before cooking helps develop a fluffier texture. With a few simple tweaks, your pancakes can become a standout breakfast feature.
Conclusion
By making small adjustments to your morning routine, you can completely transform breakfast from a rushed necessity into an enjoyable ritual. Whether it’s rethinking the ingredients you use, leveraging kitchen gadgets like slow cookers, or adding a touch of creativity with fun shapes, each tip brings new life to your first meal of the day. The key is to experiment, adapt, and find what works best for your lifestyle and taste preferences. Breakfast doesn’t have to be boring or repetitive. As food journalist Bee Wilson states in First Bite: How We Learn to Eat, “Our food habits are not fixed—they can be reshaped and improved at any time.” With the right inspiration and techniques, you can create a breakfast experience that is nourishing, delicious, and exciting, setting the perfect tone for the rest of the day.
4 – Bake an egg in half an avocado
Eggs and avocados are a powerhouse combination, packed with protein, healthy fats, and essential vitamins. Baking an egg inside an avocado not only makes for an eye-catching breakfast but also offers a nutrient-dense start to the day. This dish is naturally low in carbs and high in fiber, making it an excellent option for those following a keto or paleo diet. The creamy texture of the avocado pairs beautifully with the richness of the baked egg, creating a balanced and satisfying meal.
To elevate this simple recipe, consider experimenting with toppings that add flavor and texture. A sprinkle of chili flakes brings heat, while crumbled feta or grated Parmesan adds a salty contrast. You can also incorporate smoked salmon for extra protein or drizzle honey over the finished dish for a sweet-savory twist. Nutritionist Dr. Mark Hyman, author of Food: What the Heck Should I Eat?, emphasizes the importance of whole, unprocessed ingredients, stating, “Healthy fats from sources like avocado can support brain function and sustain energy levels throughout the morning.” Serve your baked egg and avocado creation with grilled sourdough or a side salad for a well-rounded breakfast.
5 – Test out eggs in bacon cups
If you love a hearty breakfast but hate the cleanup, eggs in bacon cups are a game-changer. This recipe combines protein-rich eggs with crispy, flavorful bacon, all baked together in a convenient muffin tin. The bacon acts as a savory shell, holding in the eggs and any additional fillings, ensuring that every bite is packed with flavor. Unlike traditional fried breakfasts, this method requires little active cooking time, making it perfect for busy mornings or meal prep.
For an even more gourmet twist, try experimenting with different fillings. Spinach and goat cheese add a Mediterranean touch, while diced bell peppers and cheddar offer a classic American-style combination. Adding a dash of smoked paprika or fresh herbs like chives can enhance the flavor profile. Dr. David Ludwig, an endocrinologist and author of Always Hungry?, notes that “protein-rich breakfasts can help control appetite and prevent overeating later in the day.” Serve these bacon cups with sautéed greens or a slice of toasted baguette for a complete and satisfying meal.
6 – Mix up your usual avocado toast
Avocado toast has become a breakfast staple, but there’s no reason to settle for the same preparation every time. By adding unexpected ingredients or using alternative preparation methods, you can keep this classic dish exciting and full of bold flavors. A simple way to elevate avocado toast is by incorporating umami-rich spreads like Marmite or Vegemite before adding the avocado. These savory additions bring out the natural creaminess of the fruit while providing an extra punch of flavor.
For a more indulgent take, try pairing smashed avocado with crispy chorizo bits and crumbled feta, or mix in finely chopped sun-dried tomatoes for a Mediterranean-inspired twist. If you’re feeling adventurous, fresh berries like strawberries or pomegranate seeds can provide a sweet contrast to the buttery avocado. Food writer Nigella Lawson, in her book At My Table, suggests grilling avocado slices rather than mashing them, which intensifies their flavor and adds a smoky depth. With a little creativity, avocado toast can remain a delicious yet ever-changing part of your breakfast rotation.
Conclusion
Breakfast doesn’t have to be routine when there are endless ways to get creative with simple, wholesome ingredients. Whether it’s baking eggs in an avocado, crafting easy yet elegant bacon cups, or reinventing avocado toast, these ideas ensure that mornings stay exciting and flavorful. Small tweaks to classic dishes can result in a fresh, gourmet experience without adding extra time to your routine.
The key to a great breakfast is variety and balance. As culinary expert Michael Pollan advises in In Defense of Food, “Eat food. Not too much. Mostly plants.” By incorporating high-quality ingredients and experimenting with new textures and flavors, you can make breakfast a meal to look forward to every day.
7 – Upgrade your fried eggs
Fried eggs are a breakfast staple, but a few simple tweaks can turn them from basic to gourmet. Instead of cooking eggs in plain oil or butter, try using flavored oils, infused butters, or even sauces like pesto. The viral pesto egg trend, which took social media by storm, is a perfect example—cooking eggs in pesto infuses them with a rich, herby taste while preventing them from sticking to the pan. Similarly, frying eggs in chili crisp, truffle oil, or even a spoonful of harissa can add a whole new dimension of flavor. For an extra touch of elegance, top your fried eggs with unexpected ingredients. Crumbled feta, sun-dried tomatoes, or a drizzle of balsamic glaze can elevate their taste profile. Chef Yotam Ottolenghi, known for his bold flavor combinations, suggests serving fried eggs over a bed of creamy labneh with za’atar for a Middle Eastern twist. Whether paired with crusty sourdough or served atop a breakfast bowl, these small upgrades can make fried eggs feel like a restaurant-worthy dish.
8 – Use sweet potato for rösti
Sweet potatoes are a nutrient-dense alternative to regular potatoes, offering natural sweetness, vibrant color, and a boost of vitamins A and C. When used in rösti, they create a crispy, slightly caramelized crust that pairs beautifully with both sweet and savory toppings. The key to a perfect sweet potato rösti is squeezing out excess moisture from the grated potatoes before mixing them with eggs and seasonings—this ensures a golden, crispy texture rather than a soggy one. Once baked, the versatility of sweet potato rösti shines through. For a luxurious touch, top with cream cheese and smoked salmon, or add a perfectly fried egg and a spoonful of guacamole for a hearty, nutrient-packed meal. If you prefer a sweeter take, try serving rösti with Greek yogurt, cinnamon, and a drizzle of honey. According to The Flavor Bible by Karen Page and Andrew Dornenburg, “Sweet potatoes pair exceptionally well with tangy, creamy, and smoky flavors,” making them the perfect base for a wide variety of breakfast options.
9 – Give Dutch baby pancakes a try
Dutch baby pancakes may look extravagant, but they require minimal effort and always impress at the breakfast table. These oven-baked pancakes puff up dramatically while cooking, resulting in a crisp, golden exterior with a soft, custardy center. Unlike traditional pancakes, Dutch babies don’t require flipping, making them a foolproof choice for both beginner and seasoned cooks.
While the classic Dutch baby is dusted with powdered sugar and served with a squeeze of lemon, there are endless variations to explore. A savory version topped with crispy bacon, Gruyère cheese, and caramelized onions creates a satisfying brunch dish. On the sweeter side, fresh berries, maple syrup, or even Nutella can make for a decadent treat. As culinary historian Anne Willan notes in The Cookbook Library, “Baked pancakes have been a beloved dish for centuries, combining simplicity with indulgence.” With just a few basic ingredients, you can create a breakfast centerpiece that looks as good as it tastes.
Conclusion
The beauty of breakfast lies in its endless possibilities. Simple ingredients like eggs, sweet potatoes, and pancake batter can be transformed into vibrant, flavorful dishes with just a little creativity. Whether you’re enhancing fried eggs with infused oils, making crispy sweet potato rösti, or baking a showstopping Dutch baby pancake, these small upgrades ensure that breakfast remains exciting and satisfying. As author and food writer Ruth Reichl says, “Pull up a chair. Take a taste. Come join us. Life is so endlessly delicious.” With the right techniques and a willingness to experiment, your morning meal can become the highlight of the day—delicious, nourishing, and worth savoring.
10 – Add breakfast pizza to your repertoire
Pizza for breakfast may sound indulgent, but when done right, it can be a balanced and satisfying meal. A well-made breakfast pizza combines the comfort of a classic pizza with the heartiness of a morning spread. Whether you opt for a homemade dough or a store-bought crust, the key lies in the toppings. Traditional breakfast ingredients like eggs, bacon, hash browns, and mushrooms transform a simple pizza into a morning feast. Baking the pizza at a high temperature ensures a crispy base while keeping the toppings perfectly cooked. For a more gourmet approach, consider experimenting with flavors beyond the usual suspects. Smoked salmon with crème fraîche and dill, ricotta with caramelized onions and arugula, or even a Mediterranean-inspired version with olives, feta, and sun-dried tomatoes can elevate the dish. Renowned chef Alice Waters, in The Art of Simple Food, emphasizes that “good food depends almost entirely on good ingredients,” so selecting high-quality toppings makes all the difference. Serve your breakfast pizza with a fresh side salad or fruit for a well-rounded meal that feels both indulgent and nutritious.
11 – Give green eggs a whirl
A vibrant twist on traditional shakshuka, green eggs offer a nutrient-packed alternative to the usual tomato-based dish. By swapping red sauce for sautéed greens like asparagus, spinach, and cabbage, this breakfast is both visually striking and incredibly wholesome. The key to perfecting this dish lies in gently poaching the eggs among the greens, ensuring the yolks remain runny while the whites are fully set. Adding crumbled feta, chili flakes, or a drizzle of tahini enhances the dish with bold flavors and creamy textures. Green eggs aren’t just delicious—they’re also rich in vitamins, fiber, and antioxidants. According to How Not to Die by Dr. Michael Greger, “leafy greens are among the most nutrient-dense foods available, supporting everything from heart health to brain function.” Pairing them with eggs provides an excellent source of protein, making this dish a powerhouse breakfast. Serve with warm pita bread or a slice of whole-grain toast for a satisfying start to the day.
12 – Use a cupcake tin to bake egg muffins
Egg muffins are the perfect solution for busy mornings, combining convenience with nutrition. These mini frittatas can be prepped in advance and customized with a variety of ingredients, ensuring breakfast never becomes monotonous. By whisking eggs with milk and adding chopped vegetables, meats, or cheese, you create a portable, protein-packed meal that can be stored in the fridge or freezer for later. Baking them in a cupcake tin ensures even cooking and easy portioning.
To elevate your egg muffins, consider using unique flavor combinations. A Mediterranean-inspired mix of sun-dried tomatoes, feta, and spinach brings a tangy, savory touch, while a Southwest-style version with chorizo, bell peppers, and cheddar adds a smoky kick. Culinary expert Mark Bittman, in How to Cook Everything Fast, highlights the value of simple, adaptable recipes, stating, “Cooking should be flexible—use what you have, experiment, and make it your own.” These muffins are an ideal way to reduce food waste while creating a delicious, protein-rich breakfast that fits any schedule.
Conclusion
Breakfast doesn’t have to be repetitive or uninspired. By introducing creative dishes like breakfast pizza, green eggs, and egg muffins, you can transform your morning routine into something exciting and deeply satisfying. These recipes prove that a little innovation in the kitchen can go a long way in making breakfast more enjoyable. As Julia Child famously said, “You don’t have to cook fancy or complicated masterpieces—just good food from fresh ingredients.” With these ideas in your arsenal, you’ll never look at breakfast the same way again. Whether you’re cooking for a crowd or prepping meals ahead of time, these dishes ensure that every morning starts on a delicious note.
13 – Turn leftover pasta into a frittata
Transforming last night’s pasta into a golden, satisfying frittata is a brilliant way to reduce food waste while creating a hearty breakfast. A frittata is essentially an open-faced omelet, and when combined with pasta, it takes on a wonderfully dense and chewy texture. The key to making it successful is to use a mix of eggs, cheese, and seasonings to bind the pasta together before cooking it in a non-stick pan. Parmesan, Pecorino, or even a touch of mozzarella can add depth of flavor, while fresh herbs like basil or parsley provide brightness. For a more elevated version, consider adding sautéed onions, roasted red peppers, or crumbled sausage before setting the frittata in the oven. In Salt, Fat, Acid, Heat, Samin Nosrat emphasizes the importance of balance in cooking: “A truly delicious dish finds harmony between these elements.” Whether served hot or at room temperature, this dish is a wonderful way to breathe new life into leftovers while making breakfast feel both indulgent and practical.
14 – Make a morning mezze
A Middle Eastern–inspired morning mezze is a refreshing departure from the usual breakfast fare. Instead of slaving over a stove, simply assemble a spread of fresh, flavorful ingredients that invite leisurely grazing. Think warm, fluffy flatbreads, creamy labneh, rich hummus, marinated olives, pickled vegetables, and perfectly boiled eggs. The beauty of a mezze-style breakfast lies in its variety—each bite offers something different, from tangy yogurt to briny olives, making it a satisfying and interactive way to start the day. This breakfast style is deeply rooted in Middle Eastern culinary traditions, where meals are often communal and centered around fresh, nourishing ingredients. Claudia Roden, in The New Book of Middle Eastern Food, writes, “The beauty of mezze lies in the pleasure of sharing small, flavorful bites with good company.” Adding extras like spiced chickpeas, grilled halloumi, or a drizzle of pomegranate molasses can take the spread to the next level. Whether for a weekend brunch or a special gathering, a mezze breakfast is a vibrant and fuss-free option that brings people together.
15 – Spice up simple poached eggs
Poached eggs, with their delicate whites and rich, runny yolks, are a breakfast classic, but a few simple additions can elevate them to gourmet status. Infusing the cooking water with aromatics such as bay leaves, garlic, or a splash of vinegar can subtly enhance their flavor. However, one of the best ways to upgrade poached eggs is by taking inspiration from çılbır, a traditional Turkish dish. Placing poached eggs over a bed of thick, garlicky yogurt and drizzling them with chili-infused butter creates a luxurious contrast of creamy, spicy, and tangy flavors.
To take it a step further, sprinkle the dish with sumac, fresh dill, or crumbled feta for added texture and depth. In The Food of the Eastern Mediterranean, Paula Wolfert describes the magic of Eastern spices, stating, “A simple dish can be transformed with the right use of heat and seasoning.” Served with griddled sourdough or warm pita, these poached eggs become the centerpiece of an unforgettable breakfast that feels both comforting and sophisticated.
Conclusion
Breakfast should never be an afterthought, and with a little imagination, even the simplest ingredients can be transformed into something extraordinary. From repurposing pasta into a rich, cheesy frittata to indulging in a Mediterranean-style mezze or spicing up poached eggs with aromatic butter and yogurt, these dishes prove that morning meals can be both effortless and exciting. As celebrated chef and author Nigel Slater puts it, “Good food is the foundation of genuine happiness.” With these inventive breakfast ideas, you can start each day not just with sustenance, but with a moment of culinary delight. Whether you’re cooking for yourself or sharing with loved ones, these tips ensure that breakfast remains a meal to look forward to.
16 – Get a dose of fiber with a breakfast crumble
Starting your day with a fiber-rich breakfast can boost digestion, regulate blood sugar, and keep you full longer. A breakfast crumble made with roasted stone fruits, oats, and dates is an excellent way to achieve this while indulging in a naturally sweet, wholesome dish. Peaches, apricots, and plums release their natural sugars when roasted with a drizzle of honey, creating a warm, caramelized base. Topping them with crunchy granola, fiber-rich dates, and creamy yogurt not only adds texture but also enhances the dish’s nutritional value. To make this breakfast even more nutritious, consider adding flaxseeds or chia seeds for an extra fiber boost. A sprinkle of cinnamon or nutmeg can provide warmth and depth of flavor. According to The Fiber Fueled Cookbook by Dr. Will Bulsiewicz, “Fiber isn’t just important for digestion—it feeds the good bacteria in your gut, which impacts everything from mood to metabolism.” Whether enjoyed warm or chilled, this breakfast crumble offers a delicious and satisfying way to incorporate more fiber into your diet.
17 – Make your own chocolate pastries
Freshly baked chocolate pastries can bring a touch of luxury to your breakfast without the need for a trip to the bakery. Using store-bought puff pastry, you can easily create flaky, buttery croissants filled with rich, melted chocolate. The key to success is rolling the pastry tightly around the chocolate, ensuring it stays enclosed while baking. A quick egg wash adds a glossy finish, while baking at the right temperature guarantees crisp layers and a golden-brown exterior. For a gourmet twist, consider using dark chocolate or a hazelnut spread instead of chocolate chips. A sprinkle of sea salt on top can enhance the sweetness and balance the flavors. As Julia Child once said, “A party without cake is just a meeting,” and the same could be said about breakfast without pastries. Pair these homemade delights with a cup of coffee or a glass of freshly squeezed orange juice for a truly indulgent start to the day.
18 – Cook bacon in the microwave
For those who crave crispy bacon but dislike the mess and time involved in pan-frying, the microwave offers a surprisingly effective alternative. Cooking bacon this way not only reduces splatter but also ensures even crisping in just a few minutes. The trick is to layer the bacon between paper towels, which absorb excess grease while allowing the bacon to cook evenly. This method is particularly useful for busy mornings when time is short but the craving for a hearty breakfast is strong.
While purists may argue that bacon should only be cooked in a pan or oven, modern kitchen hacks like this offer convenience without sacrificing texture. In The Food Lab, J. Kenji López-Alt notes, “Cooking is about achieving the best results with the tools at hand.” Using the microwave for bacon saves time and effort, making it an ideal solution for quick breakfasts. Serve your perfectly crisp bacon alongside eggs, toast, or even crumbled over a salad for a versatile addition to any meal.
Conclusion
A great breakfast doesn’t have to be complicated—it just requires a little creativity and the right techniques. Whether it’s a fiber-packed fruit crumble, homemade chocolate pastries, or perfectly crisp bacon cooked in minutes, these simple yet effective tips help transform your morning routine. As culinary expert Yotam Ottolenghi states in Plenty, “Breakfast is an opportunity to start the day with something beautiful.” By incorporating these easy upgrades into your routine, you ensure that every morning begins on a delicious and satisfying note.
19 – Try your hand at one-pan shakshuka
Shakshuka is a dish that blends simplicity with bold flavors, making it a breakfast staple in the Middle East and North Africa. It consists of poached eggs nestled in a rich, spiced tomato sauce, all cooked in a single pan for minimal cleanup. The combination of onions, garlic, and paprika enhances the depth of flavor, while the tomatoes create a tangy and slightly sweet base. The key to perfecting shakshuka lies in simmering the sauce until it thickens, ensuring the eggs cook gently in their wells without becoming overdone.
For an even heartier version, try adding bell peppers, crumbled feta, or spiced merguez sausage. Serve it with warm pita, crusty sourdough, or even a sprinkle of za’atar for an extra layer of complexity. Yotam Ottolenghi, in his book Jerusalem, describes shakshuka as “a dish of warmth and comfort, best shared straight from the pan.” Whether you’re serving guests or just treating yourself, shakshuka is a vibrant and nourishing way to start the day.
20 – Batch-cook breakfast muffins
For those with busy mornings, batch-cooking breakfast muffins is a game-changer. These versatile, grab-and-go treats can be prepared in advance, saving time without compromising on nutrition. A well-balanced breakfast muffin can be packed with protein, fiber, and healthy fats to keep you full and energized. Options range from savory versions with cheese, herbs, and vegetables to sweet ones with berries, nuts, and seeds.
To keep things interesting, experiment with different flour bases like almond or oat flour for added nutrients. You can also incorporate flaxseeds or chia seeds for a fiber boost. In The Joy of Cooking, Irma S. Rombauer emphasizes that “preparation is the key to stress-free meals.” With a batch of breakfast muffins ready to go, you’ll have a nutritious start to the day, even on the busiest mornings.
21 – Try a one-pan full English wonder
A full English breakfast is a beloved classic, but it can often involve multiple pans and a pile of dishes. By cooking everything in a single pan, you streamline the process while allowing the flavors to meld beautifully. Start by frying the heartier components—potatoes and sausages—before adding mushrooms, bacon, and eggs. Letting everything cook together ensures that each bite is infused with rich, savory flavors.
For a gourmet twist, swap regular sausages for black pudding or add cherry tomatoes for a burst of sweetness. A sprinkle of fresh herbs like thyme or chives can elevate the dish even further. Food writer Nigel Slater once remarked, “A good breakfast is the foundation of a happy day,” and a one-pan full English delivers that satisfaction with minimal effort. Serve with thick, buttery toast and your favorite sauce for a hearty, comforting start to the morning.
Conclusion
A great breakfast doesn’t need to be time-consuming or complicated. With a few clever techniques, you can enjoy rich, flavorful dishes like shakshuka, breakfast muffins, or a simplified full English, all with minimal effort. These methods not only save time but also ensure that every morning meal is both satisfying and stress-free.
As The Breakfast Book by Marion Cunningham suggests, “Breakfast should be something to look forward to, not just another task to complete.” By incorporating these simple yet delicious ideas into your routine, you can turn every morning into a moment of indulgence and nourishment.
22 – Swap toast for potato
If you’re tired of the usual toast routine, swapping it out for a crispy, golden potato alternative can transform your breakfast experience. Potato waffles provide the perfect base for creamy smashed avocado and a runny fried egg, offering a delightful contrast of textures. The crispiness of the potato complements the smoothness of the avocado, while the egg yolk adds a luxurious richness. Not only does this swap enhance flavor, but it also introduces a more filling and satisfying alternative to traditional bread. For those craving something more indulgent, consider a breakfast sandwich where hash browns replace the usual English muffin. Layering a perfectly fried egg, crispy bacon, and gooey melted cheese between two crispy hash browns creates a meal that feels like a special treat. As James Beard, the legendary chef and food writer, once said, “Good food is very often, even most often, simple food.” With just a few clever swaps, you can reinvent your breakfast while keeping it easy and delicious.
23 – Prep granola pots ahead of time
When mornings are rushed, having a ready-to-go breakfast can make all the difference. Granola pots are a fantastic solution, combining nutrition, convenience, and flavor in a single jar. The beauty of granola pots lies in their versatility—layering Greek yogurt with crunchy granola and fresh fruit provides a well-balanced meal packed with protein, fiber, and vitamins. A drizzle of honey or a sprinkle of flaxseeds can enhance the nutritional value, offering sustained energy throughout the morning. Making these pots in advance means you always have a quick breakfast option on hand. Store them in mason jars in the fridge for up to three days, ensuring a stress-free start to your mornings. As Michael Pollan writes in Food Rules, “Eat food. Not too much. Mostly plants.” By incorporating fruits, nuts, and yogurt into your breakfast routine, you create a meal that’s both wholesome and satisfying.
24 – Bake banana bread with a kick
Banana bread is a beloved classic, but adding a bold twist can make it even more exciting. One simple way to elevate your banana bread is by incorporating a shot of espresso into the batter. The deep, roasted flavors of coffee pair beautifully with the natural sweetness of ripe bananas, creating a breakfast treat that offers both comfort and an energizing boost. This twist not only enhances the taste but also provides a mild caffeine kick to help start your day.
To maintain moisture and richness throughout the week, store banana bread in an airtight container and gently reheat slices before serving. For extra indulgence, try spreading a little almond butter or cream cheese on top. As food historian Bee Wilson notes in Consider the Fork, “The way we cook and eat is shaped by history, but also by innovation.” By adding a new dimension to a traditional recipe, you can keep breakfast exciting and satisfying day after day.
Conclusion
With a little creativity, breakfast can be more than just a routine meal—it can be an opportunity to enjoy new textures, flavors, and nutrients. Whether it’s swapping toast for crispy potatoes, preparing nutritious granola pots in advance, or giving banana bread an energizing twist, these simple changes can have a big impact on your morning satisfaction. As culinary expert Marion Nestle reminds us in What to Eat, “The best meals are those that nourish both body and soul.” By incorporating these inventive yet practical breakfast ideas, you set the tone for a more enjoyable and fulfilling day, proving that a great morning meal doesn’t have to be complicated.
25 – Experiment with two-ingredient pancakes
Pancakes don’t have to be complicated to be delicious. If you’re looking for a gluten-free or low-carb option, two-ingredient pancakes made with just bananas and eggs are a fantastic alternative. The natural sweetness of ripe bananas eliminates the need for added sugar, while eggs provide structure and protein. Simply mash a banana, whisk in an egg, and cook small dollops of the batter in a non-stick pan. These pancakes turn out soft, slightly caramelized, and full of flavor.
While they may be more delicate than traditional pancakes, the right toppings can take them to the next level. A dollop of Greek yogurt, a sprinkle of cinnamon, or a handful of berries can enhance both taste and nutrition. Food scientist Harold McGee, in On Food and Cooking, explains that the simplest ingredients often produce the best results when combined correctly. This minimalist approach proves that great breakfasts don’t have to be time-consuming or complicated.
26 – Use leftover fruit in pancake batter
One of the best ways to make pancakes healthier and more flavorful is by incorporating fresh fruit directly into the batter. Whether it’s overripe bananas, diced apples, or a handful of berries, these natural additions infuse pancakes with sweetness and moisture, eliminating the need for refined sugar. Blueberries add a juicy pop, while apples provide a subtle crunch—each fruit brings its own unique texture and depth of flavor.
Another great way to use up leftover fruit is by making a simple compote. Simmer chopped fruit with a splash of water and a drizzle of honey until it breaks down into a thick, syrupy mixture. Served over warm pancakes with a spoonful of creamy Greek yogurt and a sprinkle of nuts, this combination transforms breakfast into a wholesome, restaurant-quality experience. As chef and food writer Alice Waters once said, “Let things taste of what they are.” By celebrating the natural sweetness of fruit, you create a breakfast that is both nourishing and delicious.
27 – Make your own fast food classic
The convenience of a fast-food breakfast sandwich is undeniable, but making your own at home allows for better ingredients, fresher flavors, and a healthier take on the classic. A homemade breakfast muffin starts with a toasted English muffin layered with a fried egg, crispy bacon or sausage, and a slice of melty American cheese. This simple yet satisfying combination delivers the perfect balance of flavors—savory, creamy, and slightly crispy in every bite.
Beyond taste, making breakfast sandwiches at home means you can customize them to suit your preferences. Swap regular bacon for turkey bacon, use whole-grain muffins for added fiber, or add avocado for a nutrient boost. Pair your sandwich with a glass of freshly squeezed orange juice, and you have a balanced meal that fuels your morning without the excess salt and preservatives found in fast food. As Michael Pollan suggests in In Defense of Food, “Eat food, not too much, mostly plants.” Making your own version ensures that every bite is wholesome and made with care.
Conclusion
Breakfast doesn’t have to be repetitive or overly complex to be enjoyable. Whether you’re whipping up two-ingredient pancakes, making use of leftover fruit, or crafting your own fast-food favorite, small tweaks can bring excitement and better nutrition to your morning routine. These simple yet delicious options ensure that your first meal of the day is both satisfying and health-conscious.
As Julia Child once said, “You don’t have to cook fancy or complicated masterpieces—just good food from fresh ingredients.” By experimenting with these creative breakfast ideas, you can turn ordinary mornings into something special while making the most of what’s already in your kitchen.
28 – Posh up your porridge
Porridge is a powerhouse breakfast packed with fiber and slow-releasing carbohydrates, but that doesn’t mean it has to be boring. Instead of the usual sugar or honey, elevate your bowl with creative and indulgent toppings. Poached pears drizzled with maple syrup, caramelized bananas, or even a spoonful of nut butter can transform a simple bowl of oats into a gourmet meal. A dash of warming spices like cinnamon, nutmeg, or cardamom adds extra depth, while a sprinkle of cacao nibs or dark chocolate shavings can make your breakfast feel like dessert.
For a more exotic twist, try a tropical porridge with coconut milk, diced mango, and toasted coconut flakes. Alternatively, give your oats a protein boost by stirring in Greek yogurt or a scoop of protein powder. By experimenting with different textures and flavors, your porridge can be both delicious and nutritious, ensuring you never get tired of this breakfast staple.
29 – Try on-the-go breakfast bars
When mornings are hectic, having a homemade breakfast bar on hand can be a lifesaver. Store-bought options are often packed with sugar and preservatives, but making your own is surprisingly easy and allows you to control the ingredients. A simple recipe involves mixing oats with mashed banana, honey, and peanut butter, then baking until set. For extra nutrition, throw in chia seeds, flaxseeds, or a handful of nuts.
For those who prefer no-bake options, energy bars made with dates, almonds, and cocoa powder are a great alternative. Simply blend the ingredients, press into a pan, and refrigerate until firm. These bars can be stored in an airtight container for a week or frozen for longer-lasting convenience. Whether you prefer fruity, nutty, or chocolatey flavors, having a healthy, homemade grab-and-go breakfast ensures you start your day on the right note.
30 – Prep overnight oats
Overnight oats are the ultimate make-ahead breakfast, requiring minimal effort while delivering maximum flavor and nutrition. By soaking oats overnight in liquid—be it almond milk, yogurt, or even fruit juice—you allow them to soften and absorb all the delicious flavors. The result? A creamy, ready-to-eat meal in the morning that requires no cooking at all.
The beauty of overnight oats lies in their versatility. For a classic version, mix in cinnamon, honey, and chopped apples. If you’re in the mood for something indulgent, try a chocolate peanut butter combination by adding cocoa powder and a dollop of peanut butter. Fresh fruit, nuts, and seeds make excellent toppings, providing a mix of textures and essential nutrients. With endless possibilities, overnight oats are a game-changer for those who want a quick yet satisfying breakfast.
Conclusion
By incorporating these small yet effective changes into your morning routine, you can turn ordinary breakfasts into extraordinary meals. Whether you’re upgrading a humble bowl of porridge, preparing nutritious homemade bars, or letting your oats soak overnight for a hassle-free start, these tips ensure you never have to settle for a bland or uninspiring breakfast again. Not only do these ideas enhance flavor and variety, but they also support a healthier lifestyle by reducing processed ingredients and promoting balanced nutrition. With a little planning and creativity, you can enjoy a morning meal that fuels your day with energy and satisfaction.
31 – Cheat your way to flawless hollandaise
Hollandaise doesn’t have to be a hassle. Simply whisk together two egg yolks, a small splash of both white wine vinegar and ice-cold water, and a pinch of salt in a metal bowl that can fit over a small pan of water. With the water barely simmering, whisk continuously until the consistency is pale and thick (around three to five minutes). Remove from the heat and whisk in 5oz cubed unsalted butter, until the sauce is creamy and runny. Season with salt and pepper, a squeeze of lemon juice, and a sprinkling of cayenne pepper.
32 – Master the art of perfect poached eggs
Haven’t cracked the art of perfect poached eggs yet? There are a few hacks out there, but here’s the simplest: add enough cold water to a pan so that the egg will be only half submerged, then add a dash of lemon juice. Crack the egg over a sieve first to release its runniest parts, place it in a small metal bowl, then add to the pan and cover. Simmer on high heat for three minutes. The result? Delicious eggs that are soft and runny every single time.
33 – Try baking your bacon
Baking bacon is a great fuss-free idea (and a delicious way to achieve perfectly crispy rashers). Line a baking tray with foil and cook at 400°F for around 15 minutes, keeping an eye on the bacon towards the end in case it burns. Pop a few rashers in between two slices of buttered bread and finish with a squirt of ketchup for the ultimate bacon sandwich.
34 – Blend sweet and savory
Don’t be afraid to mix things up when it comes to early morning flavors – you want to awaken those taste buds, after all. Maple syrup and bacon is a classic combo for a reason and works brilliantly on both waffles and pancakes. If you’re after something lighter, try apple slices spread with peanut butter and finished with a drizzle of honey for a healthy and surprisingly tasty morning mouthful. A scant sprinkling of salt, meanwhile, might be just the thing to turn your bowl of porridge from mediocre to moreish.
35 – Try microwaved scrambled eggs
There are plenty of egg-based microwave marvels you can whip up for breakfast. For what some claim is the perfect way to make scrambled eggs (purists, look away), whisk eggs with a dash of milk and a little seasoning, then cook for a minute and a half on high, stirring midway. The result? Soft, fluffy eggs with minimal cleanup. Serve over buttery wholemeal toast for a filling morning meal.
36 – Have fish at breakfast for extra nutrients
Eating fish at breakfast is a great way to fill up on both omega-3 fatty acids – which studies suggest could help boost brain health – and protein, which keeps you fuller longer. A smoked salmon and cream cheese bagel is a luxurious yet effortless option, while grilled mackerel served with soda bread, poached eggs, and fresh chives makes for a nutritious and satisfying morning feast.
Bibliography on Cooking Breakfast
If you’re looking to explore breakfast recipes, techniques, and inspirations further, here are some recommended books, websites, and articles on cooking breakfast:
Books
The Breakfast Bible – Seb Emina & Malcolm Eggs A comprehensive guide to breakfast culture, history, and recipes from around the world.
Big Bad Breakfast: The Most Important Book of the Day – John Currence A chef’s take on bold, indulgent, and classic Southern-style breakfast dishes.
Egg: A Culinary Exploration of the World’s Most Versatile Ingredient – Michael Ruhlman An in-depth look at eggs and their role in cooking, including techniques for breakfast dishes.
Brunch at Bobby’s: 140 Recipes for the Best Part of the Weekend – Bobby Flay Celebrity chef Bobby Flay shares brunch recipes, from eggs to cocktails.
The Art of Breakfast: How to Bring B&B Entertaining Home – Dana Moos A guide to creating gourmet breakfast and brunch meals inspired by bed-and-breakfast hospitality.
Affiliate Disclosure: This blog may contain affiliate links, which means I may earn a small commission if you click on the link and make a purchase. This comes at no additional cost to you. I only recommend products or services that I believe will add value to my readers. Your support helps keep this blog running and allows me to continue providing you with quality content. Thank you for your support!
This compilation of news articles and reports covers a diverse range of topics related to Saudi Arabia and the broader Middle East. It includes discussions of humanitarian aid efforts, economic development plans, and cultural initiatives within the Kingdom. Additionally, there are reports on international relations, regional conflicts, and global issues such as climate change and corruption. Specific topics range from the Saudi Cup horse race to political situations in Gaza, Syria, and Ukraine. Other articles cover topics such as combating the effects of dust and other particulates on the environment, and Saudi Arabia’s historical origins.
International Humanitarian Efforts & Saudi Arabia’s Vision 2030
Study Guide
I. Quiz: Short Answer Questions
Answer each question in 2-3 sentences.
According to the text, what is a key source of Saudi Arabia’s commitment to humanitarian work?
What specific action highlights Saudi Arabia’s humanitarian efforts, mentioned early in the document?
What did Dr. Hamad Abdullah Al-Fawzan emphasize at the Public Sector Excellence Forum 2025?
What is the stated goal of the Public Sector Excellence Forum 2025?
What does the King Salman Center for Relief and Humanitarian Aid do?
According to the text, what challenge does the increasing frequency of disasters and crises present to humanitarian work?
What is the stated purpose of Saudi Arabia’s annual Founding Day celebration?
What does the Saudi Minister of Islamic Affairs oversee annually?
What is the “Wall of Voices” initiative launched by the King Salman Global Academy for the Arabic Language?
According to the text, what are some of the economic sectors the European Union has suspended sanctions on in Syria?
II. Quiz Answer Key
Saudi Arabia’s commitment to humanitarian work is deeply rooted in the noble values of Islam and the legacy of its founder, King Abdulaziz bin Abdulrahman Al Saud. This commitment is evident in its extensive support for countries facing crises and disasters.
The establishment of the King Salman Center for Relief and Humanitarian Aid is a prime example, through which Saudi Arabia has provided billions of dollars in aid to millions in need across numerous countries.
Dr. Hamad Abdullah Al-Fawzan stressed the significance of collaboration and knowledge exchange among organizations to achieve sustainable results in the public sector.
The Public Sector Excellence Forum 2025 aims to promote specialized dialogue, review successful experiences, and address key challenges in the public sector to achieve sustainable impact.
The King Salman Center for Relief and Humanitarian Aid provides assistance to millions of people across the globe, focusing on those most in need in over 100 countries, through thousands of projects worth billions of dollars.
The increasing frequency of disasters and crises increases human suffering and poses significant challenges to the delivery of humanitarian aid, requiring international cooperation to overcome these obstacles.
Saudi Arabia’s annual Founding Day celebration is aimed at highlighting the importance of the establishment of the Saudi state and deepening Saudi citizens’ understanding of their historical roots.
The Saudi Minister of Islamic Affairs oversees the final rounds of the King Salman Prize for Memorization of the Holy Quran.
The “Wall of Voices” initiative launched by the King Salman Global Academy for the Arabic Language uses modern technology to foster community engagement and celebrate national and cultural occasions, enabling the public to interact vocally with content related to Saudi Founding Day.
According to the text, the European Union has suspended sanctions on key economic sectors in Syria including banking, energy and transportation.
III. Essay Format Questions
Discuss the role of Saudi Arabia in international humanitarian efforts, citing specific examples and initiatives described in the text. How does this role align with the Kingdom’s broader strategic goals and values?
Analyze the Public Sector Excellence Forum 2025. What key challenges and opportunities does the forum seek to address, and how does it aim to contribute to sustainable development?
Examine the significance of Saudi Arabia’s Founding Day celebration. How does this event contribute to national identity and historical awareness?
Discuss the challenges to humanitarian relief efforts as seen in the examples in the text.
How might the various programs, foundations and initiatives covered in the source lead to achieving the goals of Saudi Vision 2030?
IV. Glossary of Key Terms
Humanitarian Aid: Assistance provided to alleviate suffering and meet the basic needs of people affected by crises, disasters, or conflicts.
Vision 2030: Saudi Arabia’s strategic framework to reduce the country’s dependence on oil, diversify its economy, and develop public service sectors such as health, education, infrastructure, recreation, and tourism.
Public Sector Excellence: A commitment to improving the efficiency, effectiveness, and sustainability of government operations and services.
Digital Transformation: The integration of digital technology into all aspects of a business or society, fundamentally changing how operations are conducted and value is delivered.
Sustainable Development: Development that meets the needs of the present without compromising the ability of future generations to meet their own needs.
Governance: The systems and processes by which societies or organizations are controlled and directed.
King Salman Center for Relief and Humanitarian Aid: A Saudi Arabian organization dedicated to providing international humanitarian assistance.
Founding Day: An annual Saudi Arabian holiday commemorating the establishment of the first Saudi state.
King Salman Global Academy for the Arabic Language: An academy dedicated to promoting and preserving the Arabic language through innovative methods and technology.
Cultural Heritage: The legacy of physical artifacts and intangible attributes of a group or society that are inherited from past generations, maintained in the present, and bestowed for the benefit of future generations.
Global Affairs and Saudi Arabia: Key Themes and Ideas
Okay, here’s a briefing document summarizing the key themes and ideas from the provided sources:
Briefing Document
Subject: Review of Key Themes and Ideas from Provided Sources
Date: October 26, 2023
Overview:
This document provides a summary of the main themes, ideas, and important facts extracted from the provided sources. The sources cover a wide range of topics, including humanitarian efforts in Saudi Arabia, discussions on digital transformation in the public sector, international relations, the conflict in Sudan, the situation in Gaza, economic trends (particularly related to oil and gas and air pollution control), cultural events and initiatives in Saudi Arabia, and sports.
1. Humanitarian Efforts and Saudi Arabia’s Role:
Main Theme: Saudi Arabia plays a significant role in international humanitarian aid, rooted in Islamic values.
Key Ideas/Facts:The Kingdom has provided over $100 million in aid to countries facing disasters and crises.
The King Salman Humanitarian Aid and Relief Centre has implemented over 3,000 projects worth over $7 billion in over 100 countries.
The country is committed to alleviating human suffering regardless of race or religion.
The Kingdom emphasizes the importance of coordinating efforts between governments, NGOs, and international organizations to ensure humanitarian aid reaches those in need.
Quote: “بامل�سرة نحتفي ال��ي��وم امل���ب���ارك���ة ل��ل��م��م��ل��ك��ة ال��ع��رب��ي��ة ال�سعودية يف العمل الإن�ساين امل�ستمدة من ديننا والقيم احلنيف الإ�سالمي” – “We celebrate today the blessed efforts of the Kingdom of Saudi Arabia in humanitarian work, derived from our religion and the values of the true Islamic faith.”
Quote: “اإن�ساين مببلغ يتجاوز 7 مليارات دولر اأمركي” – “Humanitarian with an amount exceeding 7 billion US dollars.”
2. Digital Transformation and Sustainability in the Public Sector:
Main Theme: Emphasis on digital transformation and sustainable practices in the public sector.
Key Ideas/Facts:The Public Sector Excellence Forum 2025 in Riyadh focuses on effective governance and sustainable impact.
Importance of collaboration and knowledge exchange between organizations to achieve sustainable results in the public sector.
Discussions about exceptional human capabilities and human capital.
Main Theme: Active diplomatic engagement of Saudi Arabia and evolving geopolitical situations.
Key Ideas/Facts:Saudi Arabia’s Foreign Minister met with the Deputy Prime Minister of New Zealand to discuss bilateral relations and topics of mutual interest.
Syrian President receives an invitation to the Arab League summit.
The European Union is suspending sanctions on Syria targeting key economic sectors.
Quote: “ا�ستقبل �ساحب ال�سمو الأمر في�سل بن فرحان بن عبدالله وزير اخلارجية، معايل نائب رئي�س الوزراء وزير خارجية نيوزيلندا ال�سيد ون�ستون بيرتز” – “His Royal Highness Prince Faisal bin Farhan bin Abdullah, Minister of Foreign Affairs, received His Excellency the Deputy Prime Minister and Minister of Foreign Affairs of New Zealand, Mr. Winston Peters.”
4. Conflict in Sudan:
Main Theme: Ongoing conflict and humanitarian crisis in Sudan.
Key Ideas/Facts:Forces of the Rapid Support Forces (RSF) sign a pact with a rival faction in Sudan.
The conflict has resulted in thousands of deaths and the displacement of over 12 million people, with widespread human rights violations.
Doctors Without Borders suspends activities in Zamzam camp due to attacks and fighting.
The Sudanese army claims to have broken the siege imposed by the RSF on a city.
Quote: “قوات الدعم السريع تتحالف مع عدوها يف ال�سودان يف م�وازي�ة” – “Rapid Support Forces allies with its enemy in Sudan in parallel”
5. Situation in Gaza:
Main Theme: Fragile ceasefire in Gaza and ongoing political tensions.
Key Ideas/Facts:Ceasefire agreement in Gaza is in effect, with Hamas releasing Israeli abductees.
Discussions are underway to extend the first phase of the ceasefire.
The U.S. envoy is traveling to the Middle East to discuss the extension of the ceasefire.
Trump’s plan involves transferring Gazans to other locations, including Egypt and Jordan, sparking criticism.
Israeli forces target the Al-Zaytoun neighborhood in Gaza City.
Restrictions on prayers at Al-Aqsa Mosque during Ramadan.
6. Economic Trends (Oil, Gas, Air Pollution Control):
Main Theme: Fluctuations in oil and gas prices due to various geopolitical factors, and growing demand for air pollution control systems.
Key Ideas/Facts:Oil prices experience volatility due to attacks on pipelines and potential resumption of exports from Iraqi Kurdistan.
European leaders meet to discuss support for Ukraine and energy security.
The market for air pollution control systems is projected to grow significantly, reaching $22.3 billion by 2030.
Increased awareness of health risks associated with dust exposure is driving demand for air pollution control systems.
Asia-Pacific region dominates the market for air pollution control systems, with China as the leading market.
Quote: “مع تفاقم ظاهرة التغري المناخي، وتلوث الهواء يف العديد من دول العامل، تبدو احلاجة ماسة اإلى توفري أنظمة التحكم يف الغبار” – “With the exacerbation of the climate change phenomenon and air pollution in many countries of the world, there is an urgent need to provide dust control systems.”
7. Saudi Cultural Events and Initiatives:
Main Theme: Promotion of Saudi culture and heritage through various events and initiatives.
Key Ideas/Facts:The Ministry of Culture participated in the Saudi Cup 2025, showcasing Saudi cultural identity and equestrian heritage.
The King Salman Global Academy for the Arabic Language launched a “Voice Mural” initiative to promote the Arabic language.
The King Abdulaziz Public Library presents an exhibition titled “The Heart of the Arabian Peninsula.”
The “ِراث” (Heritage) institute showcased traditional arts at horse races.
Celebration of “Founding Day” highlights the history and heritage of the Saudi state.
Quote: “اختتمت وزارة الثقافة مشاركتها يف كأس السعودية 2025م بتقدمي محتوى ثريٍّ يربز ما تزخر به الثقافة السعودية من غنًى ثق�يفٍّ وتراثي” – “The Ministry of Culture concluded its participation in the Saudi Cup 2025, presenting rich content that highlights the richness of Saudi culture in cultural and heritage aspects.”
8. Sports:
Main Theme: Various sports events and competitions.
Key Ideas/Facts:Coverage of the Saudi League matches and team performances.
The Saudi national beach soccer team is preparing for the Asian Cup in the UAE.
Conclusion:
The sources paint a picture of a region grappling with complex political, economic, and social issues, while also highlighting efforts to promote culture, innovation, and sustainability. Saudi Arabia is presented as a key player in humanitarian aid, regional diplomacy, and cultural preservation. The economic discussions reveal the challenges and opportunities related to energy markets and environmental concerns.
Saudi Arabia: Humanitarian Efforts, Public Sector, and Global Impact
Frequently Asked Questions
1. What is the main focus of Saudi Arabia’s international humanitarian efforts? Saudi Arabia’s international humanitarian efforts, guided by Islamic values, focus on providing support to countries facing crises and disasters worldwide. This includes financial aid, such as the over $100 million provided to various nations, and the establishment of the King Salman Humanitarian Aid and Relief Centre (KSRelief), which has executed over 3,000 projects totaling over $7 billion, assisting millions in over 100 countries.
2. How does the King Salman Humanitarian Aid and Relief Centre (KSRelief) operate? KSRelief aims to alleviate suffering globally, irrespective of religion, race, or location. It offers aid and stands by countries in need while minimizing losses, adopting a consistent Saudi approach.
3. What is the significance of the Public Sector Excellence Forum 2025? The Public Sector Excellence Forum 2025 in Riyadh aims to promote specialized dialogue and review successful experiences in addressing fundamental challenges in the public sector. The forum emphasizes effective governance and sustainable impact through digital transformation, sustainability, artificial intelligence, and leadership in risk management.
4. What are the key issues facing Saudi Arabia, and how are they being addressed? Saudi Arabia focuses on human rights issues, including the rights of women and the need to end the Israeli occupation of Palestinian territories. These issues are brought to the forefront in discussions with international counterparts and are addressed through initiatives and policies aimed at fostering equality and justice.
5. What steps are being taken to preserve and promote Saudi Arabia’s cultural heritage? Saudi Arabia is actively preserving and promoting its cultural heritage through initiatives like the “Year of Handicrafts 2025,” showcasing traditional crafts, historical exhibitions, and cultural festivals. Events like the Saudi Cup 2025 incorporate cultural elements to highlight the Kingdom’s rich history and traditions.
6. What impact could the resurgence of Russian gas in the European market have on the global gas market and Asian economies? The return of Russian gas to the European market could ease global competition for liquefied natural gas (LNG), potentially leading to lower LNG prices. This shift could benefit Asian economies, especially those heavily reliant on LNG, like Japan, China, and India, by reducing energy costs and boosting industrial competitiveness. Morgan Stanley projects LNG prices in Asia could decline to $9.5 – $10 per million British thermal units by 2026.
7. How are rising concerns about climate change and air pollution affecting the market for dust control systems? Increasing awareness of the health risks associated with air pollution and stringent environmental regulations are driving growth in the dust control systems market. The global market is projected to reach $17.7 billion in 2025, with further growth anticipated due to increased industrial activities and infrastructure projects.
8. How is Saudi Arabia working to combat corruption and promote transparency? Saudi Arabia is committed to combating corruption and promoting transparency, as evidenced by its inclusion among the leading countries in integrity, as ranked by international organizations. The Kingdom emphasizes the importance of transparency and accountability and actively works with international bodies to implement anti-corruption measures and ensure the effective use of financial aid.
Global Humanitarian Aid Initiatives
The international community is working to achieve goals that enhance the use of modern technologies in humanitarian aid, improve mechanisms for dealing with humanitarian aid and supply chains, and address displacement in conflicts and disasters. The importance of these efforts is underscored by unprecedented challenges resulting from wars and military conflicts, which require more efficient and innovative responses.
Entities involved include:
The United Nations and its humanitarian organizations.
Governments, civil society, international institutions, and organizations.
Donor communities from the public and private sectors.
These groups are collaborating to ensure humanitarian aid reaches those in need. الدكتور عبد الله بن عبد العزيز الربيعة, Supervisor General of the King Salman Center for Relief and Humanitarian Aid, has appealed to all countries to provide the necessary support to improve the efficiency and speed of humanitarian response.
Humanitarian Aid: Delivery, Challenges, and Cooperation
Humanitarian aid is a key topic in the sources, with an emphasis on improving its delivery and effectiveness.
Key aspects of humanitarian aid discussed are:
The Role of Forums and رسالة (Messages): Forums, such as the Riyadh International Humanitarian Forum, serve as opportunities to discuss challenges and strategies for humanitarian action. They emphasize the importance of cooperation and coordination between governments, civil society, international organizations, and the private sector to ensure aid reaches those in need.
Improving Aid Delivery: There is a focus on enhancing the efficiency and speed of humanitarian responses, as well as utilizing modern technologies. This includes improving mechanisms for dealing with humanitarian aid and supply chains to address displacement caused by conflicts and disasters.
Challenges and Responses: Societies face unprecedented challenges due to wars and military conflicts, necessitating more effective and innovative humanitarian responses.
The King Salman Center for Relief and Humanitarian Aid: This center plays a leading role in providing humanitarian work to those in need around the world, offering both urgent and planned relief. The Supervisor General of the Center, Dr. Abdullah bin Abdulaziz Al Rabeeah, has appealed to countries to support humanitarian efforts.
The significance of effective humanitarian diplomacy in coordinating efforts and reinforcing humanitarian responses, with the goal of overcoming humanitarian challenges through commitment to the principles of international humanitarian law.
The necessity of finding radical solutions to humanitarian crises, enhancing cooperation, sharing information, and bridging the gap between humanitarian needs and available resources.
The Importance of Forums in Humanitarian Action
Forums are important for discussing challenges and strategies for humanitarian action. They highlight the necessity of cooperation and coordination among governments, civil society, international organizations, and the private sector to ensure aid reaches those in need.
Additional details regarding the importance of forums:
Platforms for Discussion: Forums serve as platforms to discuss challenges and strategies for humanitarian action.
Coordination and Cooperation: They emphasize the importance of cooperation and coordination between various entities to ensure aid reaches those in need.
Efficiency and Innovation: Forums like the Riyadh International Humanitarian Forum seek to improve the efficiency and speed of humanitarian responses, as well as promote the use of modern technologies in aid delivery.
Addressing Global Challenges: They address challenges arising from wars, conflicts, and disasters, requiring effective and innovative responses.
Diplomacy: Forums underscore the significance of effective humanitarian diplomacy in coordinating efforts and reinforcing humanitarian responses. They aim to overcome humanitarian challenges through commitment to international humanitarian law principles.
Sudan Army: Conflict with RSF and Potential Alliances
The sources discuss the Sudanese army in the context of the ongoing conflict in Sudan. Since April 2023, Sudan has been experiencing warfare between the Sudanese army and the Rapid Support Forces (RSF).
Key points from the sources include:
Conflict with RSF: The Sudanese army is engaged in a conflict with the Rapid Support Forces (RSF), resulting in significant casualties and a large number of displaced persons.
Allegations of Human Rights Violations: The conflict has led to severe and widespread human rights violations.
Possible Loss of Khartoum: It appears the Sudanese army is on the verge of losing the capital, Khartoum, to the RSF.
Potential Alliance with the SPLM-N: There was a potential third party to the conflict, the Sudan People’s Liberation Movement-North (SPLM-N), led by Abdelaziz al-Hilu. Recent reports suggest that the SPLM-N may align with the RSF to form a parallel government in RSF-controlled areas.
Impact of External Support: The RSF may gain a border outlet and access to support from East African countries due to a potential alliance.
Dust Control in Mining Operations: Solutions and Implementation
Dust control is discussed in the sources in the context of mining operations. There’s a growing demand for chemical materials to suppress dust in mining, which is increasing awareness about worker safety and health within the mining industry.
To address this, there’s work being done to implement effective dust control measures. This includes:
Developing advanced and smart solutions for dust control
Integrating automation and monitoring capabilities
Remote maintenance of operations
These efforts are in response to the environmental impact on soil and water systems caused by dust.
Affiliate Disclosure: This blog may contain affiliate links, which means I may earn a small commission if you click on the link and make a purchase. This comes at no additional cost to you. I only recommend products or services that I believe will add value to my readers. Your support helps keep this blog running and allows me to continue providing you with quality content. Thank you for your support!
The provided text analyzes India’s 2024 election results, particularly focusing on the performance of the BJP and its leader, Narendra Modi. It examines the BJP’s reduced seat count compared to previous elections and attributes this to factors like the waning influence of the Ram Temple issue and the unification of opposition parties. The article also discusses the impact of campaign slogans and negative propaganda on voter behavior. Furthermore, it assesses the BJP’s performance across various states and the roles of alliance partners in forming the government. The author suggests that the BJP’s perceived arrogance and failure to engage with allies contributed to their setback. Ultimately, the text reflects on the challenges and compromises Modi’s government will face in its third term, with a need to balance its agenda with the demands of coalition partners.
Indian Elections 2024: Analysis and Aftermath
Study Guide
This study guide is designed to help you review and understand the key themes and arguments presented in the provided text excerpts regarding the 2024 Indian elections. It covers major political parties, voting patterns, social issues, and the implications of the election results.
Key Topics
The BJP and Narendra Modi: Analyze the BJP’s performance, the impact of Narendra Modi’s leadership, and the slogan of “crossing 400.”
The Opposition Alliance (India Alliance): Examine the role of the India Alliance, particularly the Congress party and Rahul Gandhi, in challenging the BJP.
Uttar Pradesh (UP): Understand the significance of UP in Indian politics and how the BJP’s performance in UP affected the overall election results.
Social and Religious Issues: Explore the influence of religious tensions, caste dynamics, and social issues on voter behavior and election outcomes.
Election Promises and Propaganda: Analyze the promises made by various parties and the impact of negative propaganda during the election campaign.
Coalition Politics: Understand the importance of coalition partners and their influence on the formation and stability of the government.
The Role of Key Figures: Reflect on the influence of political figures like Sonia Gandhi, Akhilesh Yadav, and others on the election results.
Quiz
Answer the following questions based on the provided text excerpts in 2-3 sentences each.
What was the main reason cited in the text for the BJP’s seat reduction in Uttar Pradesh during the 2024 elections?
How did the construction of the Ram Temple affect the BJP’s political strategy, according to the text?
Why is Uttar Pradesh considered a “mini Hindustan” in the context of Indian politics?
What was the significance of the Amethi seat in Uttar Pradesh, and how has its political representation changed in recent elections?
According to the text, what was the adverse effect of BJP’s slogan of crossing 400 in the 2024 elections?
How did the opposition parties attempt to use the slogan of “400 crossed” against the BJP during the election campaign?
According to the text, in which states BJP could not win even a single seat?
Why did Prime Minister Narendra Modi find it necessary to address concerns about changing the constitution during the election campaign?
According to the text, what is the importance of coalition partners, like Nitish Kumar and Chandrababu Naidu, for the Modi government?
How does the author characterize Narendra Modi’s personal image and its contrast with his political actions?
Quiz Answer Key
The main reason for the BJP’s seat reduction in UP was the decline in the appeal of the Ram Temple after its construction and the unity of the India Alliance, which emphasized social issues over religious tensions.
The construction of the Ram Temple was seen as the expiration of an “old card of the oppressed class,” suggesting that it had diminishing returns in mobilizing voters.
Uttar Pradesh is considered a “mini Hindustan” because it is a significant cultural center of India, reflecting the diverse political and social landscape of the entire country.
The Amethi seat was traditionally a stronghold of the Nehru-Gandhi family, but the BJP has successfully contested and won this seat in recent elections, marking a shift in political allegiances.
The slogan of “crossing 400” led to voter complacency among BJP supporters, as many believed victory was assured regardless of their participation.
Opposition parties used the slogan of “400 crossed” to propagate the idea that the BJP would alter the constitution and eliminate protections for minorities and weaker sections.
According to the text, the BJP or the ruling alliance could not win even a single seat in Tamil Nadu and Punjab.
Prime Minister Modi found it necessary to address concerns about changing the constitution to counter the negative propaganda spread by the opposition, who claimed the BJP would undermine secular values and harm weaker sections.
Coalition partners like Nitish Kumar and Chandrababu Naidu are important for the Modi government because they provide crucial support in parliament and regional influence, strengthening the ruling alliance’s position.
The author characterizes Modi as presenting himself as a “fakir” but notes a contrast between this image and his lifestyle, suggesting that his actions sometimes contradict his claims of simplicity and devotion.
Essay Questions
Consider these essay questions to further develop your understanding of the text.
Analyze the factors contributing to the BJP’s performance in the 2024 Indian elections, considering both its successes and setbacks as highlighted in the text.
Discuss the role of social and religious issues in shaping the outcome of the 2024 Indian elections, using specific examples from the text to support your claims.
Evaluate the strategies employed by the opposition alliance (India Alliance) in challenging the BJP, and assess the effectiveness of these strategies based on the election results.
Examine the significance of Uttar Pradesh in Indian politics and analyze how the election results in UP influenced the overall outcome of the 2024 elections.
Critically assess the impact of election promises and propaganda on voter behavior during the 2024 Indian elections, providing examples from the text to illustrate your arguments.
Glossary of Key Terms
BJP (Bharatiya Janata Party): A major political party in India, often associated with Hindu nationalism.
India Alliance: A coalition of opposition parties formed to challenge the BJP in the 2024 elections.
Uttar Pradesh (UP): A state in northern India with significant political influence due to its large population and representation in parliament.
Ram Mandir: A Hindu temple in Ayodhya, a controversial site that has been a central issue in Indian politics.
Dalit: A term used for historically marginalized communities in India, formerly known as “untouchables.”
Hindu Rashtra: An ideology advocating for India to be a Hindu nation, often associated with Hindu nationalist groups.
Sabka Saath Sabka Vikas: A slogan meaning “Together with all, development for all,” used by Narendra Modi to promote inclusive growth.
Lok Sabha: The lower house of the Indian Parliament.
Negative Propaganda: The spreading of information, often biased or misleading, to damage the reputation of an opponent.
Coalition Politics: A system where multiple political parties form a government together, requiring compromise and negotiation.
2024 Indian Election Analysis: BJP’s Diminished Mandate
Okay, here’s a briefing document summarizing the main themes and important ideas from the provided text about the 2024 Indian elections.
Briefing Document: Analysis of 2024 Indian Election Results
Source: Excerpts from “Pasted Text”
Date: October 26, 2023 (Assumed based on request date)
Subject: Analysis of 2024 Indian Election Results and the Implications for the Modi Government
Executive Summary:
The provided text analyzes the 2024 Indian election results, focusing on the performance of the BJP (Bharatiya Janata Party) and the opposition alliance. The document argues that while the BJP secured a third term, it suffered significant setbacks compared to previous elections. Several factors are cited, including the diminishing appeal of religious polarization after the Ram Temple construction, the unity of the opposition alliance, and the impact of negative campaigning. The briefing also discusses the challenges and compromises the Modi government will face in its third term due to its reduced majority and reliance on coalition partners. The document also makes commentary on the persona and image of Modi.
Key Themes and Ideas:
BJP’s Diminished Victory:
The text highlights the BJP’s decreased seat count in Uttar Pradesh (UP), a crucial state, attributing it to a shift away from religious fervor after the Ram Temple’s construction. “Its seats have come down to just 36 and the main reason for this is that the Ram temple, which raised the radical Hindu mindset, has lost its charm with the construction of the temple.”
The rise of the opposition alliance, especially in UP, is credited to addressing social issues rather than religious tensions. “…the unity of India Alliance, Akhilesh Yadav’s Samajwadi Party and Rahul’s Congress Party has given the people of UP the verdict that our real issue is the social issues and not the religious tension.”
Despite being the single largest party with 240 seats, the BJP fell short of the 272 required for a majority.
The Role of Uttar Pradesh (UP):
UP is emphasized as a culturally and politically significant region, likened to Punjab’s importance in Pakistan’s politics. “Uttar Pradesh is such a cultural center of the whole of India that we can also call it a mini Hindustan. Just as in Pakistan it is said about Punjab that it is necessary to establish a foothold in Punjab for the rule of Islamabad, similarly in India it is generally said that Delhi has been the throne or the 100th seat or the vicinity and the Indian Lok Sabha The maximum number of 80 seats are here.”
The BJP’s reduced presence in UP is seen as a major blow, signaling a broader shift in political sentiment.
Impact of the Ram Temple:
The text suggests that the Ram Temple issue, a long-standing point of contention, may have lost its political potency. “Thus, with the construction of Ram Mandir or Temple, the old card of the oppressed class expired.”
While the temple’s construction initially benefited the BJP, it may have also contributed to a sense of complacency among its supporters.
Opposition’s Strategy and Messaging:
The opposition, particularly Rahul Gandhi and the India Alliance, effectively used negative campaigning, warning about the BJP’s alleged plans to change the constitution and undermine secular values. “Rahul Gandhi and the opposition leadership were found giving this statement in every speech that 400 crossed means that BJP will change the Constitution i.e. Indian law given by our elders or founding fathers, in which there is no provision for intellectuals and weaker sections.”
This messaging resonated with farmers, Jats, Dalits, and Muslims, leading to a consolidation of votes against the BJP.
Challenges for the Third Modi Government:
The reduced majority necessitates reliance on coalition partners, potentially leading to compromises and internal tensions. “They will also have to bear the tantrums of their own people. From the division of offices in the cabinet to their power in the states, they will have to take care of it.”
The text mentions specific challenges related to accommodating the demands of coalition partners like Nitish Kumar in Bihar and Chandrababu Naidu in Andhra Pradesh.
Analysis of Modi’s Image and Slogans:
The text criticizes Modi’s image as a “fakir” (ascetic), arguing that his lifestyle doesn’t align with this portrayal. “Narendra Modi also presents himself as a fakir in the market, but his living style often does not match his claim.”
The slogan of “crossing 400” is deemed an exaggerated claim that led to complacency among BJP voters and fueled opposition propaganda.
Important Facts:
In 2014 and 2019, BJP won 71 and 62 seats respectively in UP. In 2024, it won 36 seats.
The BJP secured 240 seats alone, against the 272 majority and against the India Alliance’s 232.
The ruling alliance (NDA) has won 294 seats.
The BJP lost seats in several states, including Rajasthan, Haryana, and Maharashtra, but gained ground in Gujarat, Orissa, and Madhya Pradesh.
Quotes:
“If we take a look at this scenario, then the political awareness of the Indian people has proved to be better than ours.”
“This time the slogan of crossing 400 was also an exaggerated slogan of its own…”
“In today’s India, Mahatma You can rid yourself of Gandhi’s ideas as much as you want, but many of the ideals of this saint have originated from the ancient Hindu society and culture, in which the simplicity of Hindu religion, the intellectualism and greatness are displayed.”
“… this is done by the Congress which shows the identity or division of sects in the name of religion. We talk of national unity by bringing everyone together.”
Conclusion:
The 2024 Indian elections represent a significant shift in the political landscape. While the Modi government secured a third term, it faces considerable challenges due to its diminished majority, the rise of a united opposition, and the need to accommodate coalition partners. The election results suggest a cooling of religious fervor as a dominant political force and a greater focus on social and economic issues. The effectiveness of negative campaigning in mobilizing opposition votes also presents a new dynamic in Indian politics. The Modi government’s success in its third term will depend on its ability to navigate these challenges and adapt to the changing political realities.
Indian Elections 2024: BJP Performance and Political Analysis
Here is an 8-question FAQ based on the provided text, formatted in markdown:
1. What was a key takeaway from the recent Indian elections regarding the BJP’s performance compared to previous elections?
While the BJP secured a third term, they experienced a significant setback compared to the 2014 and 2019 elections. Their seat count in Uttar Pradesh (UP), a crucial state, dropped considerably. This suggests a shift in voter priorities away from solely religious issues to broader social concerns.
2. What factors contributed to the BJP’s diminished performance in the 2024 elections, particularly in Uttar Pradesh?
Several factors played a role. The construction of the Ram Temple, a long-standing issue, seemingly lost its appeal as a primary motivator for voters. The unity of the India Alliance (including Akhilesh Yadav’s Samajwadi Party and Rahul Gandhi’s Congress Party) successfully highlighted social issues over religious tension. The perception of arrogance stemming from the BJP’s past electoral success might have also alienated potential allies and contributed to voter apathy.
3. How did the slogan “crossing 400” impact the election results, according to the source?
The “crossing 400” slogan, referring to a target of winning over 400 seats, had a mixed effect. It potentially led to complacency among some BJP voters who felt victory was assured, resulting in lower voter turnout. Conversely, it fueled the opposition’s narrative that the BJP aimed to alter the Constitution, mobilizing certain segments of the population, particularly marginalized communities, to vote against them.
4. What role did negative propaganda play in the election outcome?
The negative propaganda spread by the opposition, focusing on the alleged threat to the Constitution and the rights of marginalized communities if the BJP secured an overwhelming majority, resonated with some voters. Despite Prime Minister Modi’s attempts to dispel these concerns, the propaganda proved effective in mobilizing opposition support.
5. Which regions in India showed mixed results for the BJP?
Several states exhibited mixed results, including Punjab, Haryana, Kashmir, Rajasthan, Maharashtra, West Bengal, Kerala, Tamil Nadu, Karnataka, and Jharkhand. In some, like Tamil Nadu and Punjab, the BJP or its alliance failed to win any seats. In others, like Rajasthan and Haryana, the BJP lost a significant number of seats despite previous strong performances. Maharashtra saw a significant win for the opposition alliance.
6. How do regional parties and alliances impact the stability of the Modi government moving forward?
The BJP’s reliance on alliances with regional parties like Nitish Kumar’s Janata Dal in Bihar and Chandrababu Naidu’s Telugu Desam Party in Andhra Pradesh will require careful management. These parties, while supporting the Modi government, will likely demand concessions and influence policy decisions, potentially leading to internal tensions and challenges to the government’s agenda.
7. What lesson should the BJP learn, based on the author’s analysis of other countries’ political history?
The author suggests that the BJP should learn from the mistakes of other countries where religion has been used for political purposes, leading to societal division and ultimately, negative consequences. They argue that focusing solely on religious issues may have a short-term benefit but can ultimately undermine social cohesion and political stability.
8. What aspects of Mahatma Gandhi’s ideals does the author believe are still relevant in contemporary Indian politics?
The author emphasizes the continuing relevance of Mahatma Gandhi’s ideals of simplicity, service, and devotion, rooted in ancient Hindu society and culture. They suggest that Prime Minister Modi’s public image as a humble “fakir” (ascetic) should align more closely with his actual lifestyle and actions to resonate authentically with the Indian public.
2024 Indian Election: BJP’s Reduced Majority and Opposition Gains
The Indian elections have seen the BJP, led by Narendra Modi, secure a third term, but with a reduced majority. Here’s a breakdown:
2024 Election Results: The BJP won 240 seats, making it the single largest party in the Lok Sabha, which has 543 seats. To form a government, 272 seats are needed. The ruling alliance secured 294 seats, while the opposition alliance has 232.
Setback for BJP: Despite efforts, the BJP’s seat count decreased significantly in the 2024 elections. In Uttar Pradesh, their seats fell from 62 in 2019 to 36 in 2024.
Reasons for the outcome:Diminished Ram Mandir effect: The construction of the Ram Temple, which initially fueled a radical Hindu mindset, lost its charm.
Opposition Unity: The alliance between Akhilesh Yadav’s Samajwadi Party and Rahul Gandhi’s Congress Party shifted focus to social issues rather than religious tensions in Uttar Pradesh.
Negative Propaganda: The opposition successfully spread negative propaganda, which resonated with groups of farmers, Jats, Dalits, and Muslims. Concerns were raised that the BJP would change the constitution.
Overconfidence: The BJP’s slogan of “crossing 400” led to complacency among voters, resulting in lower voter turnout.
Regional Variations: The BJP experienced a mixed situation across different states.
Losses: The BJP lost seats in states like Uttar Pradesh, Rajasthan, and Haryana. In Tamil Nadu and Punjab, the BJP or its ruling alliance failed to win any seats.
Gains: The BJP performed strongly in Gujarat, Orissa, and Madhya Pradesh.
Alliances and Dependence: The BJP will rely on its alliance partners, such as Nitish Kumar in Bihar and Chandrababu Naidu in Andhra Pradesh. These parties’ success will contribute to Modi’s government. However, accommodating their demands and concerns, from cabinet positions to state power, will be a challenge.
The Importance of Uttar Pradesh: Uttar Pradesh is a crucial state in Indian politics, often referred to as “mini Hindustan”. With its 80 Lok Sabha seats, it holds significant influence in determining who rules Delhi.
Historical Context: The Nehru-Gandhi family has traditionally held the Amethi seat in Uttar Pradesh, but the BJP has won it in the last two elections. In the 2024 election, Smriti Irani, the BJP’s face in the constituency, lost to Kishori Lal Sharma of the Congress.
Modi’s Image: Despite presenting himself as a humble person, Modi’s lifestyle and attire sometimes contradict this image. His slogan of crossing 400 also had its own humanitarian or moral value in it, which would remind of his great deeds.
Indian Election Analysis: Modi’s Third Term and Reduced Majority
The Modi government secured a third term in the recent Indian elections, but with a significantly reduced majority. Here’s an overview of the key aspects:
Election Results: In the Lok Sabha, which consists of 543 seats, the BJP won 240 seats, making it the single largest party. To form a government requires 272 seats. The ruling alliance secured 294 seats, while the opposition alliance secured 232.
Setback in Uttar Pradesh: The BJP experienced a significant setback in Uttar Pradesh (UP), a crucial state in Indian politics. Their seat count fell from 71 in 2014 and 62 in 2019 to just 36 in the 2024 elections. UP is considered a “mini Hindustan” due to its cultural significance and its 80 Lok Sabha seats.
Factors Contributing to the Election Outcome:Diminished Effect of Ram Temple: The Ram Temple construction, initially a boost for Hindu sentiment, lost its appeal.
Opposition Unity: Alliances like the one between Akhilesh Yadav’s Samajwadi Party and Rahul Gandhi’s Congress Party, successfully shifted the focus to social issues, taking attention away from religious tensions.
Concerns About the Constitution: Negative propaganda suggesting the BJP would alter the constitution resonated with farmers, Jats, Dalits, and Muslims.
Overconfidence: The BJP’s ambitious slogan of “crossing 400” led to complacency among voters and a lower turnout.
Regional Performance: The BJP’s performance varied across states. They performed strongly in Gujarat, Orissa, and Madhya Pradesh, but lost seats in Uttar Pradesh, Rajasthan, and Haryana. In Tamil Nadu and Punjab, the BJP and its allies failed to win any seats.
Reliance on Alliances: The Modi government will depend on alliance partners such as Nitish Kumar in Bihar and Chandrababu Naidu in Andhra Pradesh. Accommodating these allies and addressing their concerns regarding cabinet positions and state power will be crucial.
Challenges and Future Approach: Modi will need to showcase political strength, prioritize the slogan ‘Sabka Saath Sabka Vikas’, and avoid making blatant claims.
BJP’s 2024 Election Setback: Factors and Analysis
The BJP experienced a setback in the recent Indian elections. Despite securing a third term, the party saw a reduction in its majority.
Here’s a breakdown of the key factors contributing to this setback:
Reduced Seat Count: In Uttar Pradesh, a crucial state in Indian politics, the BJP’s seat count decreased from 62 in 2019 to 36 in the 2024 elections.
Diminished Ram Mandir Effect: The construction of the Ram Temple, which initially fueled a radical Hindu mindset, lost its charm.
Opposition Unity: The alliance between Akhilesh Yadav’s Samajwadi Party and Rahul Gandhi’s Congress Party shifted focus to social issues rather than religious tensions in Uttar Pradesh.
Negative Propaganda: The opposition successfully spread negative propaganda, which resonated with groups of farmers, Jats, Dalits, and Muslims. Concerns were raised that the BJP would change the constitution.
Overconfidence: The BJP’s slogan of “crossing 400” led to complacency among voters, resulting in lower voter turnout.
Losses in Key States: The BJP lost seats in states like Uttar Pradesh, Rajasthan, and Haryana. In Tamil Nadu and Punjab, the BJP or its ruling alliance failed to win any seats.
Indian Elections: Opposition Alliance Impact and Analysis
The opposition alliance played a significant role in the recent Indian elections, impacting the BJP’s performance.
Here’s a breakdown of the opposition alliance’s key aspects:
Unity: Alliances, such as the one between Akhilesh Yadav’s Samajwadi Party and Rahul Gandhi’s Congress Party, successfully shifted the focus to social issues, taking attention away from religious tensions. In Uttar Pradesh, this unity gave the people the verdict that their real issue is social issues and not religious tension.
Negative Propaganda: The opposition successfully spread negative propaganda, which resonated with groups of farmers, Jats, Dalits, and Muslims. They raised concerns that the BJP would change the constitution.
Seat Count: The opposition alliance secured 232 seats. Rahul Gandhi’s party won only 99 seats. Rahul’s party in India has grown from 26 to 37 seats.
Impact on BJP: In Uttar Pradesh, the BJP’s seat count decreased significantly, which is attributed in part to the unity of the opposition alliance. In Maharashtra, the opposition alliance won 30 seats.
Leadership Issues: The parties in the India alliance do not agree on leadership. There have been talks of distributing ministries every year.
Indian Elections: The Role of Religion and Social Issues
In the context of the Indian elections, religion and religious politics played a significant role, influencing outcomes and voter behavior.
Here’s a breakdown of key points:
BJP and Religious Sentiment: The BJP initially utilized the construction of the Ram Temple to fuel Hindu sentiment. However, the source suggests this appeal diminished over time.
Ram Mandir Effect: The construction of the Ram Temple initially fueled a radical Hindu mindset but lost its charm.
Opposition’s Counter-Narrative: The opposition successfully raised concerns that the BJP would change the constitution, playing on fears of the end of provisions for intellectuals and weaker sections and the establishment of “Ram Rajya” or “Hindu Rashtra”. This narrative resonated with groups of farmers, Jats, Dalits, and Muslims, leading them to gather together for protection.
Shifting Focus to Social Issues: Opposition alliances, such as the one between Akhilesh Yadav’s Samajwadi Party and Rahul Gandhi’s Congress Party, successfully shifted the focus to social issues, taking attention away from religious tensions. In Uttar Pradesh, this unity gave the people the verdict that their real issue is social issues and not religious tension.
BJP’s Defense: Prime Minister Narendra Modi attempted to counter the opposition’s propaganda by emphasizing secular values and referencing Baba Saheb Ambedkar. He insisted that his party does not intend to change the constitution and accused the Congress of dividing society in the name of religion.
Views on Using Religion for Political Purposes: One source cites an individual who expressed that the BJP leadership should learn a lesson from how religion was used for political purposes, lest they be affected the same way.
Hindutva Agenda: In Maharashtra, the Hindutva agenda of Shiv Sena matches that of BJP, but its Hinduism is more than that of BJP.
The Original Text
इंडियन इंतखाब मोदी सरकार तीसरी बार दरवेश ने पिछली किस्त में एक सवाल का जवाब देते हुए यह तहरीर किया था कि अगर उसे बीजेपी कयादत से मिलने का इफाक हुआ तो व इनसे यह जरूर कहेगा कि देखो जिस तरह हम लोगों ने अपने खिता में मजहब का सियासी इस्तेमाल करते हुए अपने मुल्क और समाज को बर्बाद कर लिया है आप लोग हमसे इबरत हासिल करो वरना आप लोगों का भी वही असर होगा इस पस मंजर में जायजा लिया जाए तो भारतीय जनता का सियासी शऊर हम लोगों से ज्यादा मोर साबित हुआ है उन्होंने हिंदुओं के खिलाफ रवा रखी जाने वाली मजहबी जातियों पर एक हद तक जरूर बीजेपी को पजरा बख्शी है जिसके कारण वह राम मंदिर का 500 साला पुराना इशू हल करने या कराने में कामयाब हो गई यूं राम मंदिर या टेंपल की तामीर के साथ ही मजलूम अत का कदीमी कार्ड एक्सपायर हो गया इस तरह बीजेपी ना सिर्फ यह कि पूरे यूपी से बल्कि फैजाबाद के खालिस अयोध्या राम मंदिर वाले राम जीी कलके से भी अखिलेश सिंह यादव की समाजवादी पार्टी के दलित नुमाइंदे से बुरी तरह पिट गई है इसके बिल मुकाबल राय बरेली के ब यों ने जिन्हें श्रीमती सोनिया गांधी ने यह कहा था कि राहुल गांधी अब तुम्हारा बेटा है भारी मैंडेट के साथ जितवा दिया है इसी तरह यूपी के अमेठी वाली सीट रवायत तौर पर नेहरू गांधी परिवार के पास चली आ रही थी श्रीमती इंदिरा गांधी भी यहीं से जीता करती थी राजीव गांधी भी यहां से लड़ते रहे लेकिन पिछले दोनों इंतखाब में बीजेपी ने कांग्रेस से यह सीट भी छीन ली है साबका अदाकारा स्मृति ईरानी जिन्हें बीजेपी का चेहरा कर दिया जाता है जिन्होंने कुछ अरसा कबल मदीना यात्रा भी की थी और पिछले इंतखाब से ये सीट इन्हीं के पास थी मगर मौजूदा 2024 के इलेक्शन में वो सोनिया गांधी के मैनेजर या स्टेनो किशोरी लाल शर्मा से बड़े मार्जन के साथ हार गई है उत्तर प्रदेश खिता हिंद का ऐसा तहजीब गहवारा है जिसे हम मिनी हिंदुस्तान भी कह सकते हैं पाकिस्तान में जिस तरह पंजाब के मुतालिक कहा जाता है कि इस्लामाबाद की हुकूमत के लिए पंजाब में कदम जमाना जरूरी है इसी तरह भारत में बिल अमोम यह कहा जाता है कि दिल्ली सिंघासन या इक्दर्म या आसपास रही है और भारतीय लोकसभा की सबसे ज्यादा 80 सीटें यहां हैं बीजेपी को 2014 के चुनाव में यहां से 7171 सीटों पर कामयाबी मिली थी और 2019 के इंतखाब में भी हसबे साबिक यह तादाद योगी आदित्यनाथ की कयादत में 62 थी जबकि इस मर्तबा 2024 के चुनाव में बीजेपी को तमाम तर खिदमा और दामों के बावजूद बड़ा सेटबैक पहुंचा है इसकी सीटें घटकर महत 36 रह गई हैं और इसकी बड़ी वजह जहां यह है कि र वायती हिंदू माइंडसेट को उभारने वाला राम मंदिर कार टेंपल की तामीर के साथ ही अपनी कशिश खो बैठा है वहीं इंडिया अलायंस बिलख सूस अखली देश सिंह यादू की समाजवादी पार्टी और राहुल की कांग्रेस पार्टी की एकता से यूपी की जनता ने यह फैसला सुना दिया है कि हमारा असल इशू माशी मसाइल है ना के मजहबी तंग नाए कुछ इसी तरह की मिलीजुली सूरत हाल दीगर राज्यों सूबों या रियासतों की है पंजाब हरियाणा कश्मीर राजस्थान महाराष्ट्र वेस्ट बंगाल केराला तमिलनाडु कर्नाटका झारखंड में बीजेपी अपनी सियासी हैसियत कहीं कम कहीं ज्यादा खो बैठी है बिलख सूस तमिलनाडु और मशर की पंजाब से तो बीजेपी या हुक्मरान इतहाद कोई एक सीट भी हासिल नहीं कर सके राजस्थान और हरियाणा जहां बीजेपी ने क्लीन स्वीप किया था वहां भी निस सीटें खो बैठी है महाराष्ट्र की 30 सीटें अपोजिशन अलायंस ने जीत ली हैं अलबत्ता बिहार में हुक्मरान इतहाद ने 30 और अपोजिशन ने नौ सीटें जीती हैं गुजरात उड़ीसा मध्य प्रदेश में अलबत्ता बीजेपी मजबूत हैसियत में उभरी है आंध्र प्रदेश में गेंद चंद्र बाबू नाडो के हाथ में है जो मोदी के मजबूत इतहाद गल दने जाते हैं इस तरह बिहार में नितेश कुमार की मजबूत पोजीशन का फायदा मोदी सरकार को पहुंचेगा और शरद पवार की कामयाबी भी मोदी के खाते में जाएगी यहां इस अमर का इजहार भी शायद मौजू हो कि बीजेपी की जरूरत से ज्यादा बढ़ी हुई खुद इत मादी एक तरह के गुरूर तक पहुंच गई थी इसलिए उन्होंने अपने तहा दियों को भी या कई दीगर असर सूफ वाली पार्टियों को साथ जोड़ने में कोई सरगर्मी ना दिखाई जिसकी एक मिसाल पंजाब में अकाली दल है जबकि इंडिया नामी राहुल का अलायंस 26 जमां से बढ़ते हुए 37 तक चले गया और फिर उन्होंने जो इंतखाब वादे किए वो ऐसे थे कि जैसे एक शख्स को अपनी जीत का यकीन ना हो और वह हर बात को बढ़ा चढ़ाकर बयान करता चला जाए मसलन यह कि हर गरीब खातून को ₹ लाख अकाउंट में भेजने या फौरी तौर पर मुल्क से फटाफट गरीबी खत्म करने के लनात और फिर इनका इतहाद ऐसा चूचू का मुरब्बा है जिसका स्वाय बीजेपी से हसद या जलन के कोई मुस्त एजेंडा नहीं है इनका तो अभी तक कयादत पर भी इत्तफाक नहीं हत्ता कि विजारत उजमा भी एक-एक साल पर बांटने की बातें होती रही हैं खोखले वादे झूठी उम्मीदें पैदार और मजबूत कयादत नहीं ला सकती 2014 और 2019 के बिल मुकाबल बिला शुभ बीजेपी को इलेक्शन 2024 में सेट बैक पहुंचा है अबकी बार 400 पार का नारा भी जरूरत से बढ़ी हुई खुद इत मादी का मजहर था मगर हमारे मीडिया में बिल मूम बीजेपी और मोदी की वाज जीत को जिस तरह मनफी प्रोपेगेंडा जा रहा है यह तर्ज अमल भी सावती दियानत दारी के जिमरे में नहीं आता है 543 के लोकसभा आवान में हुकूमत साजी के लिए 272 सीटें दरकार हैं और की बीजेपी 37 जमाती अलायंस के बिल मुकाबल तन्हा 240 निशि हासिल करते हुए सिंगल लार्जेस्ट पार्टी की हैसियत से उभरी है जबकि इसके सामने राहुल गांधी की कांग्रेस पार्टी 999 से आगे नहीं बढ़ पाई अलायंस के हवाले से भी जहां हुक्मरान इतहाद ने 294 निशि जीती है वहां अपोजिशन इतहाद की कुल सीटें 232 हैं ऐसे में अपोजिशन के हुक्मरान या मोदी के जवाल की बातें बेमानी है जिन्हें अब अपने नारे सबका साथ सबका विकास पर बिल फेल ज्यादा तवज्जो देते हुए अटल बिहारी वाजपेई की सियासी दम और बड़े पन का मुजहरा करना होगा प्राइम मिनिस्टर मोदी की जरूरत से ज्यादा खुद त मादी को हका शनास में लाना होगा ब्लं बांग दावों से परहेज करना होगा आज के भारत में महात्मा गांधी के विचारों से आप जितनी चाहे जान छुड़ा ले लेकिन इस साधु के बहुत से आदर्श कदीमी हिंदू समाज और तहजीब से फूटे हैं जिनमें हिंदू मत की सादगी वस्ते कल्बी वुसी नजरी और बड़ा पन नुमाया तर है नरेंद्र मोदी भी बजार खुद को एक फकीर के रूप में पेश करते हैं मगर इनका लिविंग स्टाइल अक्सर इनके दावे से मेल नहीं खाता वो कहते हैं कि मैं पीएम की की हैसियत से जब गैरों को मिलता हूं तो मैं इस वक्त मोदी नहीं हो 1 अरब 40 करोड़ की जनता का नुमाइंदा बनकर वकार और डिग्निटी दिखाता हूं जो हमारी नजर में बाज औकात कुछ आगे तक पहुंची होती है और फिर वह रंग बंगी जितनी जैकेट्स बदलते और बढ़िया लिबास के लिए मुत फक्कर रहते हैं ये अप्रोच इंडियन समाज की सेवा और भक्ति भरे आदर्शों के खिलाफ हैं आपकी बार 400 पार के नारे ने भी अपना मुसब्बर नाजर में इसकी कोई मानवीय या मक दियत वाजिया होती जो इनके बहुत बड़े कारनामों की याद दिलाता इंडियन इंतखाब तारीख में 400 पार तो महज एक मर्तबा हुआ है जब श्रीमती इंदिरा गांधी अपने देश की एकता और रिक्शा पर कुर्बान हो गई तो बदले में राजीव गांधी को 404 या 400 पार हुए बीजेपी यह नारा भी रख सकती थी कि तीसरी बार मोदी सरकार बहरहाल जब 400 पार की गूंज दिमाग में छाई हुई थी तो बहुत से अपनों ने यह समझा कि हमारी जीत तो इस कदर यकीनी है कि अगर इतनी शदीद गर्मी में हम वोट डालने ना भी गए तो कोई बात नहीं जीत तो मोदी ने ही जाना है 400 पार ना हुए तो 350 पार हो जाएंगे यही वजह है कि 2024 के इलेक्शन में वोटिंग रेशो निसन कदर कम रही शायद 60 पर से ऊपर नहीं जा सकी बीजेपी का वोटर साबका इनमार्क से नहीं निकला दूसरी तरफ इस नारे का मुखालिफ असर यह हुआ कि राहुल गांधी और अपोजिशन कयादत अपनी हर तकरीर में यह तश्वी बयान करते पाए गए कि 400 पार का यह मतलब है कि बीजेपी हमारे बड़ों या फाउंडिंग फादर्स का दिया हुआ अजमु शन संविधान यानी भारतीय आईन बदल डालेगी जिसमें अकली तों और कमजोर तबकात को दिए गए तजत खत्म हो जाएंगे राम राजिया या हिंदू राष्ट्रिय से बचने के लिए तमाम कमजोर तबकात को उठ खड़े होना चाहिए वरना बीजेपी और नरेंद्र मोदी की आमनियन कायम होने जा रही है अगर हकीकत की नजर से देखा जाए तो किसान जाटों दलितों और मुसलमानों के खद शत इस हवाले से तहफ्फुज या बचाओ की खातिर इकट्ठे हो गए और इलाकाई पार्टियों ने भी अपना असर दिखाया प्राइम मिनिस्टर नरेंद्र मोदी को इस हवाले से फैलाए गए खद शत के मुजम का एहसासो द्राक हो चुका था और उन्होंने अपनी इलेक्शन कैंपेन के आखिरी मराल में इस हवाले से खूब वजाहत की हर जगह यह कहा कि हम संविधान या आईन बदलने का कोई इरादा नहीं रखते और यह भी कि हम सेकुलर वैल्यूज को बड़ी अहमियत देते हैं मोदी जी ने इस अमर पर इसरार किया कि यह हरकत तो कांग्रेस करती है जो धर्म के नाम पर फिरको की पहचान या तकसीम को नुमाया करती है हम तो सबको साथ मिलाकर कौमी एकता की बात करते हैं इस सिलसिले में उन्होंने बार-बार बाबा साहब अंबेडकर का रेफरेंस दिया मगर वह अपने खिलाफ फैलाए गए राहुल और इंडी अलायंस के इस मनफी प्रोपेगेंडा जिसकी कुछ ना कुछ झूठी सची बनदे बाल अपोजिशन के पास थी इन जैसे-तैसे खद शत के कारण भारतीय जनता ने अपने पॉपुलर प्रधानमंत्री को तीसरी बार दिल्ली के इक्दर्म बक में बेल फेल साहब को साथ लेकर चलना होगा अपने इतहाद हों के नखरे भी उठाने होंगे काबीना में उदों की तकसीम से लेकर राज्यों में इनकी तजत का बाल ख्याल रखना होगा महाराष्ट्र में शिव सना का हिंदुत्व का एजेंडा अगर च बीजेपी से से मेल खाता है लेकिन इसकी हिद्दी बीजेपी से ज्यादा है बाल ठाकरे जी के विचारों से कौन वाकफ नहीं है अब इनके बच्चे इसी लगन के साथ आगे बढ़ेंगे बहरहाल इनकी नौ सीटें बीजेपी की हुकूमत के लिए एक तरह से हम ख्याल अदि हों जैसी होंगी बिहार में नितेश कुमार की जनता दल के पास 12 सीटें हैं जबकि आंध्र प्रदेश में चंद्रबाबू नायडू के तलग देशम की 16 नशत मोदी सरकार के लिए मामन होंगी
Affiliate Disclosure: This blog may contain affiliate links, which means I may earn a small commission if you click on the link and make a purchase. This comes at no additional cost to you. I only recommend products or services that I believe will add value to my readers. Your support helps keep this blog running and allows me to continue providing you with quality content. Thank you for your support!
The text provides instructions on how to effectively use Microsoft PowerPoint. It guides users through creating professional-looking documents by utilizing pre-designed templates and customizing blank presentations. It emphasizes the interface, ribbon, and search functionalities of PowerPoint. The source also explains how to enhance presentations using slides, themes, and various design elements like text, images, and charts. Finally, it explores features such as rehearsing with a coach, accessibility checking, and presentation delivery tips for a polished final product.
PowerPoint Mastery: A Comprehensive Study Guide
Quiz
Instructions: Answer the following questions in 2-3 sentences each.
What are the three main components of the PowerPoint start screen, and what is the primary function of each?
What is a theme in PowerPoint, and what elements does it typically encompass?
Describe the purpose of the “Shape Format” contextual tab and how it appears in PowerPoint.
How can the eyedropper tool be used to select colors in PowerPoint, and what is its benefit?
What is the purpose of the “Stock Images” library in PowerPoint, and what types of content can be found there?
How does the Morph transition work in PowerPoint, and what are the three steps to applying it effectively?
Explain how to use the “Insert Slides from Outline” feature in PowerPoint.
What is the Slide Master, and how does it help ensure a consistent design across a presentation?
Describe the process of saving a custom theme in PowerPoint and its benefits.
What are the benefits of using the “Rehearse with Coach” feature in PowerPoint?
Quiz Answer Key
Home: Displays recent presentations and options to create or open files. New: Provides options to create a blank presentation or choose from various templates. Open: Allows users to open existing PowerPoint files from their computer or other locations.
A theme is a pre-designed set of visual elements that provides a consistent look and feel to a presentation. It typically includes fonts, colors, and effects that complement each other.
The “Shape Format” tab is a contextual tab that appears when an object like a text box, chart, or image is selected. It provides tools for formatting the selected object’s appearance, such as fill color, outline, effects, and size.
The eyedropper tool allows you to select a color from anywhere within the PowerPoint window, or even outside of it. This ensures accurate color matching and allows for consistent branding in your presentation.
The “Stock Images” library provides access to a collection of royalty-free images, icons, videos, illustrations, and stickers that can be used in presentations. It allows users to quickly find and insert visuals without searching external sources.
The Morph transition creates a seamless animation between two slides by smoothly transforming elements from one slide to the next. The three steps are: duplicate a slide, move/resize elements on the duplicated slide, and apply the Morph transition to the second slide.
The “Insert Slides from Outline” feature allows you to create a presentation based on a structured text document, like a Word document. PowerPoint uses headings in the document to create slides and populate them with content.
The Slide Master is a template that controls the overall design and layout of a PowerPoint presentation. It allows you to make universal changes to fonts, colors, and other elements, ensuring a consistent look and feel across all slides.
To save a custom theme, go to the Slide Master view, customize the fonts, colors, and effects, then click “Themes” and “Save Current Theme.” This allows you to reuse your custom design in future presentations.
“Rehearse with Coach” provides feedback on your pacing, filler words, originality, and pitch as you practice your presentation. It helps identify areas for improvement and build confidence before presenting.
Essay Questions
Discuss the importance of storytelling in presentations. How can incorporating a narrative structure improve audience engagement and retention? Provide examples of how to apply storytelling principles to different types of presentations.
Evaluate the impact of visual aids on presentation effectiveness. How can images, charts, and animations enhance understanding and memory? Provide examples of effective and ineffective uses of visual aids and explain the underlying principles.
Examine the role of the Slide Master in creating a consistent and professional-looking PowerPoint presentation. How can the Slide Master be used to customize themes, layouts, and other elements? Discuss the benefits and limitations of using the Slide Master.
Analyze the common mistakes made in PowerPoint presentations, such as information overload, poor design choices, and ineffective delivery. How can these mistakes be avoided, and what strategies can be used to create more engaging and impactful presentations?
Explore the potential of AI tools, such as co-pilot, to transform the PowerPoint presentation creation process. What are the benefits and limitations of using AI to generate slides, suggest content, and provide design recommendations?
Glossary of Key Terms
Theme: A pre-designed set of formatting choices that includes colors, fonts, and effects to provide a unified look.
Template: A pre-designed presentation file with specific layouts, themes, and sample content.
Layout: The arrangement of placeholders for different types of content (text, images, charts, etc.) on a slide.
Slide Master: A master template for the entire presentation, controlling the design and layout of all slides.
Contextual Tab: A tab that appears on the ribbon only when a specific object or feature is selected, providing relevant tools and options.
Eyedropper Tool: A tool used to select and apply a color from any part of the screen to an object or text.
Stock Images: A library of royalty-free images, icons, videos, and other visuals available for use in presentations.
Morph Transition: A transition effect that creates a seamless animation between two slides by smoothly transforming elements from one slide to the next.
Rehearse with Coach: A feature that provides feedback on your pacing, filler words, originality, and pitch during practice presentations.
Infographic: A visual representation of data or information, often using charts, graphs, and images to communicate complex ideas in an easily understandable format.
Grid lines: Nonprinting lines that you can display on a slide to help you align objects.
Ruler: A horizontal and vertical guide that helps you measure and position objects on a slide.
Guides: Nonprinting horizontal and vertical lines that help you align objects on a slide.
PowerPoint (Design): The intersections created by the “rule of thirds”, they mark locations where visual elements are the most attention grabbing.
Microsoft PowerPoint Training: From Basics to Engaging Presentations
Okay, here’s a briefing document summarizing the key themes and ideas from the provided text, with relevant quotes:
Briefing Document: Microsoft PowerPoint Training – Introduction, Advanced & Tips for Amazing Presentations
Overview:
The provided text excerpts come from a series of Microsoft PowerPoint training modules aimed at users of varying skill levels – beginner, advanced, and those seeking to improve their presentation skills. The training covers interface navigation, design principles, formatting techniques, animation, and advanced features like slide masters, infographics, and Copilot integration. It also emphasizes effective storytelling and presentation delivery techniques.
Main Themes and Important Ideas:
Comprehensive PowerPoint Skill Development:
The training progresses systematically from basic navigation and formatting to more advanced customization and design.
“We’ll navigate the PowerPoint interface, we’ll learn how to design presentations…insert and format text…images…work with objects such as text boxes, shapes, charts, tables…animation and transition features…” (Introduction Module)
“For our Advanced course, we have two modules so module 3 and module 4 for module 3 we’ll take a look at how we can customize the PowerPoint envir…we’ll take a look at how we can customize design templates it’s all about the slide Master.” (Advanced Module)
Importance of Design and Visual Appeal:
Emphasis is placed on using themes, colors, fonts, and effects to create visually engaging presentations.
“A theme is basically a set of fonts colors and [Music] effects so each theme has its own set of fonts colors and effects…” (Introduction Module)
“You don’t want it to appear flat on our canvas you want it to stand out…”(Introduction Module)
The “Designer” feature is repeatedly highlighted as a tool for quickly improving slide layouts.
Mastering the Slide Master for Consistent Design:
The slide master is presented as a crucial tool for maintaining consistent formatting and branding throughout a presentation.
“… it’s all about the slide Master we’ll save a design as a template that we can either share or reuse over and over again” (Advanced Module)
“whatever changes I make to this slide, it’s going to affect all of my slides regardless of what type of layout it is…” (Advanced Module)
Leveraging SmartArt for Visual Communication:
SmartArt graphics are showcased as a way to create visually appealing infographics within PowerPoint.
“…no need to search the web for infographics we can make our own there’s an extensive library of capabilities right here inside of Microsoft PowerPoint” (Advanced Module)
The importance of managing SmartArt via the text pane is emphasized for precision and control.
Animation and Transitions for Dynamic Presentations:
Animation and transitions are covered as ways to add visual interest and control the flow of information.
“We’ll actually insert and manage tables charts then we’ll take a look at some of the animation and transition features just to make your presentation more Dynamic and responsive” (Introduction Module)
The “Morph” transition is presented as an advanced technique for creating visually stunning effects.
Importance of using animation to avoid overwhelming the audience with too much information at once.
Effective Presentation Delivery:
Tips are provided for effective presentation delivery, including the use of Presenter View and avoiding common mistakes.
Emphasizes that the aim is going from boring to engaging: “The story that we want to tell is well how can we go from boring to [Music] engaging so how can we go from a boring presentation to engaging presentations…” (Tips module)
Recommends practicing via the rehearsal coach to improve presentation.
Copilot Integration for Enhanced Productivity:
The training highlights the integration of Microsoft Copilot for generating presentations, adding slides, and asking questions about content.
Co-pilot can “…create a presentation from scratch with just a sentence” or “…create a presentation based off of a file.”
Storytelling as a Guiding Principle:
Emphasizes the importance of storytelling in engaging the audience and improving information retention.
Highlights how a “simple beginning, middle, and end” enhances a presentations structure.
The Rule of Three and Visual Design:
The Rule of Three (limit concepts per slide to three) and the Rule of Thirds (positioning elements in the frame based on a grid) are presented as essential guidelines for effective slide design.
“ … we naturally understand things in threes breakfast lunch dinner morning noon and night so if we can go ahead and just kind of keep everything to then we’ll be helping our audience out” (Tips Module)
Key Quotes from the Training Modules:
“welcome to learn it training the exercise files for today’s course are located in the video description below don’t forget to like And subscribe” (Introduction Module)
“…the contextual tab is the key to formatting different objects” (Introduction Module)
“Typically you’re either choosing a picture style or you’re creating your own picture effect by choosing a shadow reflection glow and so forth and so on” (Introduction Module)
“I always use picture Styles when I insert a picture” (Introduction Module)
“Objects are things like text boxes charts tables and so forth and so on images icons shapes” (Introduction Module)
“all things cosmetic…all the tools we need to be able to manage this table…” (Introduction Module)
“Don’t want it to appear flat on our canvas you want it to stand out.” (Introduction Module)
“For our Advanced course, we have two modules so module 3 and module 4 for module 3 we’ll take a look at how we can customize the PowerPoint envir…we’ll take a look at how we can customize design templates it’s all about the slide Master.” (Advanced Module)
“no need to search the web for infographics we can make our own there’s an extensive library of capabilities right here inside of Microsoft PowerPoint” (Advanced Module)
“The very top slide is bigger than all of our other slides so in fact this is the actual slide Master” (Advanced Module)
“The story that we want to tell is well how can we go from boring to [Music] engaging” (Tips Module)
“we naturally understand things in threes breakfast lunch dinner morning noon and night so if we can go ahead and just kind of keep everything to then we’ll be helping our audience out” (Tips Module)
“People retain structured information up to 40% more reliably and accurately than information that is presented in a more free form manner.” (Tips Module)
“a huge tip right here so the rehearsal coach gives us some really nice feedback and allows us to implement some of the tips that we’ve talked about here as well” (Tips Module)
Overall:
This training series provides a comprehensive guide to using Microsoft PowerPoint effectively, covering everything from basic skills to advanced design techniques and presentation strategies. The emphasis on visual communication, consistent design, and engaging delivery makes this a valuable resource for anyone looking to create compelling and effective PowerPoint presentations. The integration of Copilot is also an important takeaway, showing the future of AI-assisted presentation creation.
PowerPoint Training: Presentation Design, Formatting, and Animation
PowerPoint Training FAQ
Here’s an 8-question FAQ based on the provided text excerpts:
What are the fundamental areas covered in a Microsoft PowerPoint introduction? The introduction covers navigating the PowerPoint interface, designing presentations, inserting and formatting text and images, working with objects (text boxes, shapes, charts, tables), and using animation and transition features.
How can you create a new presentation in PowerPoint? You can start a new presentation from the “Home” tab by finding files that you have created or created presentation as well. You can also go to the “New” tab to create a blank presentation or choose from pre-designed templates. To insert a new slide within an existing presentation, you can use the shortcut Ctrl+M (as in marry) with the slide selected, press Enter with a slide selected, or select a layout from the “New Slide” drop-down menu.
What are themes in PowerPoint, and how do they impact presentation design? Themes are sets of fonts, colors, and effects that define the overall look and feel of a presentation. Using theme colors ensures visual consistency and a professional appearance. It’s generally advised to stick with theme colors rather than using standard colors, as theme colors are designed to work harmoniously.
How can you format text within PowerPoint? Text formatting can be done by highlighting text and using the font commands on the Home tab or by selecting a content placeholder (indicated by a solid border). Font commands include bolding, italicizing, adding shadows, changing case, changing font size, changing font color, highlighting, and using bullets. The “Format Shape” tab gives access to Word Art styles and options for adding shape fills and effects to placeholders.
How do contextual tabs enhance object formatting in PowerPoint? Contextual tabs, like the “Shape Format” and “Picture Format” tabs, appear in the ribbon only when specific objects are selected (e.g., text boxes, images, charts, tables). These tabs provide relevant formatting options and tools specific to the selected object, allowing for targeted customization.
How can you insert and format images in PowerPoint? Images can be inserted from local files, the Microsoft stock image library, or online sources. Once inserted, the “Picture Format” tab provides options to apply picture styles (frames, shadows, bevels), corrections (sharpen/soften, brightness/contrast), color adjustments (recoloring, saturation), and artistic effects.
How can the eyedropper tool be used in PowerPoint, and what is it used for? The eyedropper tool, found in the “Shape Fill” or “Text Fill” menus under the “Shape Format” tab, allows you to sample a color from anywhere within the PowerPoint window or even outside the window and apply that exact color to a selected object. This is especially useful for replicating specific colors or matching colors across different elements.
How can you add animations and transitions to slides in PowerPoint? Animations can be added to individual objects on a slide through the Animations tab to reveal content sequentially, or to make a slide more dynamic. Transitions can be added between slides from the Transitions tab. The morph transition is particularly useful to morph and resize objects between two slides.
Effective Presentation Design
Presentation design involves several key elements, including storytelling, audience engagement, and avoiding common mistakes. Utilizing tools such as slide masters, custom layouts, and the accessibility checker can significantly enhance the design process.
Key aspects of presentation design include:
Storytelling: A presentation should have a clear beginning, middle, and end to guide the audience through the information.
Engagement Techniques: Incorporate activities, polls, and whiteboards to encourage audience participation and increase retention.
Visuals: Use images, icons, tables, and charts to break up text and make the presentation more engaging. Infographics can also help to present information in a concise and visually appealing manner.
Conciseness: Keep the content on each slide to a minimum, ideally sticking to three main points.
Audience Consideration: Tailor the presentation to the audience’s needs and provide key insights and summaries.
Layout and Themes: Use themes and slide masters to create a consistent and visually appealing design. Custom layouts can help to present information in a balanced and engaging way.
Accessibility: Ensure the presentation is accessible to everyone by using the accessibility checker to identify and correct any issues.
Presenter View: Utilize presenter view to have control over the content, view notes, and see upcoming slides and animations.
Font Choice and Size: Choose fonts carefully. The minimum font size should be around 20 so it’s easy to see. Use the eye dropper tool to keep the color scheme consistent for text, shapes, and text boxes.
AI Tools: Copilot and Designer can help with generating content and design ideas. The Rehearse with Coach tool offers real-time feedback on delivery.
PowerPoint Slide Master: Design and Customization Guide
The Slide Master is a powerful tool in PowerPoint that allows you to control the overall look and feel of your presentation. It enables you to make universal changes to your entire presentation, ensuring a consistent design across all slides.
Key functionalities and benefits of using the Slide Master:
Universal Design Changes: By modifying the slide master, you can change the fonts, colors, backgrounds, and effects for all slides simultaneously. This ensures a consistent look throughout your presentation.
Customizing Layouts: The slide master allows you to customize existing layouts or create new ones to suit your specific content needs. For example, you can create a three-content layout if the existing options don’t meet your requirements.
Consistent Formatting: Instead of formatting each title placeholder on every slide, you can make changes in the slide master, and they will be applied universally.
Adding Logos and Shapes: You can insert a logo or shape on the slide master, and it will automatically appear on all slides. This is useful for branding purposes and adding consistent design elements.
Theme Customization: The slide master allows you to choose a theme, color palette, and font scheme for your presentation. You can also create your own color palette to brand your presentation with your company’s colors.
Creating Reusable Slides: You can create custom title slides or other layouts that can be reused throughout your presentation. These reusable slides maintain a consistent design and layout.
Efficient Workflow: Using the slide master saves time and effort by applying changes to all slides at once. This eliminates the need to modify each slide individually.
Specific Layout Changes: Besides making universal changes, you can also modify specific slide layouts within the slide master. This allows you to tailor the design of certain slide types without affecting the entire presentation.
Accessing Slide Master: To access the slide master, click on the View tab and then select Slide Master. This will open the slide master view, where you can make your desired changes.
Closing Slide Master: To exit the slide master view and return to your presentation, click on Close Master View. This will apply the changes you made in the slide master to your presentation.
PowerPoint Custom Layouts: Design and Implementation Guide
Custom layouts in PowerPoint allow you to design and arrange the content on your slides in a way that best suits your specific needs. Instead of being limited to the pre-set layouts, you can create your own, ensuring that your information is presented in a visually appealing and organized manner.
Key aspects of custom layouts:
Creating a Custom Layout To create a custom slide layout, navigate to the Slide Master view. In the Slide Master, you can either duplicate an existing layout and modify it, or insert a new layout. Once the layout is created, you can rename it to something descriptive.
Inserting Placeholders Custom layouts involve inserting various placeholders for content. These can include placeholders for titles, text, images, charts, tables, SmartArt, media, and other objects. Placeholders are like pre-defined containers that you can insert content into.
Modifying existing layouts: You can modify existing layouts to better suit your needs. This can involve resizing and repositioning existing content placeholders, changing bullet styles, or adding design elements like shapes and accents.
Three-Content Layouts: If you need to present three main ideas or concepts, you can create a three-content layout with three columns to express these points clearly. This can be achieved by duplicating a two-content layout and resizing the placeholders to fit three columns.
Combining Content and Images: Custom layouts can also integrate images and content in unique ways. For example, you can create a title slide with a large image and then overlay text and shapes for a modern look.
Adding Visual Elements: Incorporate visual elements such as shapes, lines and icons to enhance the design and create a more engaging presentation.
Applying Custom Layouts Once you’ve created a custom layout, it will be available for use in your presentation. When you click on ‘New Slide’, your custom layout will appear as an option, allowing you to insert it into your presentation.
Enhancing Presentations with Media Elements
Media elements such as video, audio, images, and icons can significantly enhance presentations. These elements make presentations more engaging, dynamic, and effective in conveying information.
Key considerations for incorporating media elements:
Images: Inserting images can be done from various sources, including local devices, stock images, and online sources. The PowerPoint designer can provide insights and design options based on the images used, helping to create visually appealing slides.
Video: Videos can be inserted from local files or online streaming platforms. When inserting videos, it is possible to use the video format tab for quick styles and the playback tab for editing tools like trimming and setting playback options. Online videos may have limited editing options compared to locally stored files. Stock videos, which are typically short, are also available for use.
Audio: Audio elements can include recorded narration or uploaded audio files. The screen recording tool can be used to create tutorials or demonstrations, with options to save the recordings as separate media files.
Icons: Icons can serve as visual representations of concepts, and can be inserted to enhance visual appeal.
Stock Media: PowerPoint provides access to stock images and videos that can be directly inserted into presentations. These resources are useful for adding professional-quality visuals.
Contextual Tabs: When media elements are selected, contextual tabs such as “Video Format” and “Playback” appear, providing access to various formatting and editing options. These tabs allow for quick adjustments and customization.
Animation: The animation features can be used to make presentations more dynamic. Animations can be applied to charts so they are revealed piece by piece. It is also possible to group a text box and a picture, then apply animation to the group.
Accessibility: It is important to ensure that media elements are accessible to all audience members. Captions can be added to videos to make them accessible to viewers who are deaf or hard of hearing.
Designer Integration: The PowerPoint Designer tool analyzes the content on the slide and suggests various design options, often incorporating images and other media elements to enhance the slide’s visual appeal. The designer particularly likes images and provides more vibrant options when images are included in a slide.
PowerPoint Rehearse with Coach: Presentation Skills Feedback
The Rehearse with Coach tool in PowerPoint is designed to help presenters improve their delivery through real-time feedback. This tool provides constructive criticism and feedback, similar to rehearsing with a colleague.
Key features and benefits of using Rehearse with Coach:
Real-Time Feedback: As you rehearse, the tool offers immediate insights into various aspects of your presentation style.
Pace Analysis: It monitors your speaking pace, indicating whether you are too fast or too slow.
Filler Word Detection: The tool identifies the use of filler words such as “um” and “okay,” helping you to eliminate them.
Repetitive Language: Rehearse with Coach assesses your word choice and identifies repetitive language, encouraging you to use a variety of expressions.
Inclusiveness: It helps ensure that your language is inclusive and appropriate for a diverse audience.
Originality: The tool checks whether you are reading directly from the slides, advising you to summarize instead.
Pitch Monitoring: It monitors your pitch, providing feedback on whether it is too high or too low.
Detailed Report: After the rehearsal, you receive a comprehensive report summarizing your performance, including the time spent, number of slides rehearsed, and areas for improvement.
Accessibility: By improving your delivery and minimizing filler words, you can enhance the accessibility of your presentation for all audience members.
To use Rehearse with Coach:
Go to the Slide Show tab.
Click on Rehearse with Coach.
Begin your rehearsal and speak as you would during the actual presentation.
Review the report that appears after you finish rehearsing to identify areas for improvement.
PowerPoint Full Course Tutorial
MS Power Point for BEGINNERS | MS Power Point Tutorial in Hindi | MS Power Point Tutorial in Hindi
The Original Text
welcome to learn it training the exercise files for today’s course are located in the video description below don’t forget to like And subscribe welcome to Microsoft PowerPoint introduction you’re learning with Mo Jones IT professional and educator let’s take a look at what we’ll be covering today for this very popular presentation application we’ll navigate the PowerPoint interface we’ll learn how to design presentation big part of PowerPoint is being able to insert and format text we also insert and format images we’ll take it a step further we’ll work with objects such as text boxes shapes charts tables and we’ll actually insert and manage tables charts then we’ll take a look at some of the animation and transition features just to make your presentation more Dynamic and responsive go ahead and open up Microsoft PowerPoint and we’ll Dive Right In looking to support our Channel and get a great deal become a member today to unlock adree videos that’s right your favorite courses without a single ad interested in a specific video purchase one of our adree courses individually looking for even more gain access to exams through certificates and exclusive content at learnit anytime.com more information can be found in the video description [Music] below going to go ahead and open up PowerPoint depending on the operating system that you used just locate your app launcher and go ahead and open up PowerPoint when you open PowerPoint for the first time you’ll present it with the start screen and on the start screen we’ll realize we have three big buttons here one says home one says new and one says open and the main thing with these three buttons they all allow you to pretty much do a couple of different things here you can find files that you have created you can open files that you have created or open a template you can also go ahead and create a presentation as well right now I’m on the Home tab and the Home tab shows me all of my recent presentations that I’ve created if I click on the new tab here this gives me the chance to do something like create a new blank presentation or I can go ahead and start from a template so there’s a lot of templates here that are already made for us this is a really good start if you want a really good starting point to create a really professional looking document these were created by professionals they already have the slides and inserted for you you just need to go ahead and add your own content to these different ones here as well I’ll scroll down and we’ll just quickly take a brief look at one here so this one is for a sales pitch so we can see a little preview at least one of the slides and over here on the right we get a brief description of what this actually offers if I wanted to go ahead and open this up I can go ahead and click on create I will click on create here and I’ll take a look at this so This downloads the file for you and we can see over here on the slide pane we have 21 slides so this is the first slide this is the title slide we can see that we have a background image in here we have a few text boxes or content placeholders and let’s just preview this so pretty nice placement of the text and the shapes and the images it’s a very nice very organized very simple to read now one thing that you’ll realize is the modern presentations they resemble web interfaces so a lot of the shapes and a lot of the colors that we’ll see they resemble web pages as well this one uses a lot of white space which is perfectly fine if you can find a good way to balance that that works well here as well so basically all of this information here here is a table so we can plug our own information in here if we want to let’s save this was 75,000 we can go ahead and do that and then once we’re done we can go ahead and save it well I’m going to go ahead and run this here so to run the presentation we’ll talk about this in just a little bit but now here on the taskbar we have this little icon here this will allow us to run the presentation or run the slideshow here’s my slideshow I can use the arrow keys to go to the next slide I can press back to go to the first slide I can even press up and down so whichever way you want to navigate you can also click on the slide that brings you from one slide to the next down here on the bottom left you see it’s a little faded here but we have some more controls here we can go back we can go forward and we’ll cover some of these other Advanced features here in just a little bit as well so go ahead and open up your version of PowerPoint once you’re on the start screen just click on new and go ahead and search for presentation go ahead and download it and just preview it and come right back now that we’ve viewed a fully functional template let’s go ahead and create a new blank presentation so right here I’m still on my start screen from the Home tab I can go ahead and click on blank presentation I can also get there from the new tab as well let’s go ahead and create a new blank presentation here is my blank presentation let’s take a look at some of the different components here here we can see all of our slides right now we have one slide as we add slides we’ll see them appear here we can see that we have our first slide so this is actually a title slide it’s telling us to add a title and to go ahead and add a subtitle as well so this slide is a pre-made slide it has its own formatting and its own orientation in here as well if you take a look at the bottom you’ll notice that we have so this is our status bar down here we can do things like change the different views right now we’re using the normal view if we wanted to take a look at the reading view here’s the reading view if we wanted to run the presentation in full screen mode here is our presentation view here as well we can also zoom in or out notice right now I’m currently at 89% so depending on your monitor size and or resolution you may notice a different size here if I want to go ahead and make this a little bigger if I click on the plus sign here I can see it’s making it bigger if I click on the minus sign it goes back down but if I want it to fit perfectly based on my current settings I’ll click on this autofit here and this will automatically fit it so I don’t have to scroll up or sideways so I’ll click here fit slide to current window and it’s telling me that based on my current settings 89% I’m good to go we’ll work with these areas in just a little bit here right now here’s our best friend the ribbon this is where we find all of our commands that we can use such as inserting a new slide such as changing the font once we start entering text changing the paragraph options here as well if we click on the insert tab we expect to find things that we can insert such as a table or pictures or shapes or a chart or text boxes and various types of media going to be inserting a lot of things here into our PowerPoint before this course is over if we click on the design tab we’ll notice that we have different themes that we can select here and if you just kind of mouse over them we can see the preview of what our presentation would look like at least the title slide as well so that’s the ribbon the other part that we have here is the search box now this search box is pretty cool it does more than just allows us to search things we can get a quick tutorial we can search for phrases in our document let’s say I forgot how to zoom I’ll go ahead and type the phrase zoom in here and this is the way that search box works it gives us different pieces of information or opportunities so the very first tier here we have several actions that we can use so I can use the fit to window command the same thing that I did down here I can go ahead and zoom to a particular um level and then we have find and slide so I can go ahead and search for the the phrase zoom in my presentation but then down here is where it’s really cool we can get help so maybe I forgot how to zoom in or out a document down here at the bottom I can get a quick tutorial so let’s go ahead and take a look at that I’ll type zoom in here Me Clear My annotations I’ll click on zoom in or out of a document and just like that it opens up a side pane over here for me and it gives me a quick one two in terms of how to zoom in to my document notice it’s pointing me to my zoom bar here on my stat on my status bar telling me I can either slide this or I can go ahead and click on the minus or click on the plus to zoom in or out here as well if I want to be more specific I can choose a particular Zoom setting so if I click here this expands the article further for me so this is good I don’t need to go ahead and search the internet for an answer on how to zoom right here I can go ahead and and learn right here as well if I want to expand the article I can click on this link and this will open up the article in a browser for me I’ll go ahead and close this here and we’re good to go so go ahead and navigate the interface go ahead and take a look at the search bar go ahead and click on the different ribbon tabs here to see what we can do see what commands are available go ahead and zoom in or out of your document the last thing we can talk about here here is right here we have the ribbon display options right now I can see my full ribbon if I click on this drop down here I have a couple of different options I can go to full screen mode if I want to just see the tabs so I’ll just see the tabs but I don’t see any of this information down here I can show tabs only so if I click here so notice I’m only seeing tabs now why would you why would you want to do this well this gives me a little more room now I can see more of my slide and if you notice when I switch to tabs only now I can utilize more space I’m at 98% as well if I still need to access a command for example if I wanted to insert something it does it’s on demand now so it shows me the F the r the ribbon here and if I click away it goes back now it’s your choice you can either show the tabs or once you click back here again you’ll notice that the ribbon display options will appear again we can also press contrl plus F1 to collapse or expand the ribbon I’ll go back to always show ribbon and I’m good to go so go ahead and tour the interface and come right back now that we’ve toured the interface let’s go ahead and focus on our slide here let’s break this slide down so as we can see we have one slide in here let’s go ahead and add another slide so this is the title slide so from the Home tab I can click on the new slide drop down here if I click on this Arrow this will show me the different types of slides that I can insert so if I click here I can see I have a few to choose from I actually have nine different types of slides that I can choose from so right now here’s our title slide here we have title and content we have section header we have two content comparison title only so just a title with a blank slide with a blank slide caption on the left content on the right and we have a picture with caption here as well I’m going to insert a title in content and let’s go ahead and compare those two slides so now I have two because I did insert so here’s my title slide and then down here here is my title and content let’s take a look at the title slide here now in the title slide we’ll notice that we have two what’s called content placeholders right so this is a title content placeholder and on the bottom this is a subtitle content placeholder so they are pre-made they have their own special formatting in here so for example if I were to click inside of the title content placeholder we can see that it’s using the font size of 60 well let’s click on the subtitle content placeholder and let’s see what that is so that is 24 so these are already predefined here here now we’ll notice once we choose a design theme some of these options will change as well but for now we have on this slide we have a title placeholder and we have a subtitle placeholder let’s take a look at slide number two so here’s slide number two we can see that we have a title placeholder and down here we have what’s called a content placeholder this is called a content placeholder because there’s various types of content that we can insert so we can insert a image either from online or from our device we can insert icons tables charts video so a lot of different things that we can insert here we can also add text so if I just click in here I have now activated this this content placeholder and I can type in here go ahead and do that so for this particular content placeholder the default font size is 28 let’s click on the title here now notice the title placeholder for this slide it’s not 60 like the title this is 44 right so the title slide is meant to really stand out so we have bigger and Bolder font but then for each of your slides you don’t want that same size so this has a size of 44 as well so those are the basics when working with slides there’s different types of layouts that we can use and then for each slide each slide has its own placeholders content placeholder picture placeholder different things that we can do here as well go ahead and insert a slide and go ahead and take a look at the difference between the two we can also change the slide so if I right click on the slide here I’ll go down to layout maybe I want to change this to content with caption and we can see so now we have a little more detail we still have our content placehold over here to the right but we have a title and text over here as well insert a few slides change the layouts and take a look at the placeholders on each slide and come right back welcome back well let’s go ahead and start designing our slide here I’m going to delete the second slide now to delete a slide I can simply click on it I can see that it’s highlighted here and I can either press the delete key or I can right click on it and choose the delete slide command either way I’m going to go ahead and delete this slide I’ll go ahead and put a title in here so I’ll call this PowerPoint and I’ll go ahead and put module one here why not so PowerPoint module one so we’ve started we see we can just simply click on a placeholder and start typing content in there now I don’t have any colors in here everything is just black and white very plain so the next logical thing to do is choose a design so let’s go ahead and click on the design Tab and now now we have what’s called themes so we’re basically going to go ahead and choose a theme and depending on the theme that you choose you have what’s called variance so maybe you want a different variation of that particular theme maybe that theme is also available in blue or purple or orange we can go ahead and do that so the first thing I want to do is choose a theme by default we’re using the basic office theme here here’s the first one facet so we can see it adds some I’ll go ahead and actually click on there so we can see kind of add some details in here let’s go ahead and insert a slide as well so let’s go ahead and insert a new slide now take a look at the different slide layouts that are available remember originally we had nine now we have quite a few more here so each theme will have their own kind of special layouts that you can use here for example this one has a name card that we can use let’s just add a title and content and let’s go back to the design tab let’s just continue previewing the different designs here that we can use I’ll click on the gallery theme Here we can see that that’s what that looks like so here’s my title slide and here’s my title and content slide so usually spend a little bit of time choosing the theme that is right here’s another [Music] theme here’s one of my favorite here’s the ion boardroom theme and so I’ll go ahead and choose ion boardroom and then I want to go ahead and choose one of these different variants here so I have four different ones that I can choose from let’s see what this would look like with the this color here’s deep bluish color and also here’s the more orange color here as well so we can use that organic is pretty nice as well but also comes with variants we can go ahead and choose one very classy this one looks very classy so go ahead and choose one and just take a look and see what slide layouts are available and take a look and see how it’s actually changing the look and feel of your presentation here I’m going to go ahead and choose let’s see where is dividend I like dividend can’t find it right now here it is I like dividend if you just hover over it it gives you the name of it I’ll go ahead and use this and I’ll change it to this variant here as well so pretty nice very modern very classy finally let’s see what this plays okay so we just have the basic layouts here so go ahead and take a look at that go ahead and click on the design tab choose a theme choose a variant and then take a look at the different slide layouts that are available and come right back welcome back okay so I have my title slide here PowerPoint module one I have my title and content here let’s just go ahead and document what we’ve learned so far so I’ll go ahead and put lesson one in here and lesson one was all about getting started now you notice with this particular theme that I selected it’s automatically capitalizing all of the letters that I type here in the um in the title area I’ll go ahead and click inside of my content placeholder here and we’ll just talk about some things that we learned here we talked about the start screen we talked about the ribbon and I’m just working with a list here so so if I just press enter we can see I’m working with a bulleted list most of the content placeholders that we work with they will incorporate bullets as well so start screen ribbon uh we also talked about just different um slide layouts and we’re able to take a look at um content placeholders okay so content placeholders here that’s pretty much what we covered here in lesson one for lesson two let’s go ahead and insert a new slide let’s go ahead and also insert a title and content so if lesson two we started talking about just how to develop a presentation so developing a presentation so one of the first things we need to do is choose a design able to choose a design slash theme and optionally choose a variant as well so that’s what we’ve done so far let’s continue developing our presentation here in lesson two now we’re still talking about design here now one of the things that’s available is the designer now the designer it’s right here on my Home tab all the way to the far right we can see I have my designer right here now what the designer is let’s see if we Mouse over it gives us a little detail opens the designer pane for instant slide makeovers so what if you chose a theme but you’re not you know you want a little more flexibility you want a little more content on your slide let’s take a look and see based on the content that we have on this slide let’s see what this the designer will provide for us so I’ll click on the designer here now notice when I clicked on the designer it’s giving me different slides to be able to choose from so this is using an info graphic so it’s creating an infographic for me that I can use the third one on here puts a picture on the left so the designer basically analyzes the content that’s on your slide and then it tries to create a slide based on the text that you have on here or pictures now the designer really likes pictures if I were to add a picture in here we would see a lot more options that are available but let’s just scroll down here so basically if you like one of these designs you can go ahead and just click on it and that will actually convert your slide to that particular design I’ll go ahead and choose this one here and as you can see it converted our text into what’s called smart art we’ll cover smart art at another time but it created a nice infographic for us here as well I can press contrl Z to undo that so would you rather have your slide look like this would you rather have it look like this I can always change this if I want to so if I go back to the top here let’s see this one has a picture on the left okay so that looks pretty nice nice little accent color here as well so you can always change them but I like these it’s giving us some nice simple layouts to choose from here as well now this is on a per slide basis this is not going to change every slide for you if I go back to the title slide here we’ll notice that we have different options that are available if I want to see more I can click on see more designs so that’s how the design works sometimes it will not find a design for you right away you can always come back a little later and apply a design here as well I’m going to go ahead and choose one of these I’ll choose this one nice and and elegant and for my second slide I’ll go ahead and convert that to an infographic so not so bad we use the designer we have three really nice looking slides we did not have to worry about placing these objects on here and making sure that they align properly the designer took care of that for us everything is lined up everything is kind of snapped to the grid here as well so go ahead and turn on the designer go ahead and apply a couple of designs to your first three slides and come right back welcome back well hopefully you found a design theme that you like hopefully you’re able to design each of your slides individually by using the designer here so for lesson two we’ll continue talking about developing a presentation I just added another line here designing slides with the designer so when we’re developing a presentation the first step is kind of choosing your design and after that is adding content now once you add content the next thing that you may want to do is to either well really to work with the text so here’s my text here on slide number three looks a little small I have a lot of space here at the top and on the bottom and let’s go ahead and take a look and see I’ll go ahead and just highlight the text here I can double click to highlight a word I can triple click to highlight an entire row and once I do that I can see that this is using the font size of 18 now based on the theme that I’ve selected it uses its own font as well right because a theme basically a theme I’ll put the detail here I’m going to press enter I’ll press tab so a theme is basically a set of fonts colors and [Music] effects so each theme has its own set of fonts colors and effects so that’s why we notice that the font type has changed here okay well let’s go ahead and take a look at a couple of font commands maybe I want to change the color here maybe I want to change the you change the effect maybe make some with the text shadow some bold italicized let’s take a look at some of these different font commands here going to highlight my first row here and I’ll go ahead and make that bold right and I can go ahead and make that italicized I can go ahead and use the text Shadow here so the text shadow kind of gives it a nice shadow behind it I’ll go ahead and remove the bold and italicize from there so it’s just a subtle way to kind of call attention to something here as well uh what about let’s see what else can I do here now here’s the striketh through so this kind of crosses it out for me so we’re just kind of exploring the different font commands that are available now what about uh here’s the change case now this is pretty neat I can do something like capitalize each word so notice all of my words are capital ized here so like a title so I can do that I’m going to remove the strike through here I’ll move the text Shadow if I want to make it all uppercase I can go ahead and do that but I think I’m good I’m just going to leave it as sentence casing here as well now I do want to make everything a little bigger right now it’s 18 so I want to increase the size so going to highlight all of the content in here and what I’ll do is I’ll click on the the big a here and this will make my text just a little bit bigger and maybe about there I just want to make sure it’s not as big as my title so my title is 28 and now I’m at 24 so that looks pretty good I can go ahead and do that now this is a level two item here because I have a i indented this so it’s so by default it’s smaller than the level one item here as well so I’ll go ahead and make this italicized if you like shortcuts as you hover over these different commands if a shortcut is available it will be displayed for you so if I wanted to make this text bold I can press contrl B contrl I will italicize it for me contrl U will place the underline there as well so we can use those font commands going to go ahead and make make that italicized and maybe I’ll make that all uppercase as well also change the color now when you’re changing colors in PowerPoint you’ll notice that you have what’s called theme colors so again remember a theme is a set of colors fonts and effects so these are the different colors that come with this particular theme this dividend theme that I chose here we have different varieties of that color and then we always have these standard colors down here as well now you want to kind of stay away from the standard colors because the professional that created this theme these colors work together well so if I choose any of these colors it’s not going to adversely affect the look and feel of my text there but if I were to choose a standard color I can kind of see it’s not really a nice contrast right away not all of them just some of them here as well so maybe I want to change this not a lot of color options available here a lot of kind of you know dull colors but there you go so I can go ahead and change that if I want to we also have the highlighter so if you want to highlight something you can use the highlighter here not a big fan of it though I typically don’t use that so we can do that as well so we can change the font size we can apply these different font commands here as well I can also go ahead and maybe you know change the change my bullets so right now because of this particular theme I have these Square bullets if I click on the bullets drop down here I can change that to maybe arrows or Star bullets or Hollow Square bullets I’ll use Hollow Square and I’m good to go going to go ahead and remove this highlighting here so I can say no color another really nice tool that I like to use in the font command group is this little eraser here now what this does this will allow us to remove the formatting from any chunk of text so if I wanted to reset this here back to the default text I can go ahead and click here and notice how it puts it back to normal for me with the exception of the sentence casing so I can go ahead and do that as well so go ahead and insert some text go ahead and take a look at the different font commands that are available and come right back welcome back so that wraps up lesson two so we’re able to choose a design theme or we’re able to design slides with the designer we’re able to add some content here as well let’s go ahead and insert a new slide there’s several ways that we can do this let’s go ahead and turn on our notes actually this way we can kind of document any kind of tips and tricks that we’re learning here as well so I’ll cck click on notes here this opens up my notes Pane and now I can go ahead and type in here so a a shortcut for us if we want to insert a slide we can press contrl plus M as in marry that will insert a slide for us or if I click on that third slide here and just press the enter key it basically inserts the same type of slide for me so I have the title and content here as well if I press contrl Z to undo that the other way is I can click on the new slide drop down here like we did before and I can go ahead and choose another type but if I just want the title and content I can just press contrl M or I can just press the enter key as long as I have the slid selected here just going to press enter here and here is my slide let’s put the lesson three in here and lesson three is all about formatting content now when it comes to content we’ll talk about just a few here so we’re able to um we’re able to form format some text we’re going to um format our placeholder and then we’ll go ahead and format a text box as well so when it comes to formatting text one of the things that we can do we can always highlight the text or we can apply one of these font commands if we want to but let’s go ahead and use the shape format tab to format all the text that’s inside of our placeholder here now if you notice I’m clicked inside of my placeholder and take a look at the border we can see that we have a dashed line or a dotted line going to go ahead and click on the border here once I click on the border I notice that I have a solid line now when you do that that’s the same thing as selecting all of the text inside of the placeholder here so I click on the border I have a solid line and now I can do something like change the font color for all of my content that’s in there I can make everything bold if I want to so that’s one thing that we can do going to put this back to black here now I want to introduce you to what’s called a contextual tab I’ll put this up here okay so the contextual tab is the key to formatting different objects right so I’ll put that in the notes Here format objects objects are things like text boxes charts tables and so forth and so on images icons shapes so notice when I click inside of my placeholder here if you take a look at the end of my ribbon I have what’s called shape format so this is contextual or on demand it only appears when I’m interacting with an object so if I click on the blank area on my canvas here notice it’s it goes away it’s no longer there but if I click inside of my title placeholder I get shape format if I click here inside of my content placeholder I get shape format let’s click on that and let’s see what we can do right so what I can do is I have a well let’s take a look at word art first so I’ll click on shape format I want to make sure I clicked on the border here and here’s just some different word art that we can use word art they come with a lot of different types of formatting so this one has a black with a shadow so here’s the second one blue gray accent color one shadow so some of these are very subtle or very intense so it’s a quick way to just kind of call attention to your content by using one of these word art styles some are very simple some are very very complex you can click here we can see all the word art styles that are available I’ll go with the basic Shadow almost like our actually did did apply the text Shadow for us so it’s the same command let’s go ahead and format this content placeholder I’m going to resize it so I’ll click here I’m just going to drag it over to about there don’t need for it to be that big and I’ll click on shape format now once we click on the shape format this is the key to formatting content once we click on here we can do things like give it a shape style or we can give it a shape effect we can resize it using the resizing tool we can even align it here as well let’s just take a look at some shape styles that are available what if I wanted to put a background color just inside of my content placeholder not the entire slide what if I wanted some effects nice border around here as well well that’s what a shape style is if you click on shape style here are the different styles that are available very simple then it gets a little more complex as we go down the list so we can see this this first row here it’s just an outline color just different theme color outlines if I click on the more options here here are all of the shape styles that are available so that second row combines a fill color with a border color so I can use that if we go down the list we have different effects so we have some gradient effect kind of like a two-tone uh look we have shadows now we have Shadow with a glow as well so the bottom line is you don’t have to just settle for the default layout of your content placeholders you can give it a quick style if you want to just going to go ahead and give this a basic one so just give it a basic style here and let’s take a look at shape effects with different presets so here’s a preset one so it gives it that nice kind of white border looks a little three-dimensional and so just go ahead and check them out different presets right there’s a basic one in the shadow on the bottom right so we have we have shadows that we can use some basic Shadows or some more complex Shadows we have Reflections some are subtle some are intense we have glows so we can give it an outside glow if you want to we have soft edges and we have bevels as well I’ll just give it a I’ll leave mine as is here as well right then of course we can go ahead and resize this if we want to make it higher or wider we can go ahead and do that as well so go ahead and add some content to your content placeholder click on the shape format tab toggle some of the different shape Styles some of the different effects check out word art as well and come right back let’s continue lesson three so we took a look at the contextual tab in this case the shape format we’re able to insert some text we formatted the text using the couple of the word art styles here and we’re able to format the placeholder by either choosing a shape effect or a shape style also being able to resize it here as well let’s go ahead and insert an an object let’s insert a text box let’s click on the insert Tab and from the insert tab let’s go ahead and insert a text box from the text command group so this is an object that we’re actually adding here so we can draw a text box anywhere and text boxes are great because we can resize them we can add a style to them we can add text to it I’ll go ahead and click here now we have to draw it so here’s my little drawing tool so I’m just going to draw it you can make it as big as you want to you can always resize it a little later just going to go to about here make it about that big so as soon as I enter my text box here going to go ahead and add some content in there and then I’ll take a look at the shape format to see what’s available now these two are identical so my text box and my content placeholder you’ll notice a lot of the same tools are available once we start interacting with our text box here as well actually before I start adding text I’ll click on the shape format tab I’ll go ahead and give this a quick a quick style we’ll go ahead and I’ll go with this orange here I’m actually going to go ahead and change my variant here so I’ll click on the design Tab and I’ll go for a more blue color here just for purposes of this demonstration so I just change my variant to Blue again you can always change at any point in your presentation before you deliver it so I’ll go ahead and add some content here for my text box so so I’ll say use the contextual tab to format objects okay text boxes I’ll just say text boxes gives more control right so there we go so here’s my text box so I can move it so what if I wanted to go ahead and move this text box somewhere else what I can do is click on the border so take a look at my cursor it’s that diagonal Arrow if I move my cursor inside of the text box I have my basically typing cursor here if I move my cursor to the to the Border or the outside it changes to this four-way cross here now that lets me know I can grab it so now I can go ahead and move it so I click and drag and I can move it to anywhere I want to on the slide so maybe I want to place it down here towards the bottom I can go ahead and do that but let’s get a little help here maybe I want to go ahead and snap it exactly to the bottom right of my slide here so I’ll click on shape format and over here in the arrange command group I’ll choose the alignment here so I’ll click on align so first I want to align it to the bottom of the slide notice how it snaps it to the bottom of the slide for me and next I want to go ahead and align it to the right so there you go I can snap it right to the bottom right if I want to if I click back on here I decide later I want to align it to the middle I can go ahead and do that I can align Center there we go right or I can just go ahead and drag it down here as well going to align it to the bottom right so bottom and then line it to the right and there we go so those are text boxes if you want to we can actually copy and paste this text box if I right click on it I can copy it and I can paste and this allows me to have the exact replica here as well and there we go so those are text boxes going to go ahead and move this back up here and there we go so go ahead and insert a few text boxes add some content in there click on the shape format Tab and go ahead and give it a quick style come right back welcome back so that concludes lesson three formatting content as we continue with our course we’ll be spending a lot of time working with the contextual tabs that appears when we in insert different objects let’s go and insert another slide for Lesson Four and this time we want a two content slide let’s go ahead and insert that here are two content placeholders one on the left one on the right so let’s go ahead and put in Lesson Four here and Lesson Four is all about graphical elements so when we talk about graphical elements we talk about pictures we talk about icons and so forth and so on so let’s go ahead and insert an image now several ways we can insert an image right here in the content placeholder we can see that we have two options here to insert an image we can also click on the insert tab so if we click on the insert tab we can insert pictures and we’ll get a list of different types of pictures that we can add we can also do it right here from the content placeholder the first one here is stock images the second one is pictures so if I click here it opens up the folder structure on my computer let’s click on stock images so these are are the Microsoft stock images that we can reuse now when we get here here’s the stock images dialogue there’s different things that we can search for so by default we’re looking for images but we can also search for icons we have cutout people stickers videos illustration and cartoon people so there’s a lot of different content that we can add here as well so if you click on icons let’s just quickly preview them icons are pretty cool there’s pretty much an icon for everything that you want to express and they always come in the same size they’re always one one by one we have cutout people so we have carry we have Stanley Lance so forth and so on and they have different Expressions that we can use to drive a point home in our slide and of course we have stickers everyone to love stickers we have short videos these are about 10 seconds or so maybe 12 we have illustrations that we can use kind of like icons but they have a little more color a little more detail and then we have cartoon people that we can use here as well but let’s go ahead and insert an image we want to insert an image that we want to go ahead and edit that actual image or format that image using the contextual tab that will appear after we insert our image so I’ll go ahead and search for an image here I’ll look for something related to learning you can look for any picture you want let’s see I’ll scroll down here look for something let’s change that may look for something with a team I’ll go ahead and grab this one here nice colors in here I’ll go ahead and insert that picture so it inserts that picture for us right inside of that content placeholder which is very very nice if I were to insert this picture sometimes what happens is the picture appears so big that it’s kind of like going off of your slide in that case we would need to click on the format let’s keep it simple let’s go ahead this is very nice picture let’s go ahead and click on the picture format and the first thing we’ll notice is is that we have different picture styles that we can choose from on the far left we have some adjustments that we can make as well some corrections recolor let’s preview them and let’s see what we can do we want to get to picture Styles eventually but let’s go ahead and take a look and see what’s available here so here’s some different Corrections so I can either sharpen or soften the picture if I want to take a look at my picture as I’m hovering over these different options so I can brighten the picture just some simple edits that we can do to this particular picture here is color so I can recolor it saturation really saturated here 400% I can change the color tone temperature change and then can recolor it if I want to so lots of pretty cool things that we can do we have different artistic effects so if I wanted to make this look more like a marker or a pencil gray scale or a pencil sketch I can go ahead and do that so some pretty nice ones here as well right there’s glass glassy look so pretty pretty nice we have transparency and then we’ll head on over here to different picture Styles I always use picture Styles when I insert a picture you don’t want it to appear flat on our canvas you want it to stand out so click on that picture format and let’s take a look at these different styles that we can use so here’s a simple frame white just puts a nice white frame on the outside and go ahead and previe those so here’s a metal frame that looks pretty cool here’s a basic Shadow there’s one of my favorites reflected rounded rectangle if we click here on the all we can see all of the picture styles that are available and here’s my favorite this bevel rectangle nice modern look and feel here as well I’ll go ahead and choose one more my other one that I like is this one it’s a reflected bevel black so pretty pretty nice just like with our shape format we have picture effects as well different presets that we can use we can com sometimes combine them with a picture style sometimes they overwrite each other so typically you’re either choosing a picture style or you’re creating your own picture effect by choosing a shadow reflection glow and so forth and so on so go ahead and insert a picture go ahead and click on the picture format tab take a look at some of the adjustments and go ahead and choose a picture style come right back we’ll take a look at a few more tools welcome back hopefully you had fun taking a look at those picture format Styles here let’s take a look at a few more tools let’s go ahead and take a look at the cropping tool for our picture and then we’ll take a look at the background removal tool here as well so I’ll go ahead maybe I want to crop this picture so maybe I want to remove some of the space here at the top maybe I want to just kind of remove it from here as well so I can do that I’ll go ahead and click on my picture and I’ll click on the picture format contextual tab and the size command group I’ll go ahead and click on the cropping tool here so once I click here I am in cropping mode so here are my different cropping handles that I can use so what I’ll do I’ll go ahead and move everything up here want to come to [Music] about here I’ll come down just a little bit from the top coming from the sides as well so there’s my new picture that’s what the new picture would look look like now what I can do is just click away from the picture and as you can see I just crop the picture from the bottom the sides and the top here as well so that’s the cropping tool that we can use now if you made a big mess of your picture what we can always do is we can reset the picture we can reset the picture based on the formatting that we chose or the formatting and the original size so if I want to reset everything here I’ll click on reset picture if I click on reset picture that basically removes the formatting so the Styles and the effects here but it’s still cropped if I click on reset picture and size it puts my picture back to the original size so here’s one of the problems that we face when we insert pictures it’s really big we can’t see it no need to panic what we going do is locate the picture format Tab and we’re going to resize it using the width here so if I go here I’ll just click on that down arrow until it comes back into Focus I can actually see it on my slide notice is I’m using this tool it’s basically maintaining the aspect ratio so it’s not distorting my picture it’s not making it flat or so forth and so on so I’ll just go ahead and do that until I get it to the size that I like I can also resize the picture by using one of these Corner handles if I use the corner handles to resize the picture it does not distort the picture if I use this top or bottom or left or right this will distort the picture so I don’t want to use those I want to use one of these to either make it a little bigger and still maintain the aspect ratio here as well so that’s how you reset the picture let’s go ahead and insert another picture here and let’s take a look at the background removal tool let’s see if I can find my buddy the eagle here so I want a picture of this Eagle but let’s see maybe I’ll grab this one I want to remove the background from it I’ll go ahead and insert that into my content placeholder and going to make it a little bigger so I can see it a little better here so again I’ll use the corner resize not one of the side ones here notice how it flattens the picture so I’ll use one of the corners here and let’s see I’ll put it over this one for now so it doesn’t get in the way so really nice picture but I want to go ahead and remove the background I I just want to kind of cut out my eagle from this picture here right so we do have a remove background tool I’ll click on shape format and here is my remove background once I click on here it’s going to put me into the remove background editor it’s a simple editor if I click here gives me a couple of different options here now take a look at what actually did pretty good job it actually removed most of the background for me so it automatically tries to remove the background this one is very very good I actually don’t really need to do anything here I’m going to go ahead and click on keep changes and look at that so it removed the background completely for me and now I can go ahead and crop this I don’t need all that white space here and get rid of all that white space so this worked a lot better than I expected it to sometimes you just need to kind of interact with it but let me go ahead and insert another one I’ll insert my other Eagle so stock image and I’ll grab this one here and just make it a little smaller okay so that’s fine I’m going to delete this other one I’ll just press click on it press the delete key and I’ll delete this content placeholder as well okay so here’s my Eagle let’s take a look at the background removal tool okay so this one did a pretty good job but you can see it’s still trying to remove parts of the the head here so at this point what I need to do is I need I need I have two options I can choose to Mark the areas I want to keep or Mark the areas I want to remove it’s removed most of it so I want to keep the head here and that did pretty good and I want to keep the talons so here are the talons down here I want to remove the background from between the talons here so I’m just kind of pointing to where I want to keep where I want to remove and there you go that looks pretty pretty good I think I’m good to go so I’ll click on keep changes I can also discard all changes if I just don’t like the way it looks I’ll keep my changes here’s my Eagle going to go ahead and resize it and here we go so that is the background removal tool right so pretty pretty nice now remember you can always upload pictures into so if you have a picture on your computer you can upload it right here into PowerPoint take advantage of these simple editing options here as well let’s finish up Lesson Four by taking a look at the ey dropper now ey dropper is a really nice tool in this case what I want to do I’m going to delete the picture of my Eagle here I can actually rightclick and save this as a picture to my computer if I want to this will save all those formatting that I used here I’m going to go ahead and press delete just to remove it and I’m going to go ahead and insert just a few text boxes here I’ll insert about four and I’ll just call this one going to go ahead and insert another text box and this is going to be I’ll be specific this is color two this is color one and I’ll insert two more this is color three and I’ll do one more I could duplicate the text box I could copy and paste it as well as well but I’ll keep it simple we’ll talk about that in another lesson here so here I have four colors so what I want to do is I want to go ahead and I like this picture so I want to go ahead and pick up some of the colors from this picture so maybe from the shirt I want to go ahead and apply that color to this text box here maybe this color to that text box right and so forth and so on so if I wanted to recolor this text text box here if I click on it and click on shape format here is the text fill so I can choose a fill color so remember I can choose a style that will recolor it for me but what if I’m not finding the color that I want and if I click on I’m sorry shape fill not text fill if I click on shape fill here I’m pretty much limited to the colors based on the theme that I have selected here or some of the standard colors but as you can see I can’t find this color here so what I can do is click on more fill colors and now it’s really Advanced I get this kind of color palette here I have to choose from I can also click on custom and put in the RGB value if I knew what it was I do not know what the RGB value is of this color so I’m going to go ahead and hit cancel but wait a minute what I can do is I can use the ey dropper I’ll click on the shape fill again and if you take a look right underneath more fill colors here’s the ey dropper pick a fill color by clicking within the app window so pick a color outside of the app window click and drag okay let’s go ahead and turn on the eye dropper here so here’s my little eye dropper and basically what I do when I move over a color if I just pause it tells me what that color is so this is light gray and there’s the RGB value well I want this color for the shirt so that’s Plum RGB value 88 2739 let’s see what happens if I click on that color here well look at that it actually found that color and apply that color to my text box here well let’s try that again let’s click on this text box here I’ll click on shape format for the shape fill I’ll grab the ey dropper and this time I want this color so see what color this is so that is dark green so if I click on here it’s going to apply that color so it’s basically replicating that color from me from from one object to another H well let’s see what else I can do with eye dropper what if I wanted to grab something else like the color that’s off of my slide maybe a color from another slide or maybe a color from my ribbon like this PowerPoint color color here well I can do that as well it’s a little tricky well let’s see I want to grab this PowerPoint color up here so I’ll click on shape format I’ll click on shape fill this is pretty close to it but not really the color I’m looking for right so I’ll click on the eye dropper here now once I move off the slide notice my eye dropper disappears so so I want to get this color but my eye dropper disappeared if you want to grab a color off of the slide you need to while you’re still on the slide hold down the left Mouse button and drag it I’m still holding down the left Mouse button so now I can go ahead and pull in the color from anywhere on my screen either on PowerPoint another window that I have open I can pull in color from anywhere I’ll go ahead and pull in the color it’s telling me it’s red and there we go I’ll go ahead and pull in the color from this slide here as well we do have this color available but just to demonstrate how we can do that I’ll grab my ey dropper again so really really cool tool again I’ll hold down the left Mouse button now I can drag and pull in any color so that’s turquoise and let’s see what else is in here I’ll go ahead and pull that in so that is the ey dropper so that’s how we can use the eye dropper to pull in colors from one object to the next here as well so really really nice tool especially when you start to use PowerPoint often and you’re customizing your designs this is a really really nice tool to be able to use so go ahead and insert a few text boxes go ahead and add some text in there and use the eye dropper to take colors from your picture and add them to your text box welcome back so that covers our first four lessons completing module one now let’s go ahead and save our work and run our presentation so couple of different things that we can do to save we can press contrl plus s we can press F12 or we can press file and save as well if I press crl s because I’m logged into my Outlook account it’s asking me to just save it to my one drive I can give it a name and I can press save if I press the F12 key on my keyboard it pulls up the folder structure on my computer now I can save it to my desktop or my documents I’ll save it to my desktop I’ll just call this PowerPoint module one and I’ll press save there you go I’m good to go and I am saved so let’s go back I’ll click on the first slide here and let’s go ahead and run this in presentation mode here are the different views here’s normal view here’s the slide sort view so again the slid sorter view allows me to kind of move things around in a simple way if I want to do that this is helpful if you have a lot of slides the next one here is the reading View so this will run my presentation for me going to go back to the first slide here so here’s lesson one we talked about the start screen the ribbon slide layouts and content placeholders lesson two we talked about developing a presentation and lesson three we’re able to format content specifically using the contextual tab and then we’re able to integrate images and formatting into our presentation going to run this in slideshow I can also press F5 to run the slideshow so here’s my first slide my title is missing I need to fix that if I go to the next slide now I’m presenting in full screen mode I can press escape to end the presentation or if I just keep going it does that for me end of the slideshow click to exit and I’m good to go I’ll go back to the normal View and here we are so we’re saved we’re able to run the presentation not sure what happened to my title here here it is it was hiding another lesson we’ll take a look at how we can format objects when they don’t behave just like this okay there there we go all right very good so congrats on completing module one let’s go ahead I’ll share a file for module 2 and we’ll work on that file together welcome back let’s go ahead and dive into module 2 I do have my practice file open here for PowerPoint module 2 please make sure that you have that open we have five slides here here’s the title slide and we have our four lessons so lesson five is about managing objects I already have some content on this slide for us we’ll take a look at different ways that we can manage them lesson six is all about adding tables we’ll go ahead and insert a table or two Lesson Four adding and managing charts so we’ll go ahead and add a chart and manage the data there as well customize the chart for lesson number eight we’ll take a a look at what we can do to prepare before we deliver a presentation I’ll go ahead and turn the notes on so every slide will have a set of notes kind of different tasks that we’ll be performing on those as well so I’ll go back here to lesson number five slide two actually I’ll go back to to the first slide and I’m going to go ahead and choose a design so feel free to choose a design right now it’s just very plain so I’ll go ahead and choose a quick design here I’ll keep it simple I’ll either go for wood type and let’s see what that looks like so pretty simple doesn’t add a lot of visuals I’ll stick to Wood type and then we’ll go ahead and jump into lesson five so go ahead and open up this practice file come right back we’ll dive in to lesson five welcome back so let’s go ahead and jump into lesson five so what we want to do is just kind of over come some of the issues that we will face when we have multiple objects on the slide here so we can see that we have a shape we have a text box we also have three images here that we can work with well we want to go ahead and create maybe our one-year goals you can use any scenario you’d like here going to go ahead and click on slide three we want to convert this slide to look like this so This slide is well balanced we can see everything is pretty pretty aligned pretty nicely here everything is kind of on the same line we can see that our picture is Center aligned on the text box our shape is Center aligned on the text box and the picture as well so let’s go ahead and take a look and see how we can do this let’s go ahead and click on slide number two so we’ll be talking about grouping we’ll be discussing aligning objects as well so the first thing I want to do I need to determine well how what kind of layout do I want how do I want to change this here I’m going go ahead and change my title first I’ll call this my one-year goals I’ll Center align that and I’ll move it up a little bit don’t need for it to be take up that much space right and I’ll go ahead and accept the correction here so one year goals and so what I want to do I want to go ahead and move these things around so if you click on these different objects if you click on an image you can click anywhere on the image and you can pretty much move it around so we can do that with a shape same thing you click anywhere on a shape you can move it around text boxes are a little different now if I click inside of a text box I can’t move it if I want to move a text box I need to click On the Border when I see that four-way Crosshair and now I can go ahead and move it as well okay just for now just going to go ahead and move my pictures over here to the right and let’s actually take care of that first let’s let’s go ahead and group these pictures together and let’s try and make them the same size so to group an object together what we’re going to do we’re going to use the control command so if you hold on the control key so I’ll click on my picture here I’m going to hold down the control key and click on this picture I’ll hold down the control key again I’ll click on the third picture so that is how you create a group you can pretty much group anything if I wanted to group my my shape with this as well I can go ahead and do that as well I can also group my text box but for now let’s understand how grouping works so right now I have these group so what I can do now is I can use my arrow keys and I can move these together like a group so I can go to the right I can go up I can go down I can do something like if I click on the picture format here if I wanted to give all of them the same style I can do that so I can put all of them inside of a metal frame I’m going to go ahead and choose a style I’ll choose the rounded diagonal corner and then I’ll go ahead and resize all of them so I’ll click on my bigger picture here and I’ll go ahead and just kind of resize all of them at the same time here right so that’s grouping I can resize them together or I can go ahead and move them together or I can go ahead and apply the same type of style or the same type of fixure picture effect or some different adjustments here as well really I can can only recolor them to break away from the grouping just click on an blank area and now they’re on groups and now I can move them freely but I want them to all be the same size so I’ll go ahead and check the size I’m going to move my first picture over here underneath my text box just want to make sure it’s kind of the same width so I’m just going to resize it to what I like now what I’m looking for when you’re moving object around you’ll get some temporary guidelines as you can see take a look at my picture I have this these four arrows here I want to make sure it’s the same width as my text box above so I’m just going to go ahead and resize it until I see that vertical dash line on the left and the vertical dash line here on the right so those temporary lines they let me know that my picture is the same width as my text box so that looks good so what is the width of this current picture because I want my other pictures to have the same width so if I take a look over here on the picture format I can see that it is 1.9 by 2.97 so I want to make sure that these are the same so I’ll click on my other picture and I’ll make this 1.9 let’s see 1.97 2.97 so 1.97 and 2.96 that’s okay I’ll make this also 1.9 [Music] 1.97 okay so now they’re all the same size they all have to have the same picture style here as well so that is how we group objects and that’s the benefit of grouping objects together we’ll see a little later once we have them grouped we can also animate them together as well go ahead and group your pictures together apply a picture style go ahead and resize them so that they’re all the same size and come right back now that I have all three of my pictures uh as the same size I’ll go ahead and set this up here so the first thing I want to do the next thing we’ll talk about is arranging and aligning objects we’ll already see that when we’re moving an object on the canvas we get all these little temporary lines here now look what happens if I move my image right in the middle of the slide I get the vertical bar there and the horizontal bar so that lets me know that I’m dead center or exactly in the middle of this slide both vertically and horizontally if I move to the right or to the left there’s that vertical line lets me know I’m aligned right there if I go up or down I can see that horizontal line there as well so also when you move an object it gives you it lets you know how you’re aligned in relation to another object so right now I can see that I’m on the same plane as my picture on the left if I go up it’s showing me I’m aligned to my text box to the middle of the text box to the bottom of the text box and right now I’m aligned to that picture right there as well so look out for those temporary lines we can also turn on the grid lines or the guidelines if I click on The View tab here I can go ahead and turn on I could even turn on the ruler if I want to I can turn on all three of these options let’s see what I get so here’s the ruler so as I kind of move we can see where I am in relation to the ruler both vertically and horiz horizontally here are the grid lines so grid lines a really nice way to show where one object is in comparison to another and then we have the guides and so the guides gives us the vertical guide here and the horizontal guide so lots of different things I’ll go ahead and turn off the grid lines I just want the guides and the ruler for now so when we’re arranging and aligning objects we need to First decide what we want to do so remember we want a horizontal alignment so three columns here as well so the first thing I need to do is position my first object exactly where I want it to be everything else will be aligned based on that first one here as well so I’ll take my first text box here I just want to align it to the left margin here let me move my shape out of the way and I just want to focus on this I’m want to keep going to the left until I want to make sure I’m lined up with my text box here my title box rather so I’ll move it to the left right there so that’s as far as I want to go on the left and I’ll come down a little bit maybe to about here my first object is in place everything else will be based on that object now my picture I’ll go ahead and align this I can see it’s aligned I’ll just move it down just a little bit it’s aligned with my text box here and now here is my I want to make sure that my little shape here with the number one is aligned Center aligned on my picture and my text box so there we go the first three objects are aligned and now I want to go ahead and add another text box two more text boxes and align these pictures as well so what I can do I can duplicate this text box if I want to so to duplicate an object I’ll press contrl D so I’ll click on my text box here I want to make sure I’m clicking on the border and not inside okay so I’ll click on the border I see the solid line and now I can press contr D it basically duplicates that for me so any stop anything I had in there would have been the same now I’ll use those temporary guides to make sure I’m aligned horizontally with my first text box and then I’m align with my picture on the bottom here as well I’ll go ahead and duplicate that one more time so I’ll press control D and sometimes when you duplic duplicate it again it kind of distributes it evenly so it’s the same space between the first one here which is is pretty good so at this point I’ll go ahead and make sure everything else is aligned I’ll go ahead and align my picture here make sure everything is okay to make sure my pictures are the same height need to move this one up a little bit here and there we go so our three text boxes and our three pictures are aligned now I can duplicate my my shape here so I’ll press contr D and I’ll press controll D again and so here are my shapes I’ll go ahead and make sure this one is Center aligned on my picture and I’ll move this one here make sure this is centered align on this picture as well and I’ll go ahead and make these a little bigger so I’ll group my shapes hold on the control key now when you’re grouping shapes I want to make sure I click on the border of the shape if I try to click on the inside it doesn’t work I want to click on the border hold on the control key I’m just going to resize these make them a little bigger make them as big as I want to maybe about not that big now I can kind of move them I want to Center all of them on each picture I’ll go ahead and change this to to number two so this this is goal number two this is goal number three I’m good to go I’ll turn on the I’ll turn off the guides I’ll turn on the grid lines just make sure that I’m centered here on each of them that’s centered that’s centered and that’s centered make sure they’re all in the same horizontal plane that looks pretty good so I’m good to go I pretty much have everything arranged exactly the way that I want it to be so I’m good to go what we can do now is if we want to go ahead and add a style to these text boxes we can go ahead and do that so if you want to grab a quick shape shape format give those a particular style you can go ahead and do that and go ahead and add a style to each of your shapes here as well and come right back welcome back okay I’m going to turn off my grid lines here so I’ll click on The View tab I’ll uncheck the grid lines I’ll also turn off the ruler don’t really need that right now and let’s put it all together let’s go ahead and animate some of these different objects here so this slide clearly states our oneyear goals we can see our first goal is here en roll in martial arts oh I need to go ahead and change the text here I’ll type learn a new language and third one is travel to [Music] Europe there we go all right so we have everything here so we have a number representing the sequence a picture representing the the goal and the text representing the goal as well let’s click on the animations tab now here’s the animations tab here are different types of animations that we can use we’re just going to use a simple anation we’ll just use the wipe animation you can try them out when you pause the video I’ll go ahead and click on my picture here and I want my picture to come in with an animation so I’ll choose the wipe animation for my picture so that’s the first animation on the slide if I click on preview over here to the top left I can get a preview to see what this will look like so when I when I go from slide number one to slide number number two this is how it will be revealed after I click on the sequence here so let’s just animate our pictures so we can see the numbers here here’s the first animation here’s the second animation and then we’ll have a third animation over here so I’ll click on my airplane here I’ll click on wipe and let’s see what this looks like so I’ll go ahead and run this in reading view again reading view is great because it doesn’t take up the whole screen and I can still manage other windows if I want to so I’ll click on the reading here and there we go so this is what the slide looks like so we can see that we have the text boxes and the numbers in the sequence if I click next or if I click to the right it reveals that picture for me if I click to the right again here’s the other picture and if I click to the right one more time here is the third one here as well so animation is a really good way to kind of reveal things or to reveal a lot of content on one slide just one at a time as opposed to revealing all the content here as well going to go back to normal view go back to slide two so that’s not really what I want though what if I want you know my text box and my picture to come in at the same time if I go ahead and give my text box here an animation well it’s not going to come in in sequence so what I want to do I want to create an animation so that my text box and my picture comes in at the same time same thing here for the second one and the same thing here for the third one so I’m going to have three animations on this slide so when this slide is seen the only things that will be visible are my actual numers numbers right here one two and three so your audience already knows they’re expecting three different goals or content here as well so to do that I’m going to go ahead and remove the animations so I’ll say none just going to reset everything here okay now I’ll do it picture text box wipe one animation picture hold on the control key text box wipe there’s my second animation picture textbox wipe and there we go let’s go ahead and run that I’ll press uh F5 to run the presentation here’s my title slide here’s my second slide we can see the numbers here if I click or if I press next or if I use the arrow key notice how it comes in as one animation because we group the text box and the picture together I could have even grouped the shape down here with it if I wanted to but I wanted to keep it simple kind of like a reveal so here’s animation number two learning new language animation number three travel to Europe and we’re good to go so pretty good so go ahead and check out the different animations right just click on a picture check out the different animations that are available able and then go ahead and group your animations together you may need to remove the animations and then group them like I did so you don’t run into any conflicts so check them out go ahead and animate them and come right back we’ll move on to our next lesson welcome back let’s go ahead and move on to lesson number six adding tables adding tables is a great way to condense information so that your audience can basically interpret the information more efficiently let’s go ahead and insert a table we want a table that looks like this so instead of writing out our one-year goals we can express our one-year goals in the form of a table so we’ll have a title we’ll have our different headers here the goal the priority the progress and the estimated cost for that particular goal here as well so let’s go ahead and use this I’ll go back to slide number three and because I’m using a content placeholder I can go ahead and insert a table by clicking on the table icon right here the other way to insert a table is to click on the insert Tab and once I click on the insert tab so here’s table so those are two ways that we can insert a table now let’s just quickly take a look at the different ways that we can insert a table if I click on this drop down here I can go ahead and draw the table as you can see if I want like a 4×4 table my slide is already showing what that table will look like that’s probably the simplest way to do that I can also insert a table so if I click on insert a table it basically ask me how many columns and how many rows would I like so I can say 4 by4 going to go ahead and hit cancel here we also have the capability to use an Excel spreadsheet to insert a table we’ll take a look at that just a little bit the Excel spreadsheet is going to give us the Excel ribbon that will allow us to incorporate more advanced features of the table such as calculations and more Styles and Designs things like that for now let’s go ahead and click on the insert table icon inside of our content placeholder and it gives us the option how many columns and how many many rows do we want well for now let’s just say we want three columns and we want three rows let’s go ahead and press okay my content placeholder has been replaced by my 3×3 table before I start working on the table I might want to go ahead and give it a quick design so notice because we’re working with a table we actually have two contextual tabs one is for the table design so this is all things cosmetic and then we have the layout so with these two tabs gives us all the tools we need to be able to manage this table we’ll keep it simple we’ll take a look at some of the essential tools that we need to use for now we’re going to go ahead and choose a table design so when it comes to the table design we can see that we have recommended best match for our document don’t like those though we have light Styles we have medium Styles and then we have some dark tables down here at the bottom as well so kind of a table for all different types whatever you’re looking for there as well want to go for a medium table I’ll give it this medium style accent one and I’m good to go let’s go ahead and enter some data into our table so the very top line is going to be my title so I’ll just call this one year goals down here on the bottom the first one is going to be my actual goal I’ll press the Tab Key to move to the next cell so that’s my goal this will be the priority let’s say on a scale of uh I don’t know 1 to 10 10 being the highest priority and then over here let’s put the progress so how far I am along that goal here I’ll add my first goal and my first goal let’s say enroll and martial arts okay I’ll put the priority this is priority high priority so I’ll go 10 and the progress this is actually about 50% complete right but I do have other goals so I want to go ahead and add another row here so to do that I’m going to click on the layout tab now once I click on the layout tab all the way to the far left we see a rows and columns command group now this is where I want to go ahead and insert rows so I can insert a row above I can insert a row below I do want to insert a row below so I’ll go ahead and click on insert row below as a matter of fact I want two rows so I click it two times to add two rows and there we go go ahead and enter my data in here I also want another column to the right because I want to be able to add one more for the estimated cost so I’ll click on the column and now I can either now that I’ve selected this particular column I can either insert one to the left or I can insert one to the right I want to insert one to the right not to the left so I’ll click on insert right to add another column there we go I’ll go ahead and put in the estimated cost and there we go so that’s how we insert a table that’s how we choose a table design or table style that’s how we add a row and or a column and we can simply just type in each of these cells and enter our information go ahead and fill out the rest of your table and come right back and we’ll take a look at some other table tools welcome back so I went ahead and and inserted all of my text here into my table so what I want to do now I want to go ahead and merge the cells here on this top row so as you can see I have one two three four cells I want to merge them and just have one single cell for my title that will be centered here as well so to do that I’m going to go ahead and select just click and drag and highlight all these cells on that top row then I’ll click on the layout tab now on the layout tab let’s talk about formatting the actual table so when we formatting the table we’re talking about the layout tab here and over here in the merge cells command group I’m going to go ahead and choose the merge cells command that will convert these four cells into one I’ll go ahead and do that here and there we go I can see see that it’s just one cell here at the top but the next thing I want to do I want to go ahead and align it so right now it’s aligned to the left of the cell and as a matter of fact if we take a look on the layout tab and the alignment command group we can see that it’s basically aligned to the top left of that cell actually by default all of my cells here everything is aligned to the top left of each cell so for this particular cell I want to go ahead and make sure that everything is Cent to the middle so I’ll go ahead and click Center and Center so now it’s centered vertically and horizontally in this cell as well now I want to do the same thing with the rest of my my table so notice when I ran that command it only applied to this particular cell so it only applies to what you have selected so I’m going to go ahead and and press contrl a inside of my table so if I press contr a it highlights everything on my table here once I do that I’m going to go ahead and Center everything so there we go I was able to Center everything and I’m good to go now I do want my table to stand out a little bit here let’s see what else we can do so we took a look at inserting rows and columns we used the merge we took a look at some alignment options here as well now we can go ahead and interact with the cell size if we want to or I can click on my table and click on distribute columns so if I click here nothing really happens if I click on distribute rows nothing really well I do get a little bit here so it attempts to make every Row the same height and every column the same width it looks like all of my columns are already the same width so it did not really make any changes here as well so if you maybe inherited a PowerPoint file that has a table and things just look really uneven you can choose the distribute rows and distribute columns command that will take care of things for you I can also resize the table if I GL grab one of the fill handles here right right now it’s perfectly aligned but if I wanted to make it bigger I can go ahead and do that I could even kind of do this so you can pretty much resize the table in any fashion that you want here as well so I’m good to go so again any formatting options we need to click on the layout tab to be able to do that as well now if you want to delete a particular row or a particular column it’s a matter of clicking on the row you don’t have to highlight the entire row if you want to that’s okay just click on any row that you want to and here’s the delete command so we can delete the entire table we can delete the entire row or we can delete that column if I choose delete row it deletes the row for me now I only have these three rows here I’m going to go ahead and undo that so I’ll press control Z or I’ll just press undo there’s my row again same applies for deleting a column just choose the delete and you can choose to delete a particular column as well so those are the basics for formatting a table go ahead and make those formats last thing I’ll do I want my top two rows here to be bold I want it to stand out and I want my items on the left to stand out as well I’ll make those bold and there we go I’m all done if you want to go ahead and change the table style you can go ahead and do that and come right back so we were able to insert a table just to note we can also copy a table from another Microsoft Office application so if we have an existing table in a Microsoft Excel file we can copy and paste that table right here into PowerPoint and we can manage the table in here as well if we had a table in Microsoft Word we can also copy and paste that here we can also copy and paste p a table from a web page and manage it here as well for now I’m going to go ahead and insert a new slide so I’ll insert a title only slide and I’ll quickly just demo how we can um add tables via Excel so maybe you want some more tools to be able to kind of work with your table let’s go ahead and click on the insert tab here here and let’s use the Excel spreadsheet option so I’ll go ahead and click on Excel spreadsheet and it’s thinking and notice it opens up the Excel so notice here’s my PowerPoint up here but right now I’m working with the Excel interface so basically my ribbon has been replaced by the Excel here well this gives me all the tools I need I’m going to make this a little wider so here’s my Excel spreadsheet and now I can go ahead and do something like go ahead and just add my data in here so maybe I’ll just put some basic information in here I’ll just put uh sales rep and I’ll pause this and finish this up so you don’t have to watch me type everything here okay so here’s my completed data here so I have a few sales reps we’re tracking their weekly sales so for example week one Jane D had sales of 21 3832 now this is where the Excel interface comes in because now I can use the Excel tools so I can give all these the accounting format and I could even drop in some summaries and things in here if I want to use some calculations I’ll keep it simple though I’m simply going to convert this to a table and I’ll go for I’ll go for this here right so here’s my nice table and once I’m done I simply just need to click away so how do we get rid of this once I click away I click on a blank area on my slide here it’s going to close the Excel overlay and it’s going to insert this table for me so I’ll go ahead and click away from it I’m done and there is my table sometimes this will happen it’s actually showing too much detail I don’t want all of these blank cells in here so doesn’t happen all the time so to overcome that I want to go ahead and edit this table now one thing to note notice after I inserted the table PowerPoint is not treating it as a table it’s treating it as a shape so I cannot make any adjustments here to the table if I want to edit it I need to double click on it so I’ll double click the table the shape here rather and now it reopens the Excel overlay for me and I’m just going to resize this window here I only want to see these particular cells let’s see if this will work for me there we go now it’s [Music] misbehaving there we go and let’s close that let’s see what that looks like okay so almost there going to make this a little bigger okay so this basically gives us the result of what we created in Excel we cannot make any changes here but if we want to we simply just need to double click on it and we can go ahead and make any changes like for example I’m going to remove the filters I don’t need those buttons showing up here at the top and still trying to get rid of this little problematic there we go so I’ll click away and there we go so that looks better so it’s almost treating this as a picture or an output as well so if you want to use Excel to just have some more robust functions and features and calculations you can use the Excel overlay to insert your table into PowerPoint here as well welcome back let’s go ahead and take it a step further by adding a chart to our PowerPoint presentation so just like with a table we have two opportunities to insert a chart I can either click on the insert tab go ahead and insert a chart I can insert a chart from my content placeholder as well I can also insert a chart from Microsoft Excel so I can copy and paste an existing chart from Microsoft Excel we’ll keep it simple we’ll go ahead and insert a chart now when we insert a chart we will get a temporary uh Excel basic interface we basically need to add our data to the interface let’s go ahead and click on insert chart and let’s see what we are provided with so the first thing it asks us is well what type of chart do we want to use so we have clustered column a really nice chart to be able to display a lot of values we have line charts pie charts we can always change this a little later some of the more modern ones like a tree map or Sunburst these are pretty good for displaying one value at a time or one series at a time I’ll keep it simple I’ll insert that first clustered column chart I’ll press okay so we’ll notice that we have two things I’m going to move this around just a little bit here here is our Excel Window up here at the top and down here is the actual chart going to resize this make this a little bigger so I can see all the data so basically whatever data we place in our little Excel Window here will be displayed on the actual chart so for example if I were to put let’s say my name here right maybe as a sales rep I’ll go for just a couple here so we can see as we’re typing the information in Excel we can see that it’s appearing down here on our chart so it’s all based on the data that we have up up there now I could actually copy and paste the data in here as well if if I already have the data from Excel or from the table that I created earlier I can paste it in here as well but let’s just put in a couple of quarterly sales values here right I’ll just start plugging in some numbers so let’s go 5,000 so as we can see it’s already displaying here on our chart going to go ahead and put the dollar sign in front front these here as well cuz when we turn on the data labels we want to be able to see the dollar signs as well I’ll put uh I’ll put 2500 for here 4,400 this is going to be 2,000 so I’ll just follow the numbers here multiples of a th so 3500 1,800 3,000 and 4500 and 5K and there we go so that’s it so once I close this here here is my actual chart so that is how you insert a chart and that is how you add data to your chart go ahead and add some data come right back we’ll take a look at some custom izations we’ll take a look at how we can edit the data and so forth and so on now we were able to insert a chart add some data to the Chart here as well what if we wanted to do something like edit the data well we have two contextual tabs here for the chart really it’s just the chart design though the format just really some of the shape formatting tools that we can use I’ll stick to chart design and under chart design just like with our table we can choose a style now these styles are based on the theme that you have selected I did choose the wood type theme so here the different styles that I have available I can also edit the data if I want to so what if I wanted to make some changes to the data here what if M Jones did not have 7,000 for quarter 3 but 8,000 well I can go ahead and do that so I’ll go ahead and click on edit data and basically reopens the Excel overlay for us and now for quarter 3 instead of 8,000 I’ll put I’m sorry 7,000 I’ll put uh 8,000 we can already see it’s being applied here as well going to go ahead and close this now before I close this another thing that I can do while I’m here so I can actually change or update my data here I can also decide what I want to be displayed on the chart so for example what if I only wanted quarter 1 and quarter 2 to be displayed on the chart but not quarter 3 so we just want to focus on the first half results if you take a look at the bottom right here’s our little fill handle that little square so this basically lets us know how far our data reaches so right now it goes to column d and row five if I drag this over to column C and row five it’s only going to show quarter one and quarter to so let’s take a look at that I’m going to go ahead and grab this handle right here so notice I have a white cross when I move my cursor over that small square it changes to a diagonal two-way arrow that lets me know that I’m ready to go ahead and interact with it going to go ahead and click and hold and drag it to the left so that only quarter 1 and quarter 2 two are being displayed if I let go take a look at my chart we can see that only quarter 1 and quarter two are being displayed here now so that’s a quick way to to kind of pick and choose what you want to be displayed on your chart I do want quarter three as well I’ll go back over here and I’ll go ahead and close it so that’s pretty much how you edit data and how you select data as well if you want to select your data the traditional way you can click on the select data here and we get this option over here where we can choose what we want to be displayed or we can just go ahead and highlight the ranges that we want to be displayed here as well going to go ahead and hit cancel I’ll close this out and I’m good to go let’s talk about chart design now when we’re customizing the chart there’s a lot of options that we can use we’ll just take a look at some of the essentials here here at the top right of the chart you’ll notice these two icons the first one with the plus sign these are the chart elements second one here is the paintbrush if you hover over the chart elements it tells us that we can add or remove things like the title The Legend the grid lines and the data labels if you hover over the paintbrush we can set a style and color scheme for our chart we’ll do both first let’s go ahead and click on the chart elements here and you notice we can turn things off or on like turn the axis off or on right now it’s turned on I’ll go ahead and turn it off and as you can see we we lost all of our labels down here so it’s pretty difficult to explain what we’re looking at here so I’ll leave those turned on and the axis titles so this just gives us a little more detail gives us an extra text box here on the vertical and horizontal plane we can type in there add some more content we can even format the text that’s in here if we want to change the font the color the size I don’t need that I’ll go ahead and turn that off here’s my chart title I’ll go ahead and actually put something in here I’ll say quarterly [Music] sales and as I mentioned before I can go ahead and change the color if I want to make it like a I’ll make it bold and italicized as well now for each of these elements you’ll notice that there’s a small arrow to the right of it indicating that we have some other options such as the title it’s being overlaid or above the chart we have data labels so if we turn the data labels on we can see the numerical values on top of each of the bars as well here’s the data table this is like a hybrid chart so we have the chart on the top and then we have the Excel table down here on the bottom this works well if you have a small table if you have a large table you may not want to use that I’ll go ahead and turn that off the good thing with the data table it does come with its own Legend so I can actually turn off this Legend down here and save a little bit of space as well we have error bars not really applicable here and then we have the grid lines we can turn them off we can turn them on don’t really need them if you have the numbers here and then we have the legend I can turn them off or on or I can move them to the right now they’re over here to the right or I can move them to the let’s see Mo to the left as well the top the bottom I’ll leave them here on the bottom so those are different chart elements let’s click on the paint paint brush so when you click on the paintbrush you’ll notice that you have 14 different styles to choose from so here’s style 14 and this is a really nice way to quickly choose a choose a design for your chart some of these will kind of move things around for you so style number two you can see my Legend has moved you can see that my values over here on the vertical aess are gone and take a look at the way that my data labels are being displayed their vertical instead of horizontal so go ahead and choose one of these Styles I like style number eight nice dark style I also like style 14 as well you can also choose a color so depending on the theme that you have selected you have different colorful palettes to choose from and then you also on the bottom you have different monochromatic different shades of the same color here as well so go ahead and modify your chart go ahead and interact with some of the chart elements go ahead and choose a chart Style change the color as well and come right back now after formatting the chart there’s some other things that we can do before we insert a chart from Excel we can also change the chart so if I click on the chart design tab if I want to change this to another type of chart I can go ahead and do so this brings us back to our first window where we can change the type of chart so if I wanted a stack column chart I can go ahead and do that if I want a 3D clustered column I can do that if I want a line chart here are different line charts that will integrate my existing data for me if I want a pie chart now remember a pie chart tends to just focus on one value at a time here as well right so it looks like it’s focusing on the let’s see what week that is a particular week looks like the week or the quarter three not sure which one that is and we have bar and let’s see the tree map so the tree map here the bigger the Box the higher the value so again this is going to be based on Quarters here as well so we can change this to a different type let’s try the tree map we’ll go ahead and press okay and if I hover over it it says this is 5,000 doesn’t really give me too much detail I would need to go ahead and um basically go ahead and and go into the advance menu to kind of change to see what’s being displayed here so I’m going to go ahead and change this back to a clustered column I’ll go for 3D I’ll press okay and I’m good to go now let’s go ahead I’m going to going to insert another slide here and this time I’m just going to go ahead and insert or I’ll copy a chart or paste a chart from Excel and let’s see what options we have here as well I already have my chart here’s my Excel Window so here’s a chart that I created from the data so I already have my chart here so I don’t feel like building this all over again in PowerPoint so I’ll write I’ll click on the chart I’ll right click on it I’ll copy it to the clipboard I’ll come back to PowerPoint I’ll click inside of this content placeholder and I’ll go ahead and paste it so I can use the destination theme and embed the chart into PowerPoint so I can manage the chart right here in PowerPoint or I can just kind of override the theme that I’m currently using and basically carry over the theme from Excel I don’t want to do that I prefer to stick to the destination theme and then we have use the destination theme and Link the data so basically what this will allow us to do if I make any changes to that chart in Excel will automatically update here um in PowerPoint right same thing here and then we have a picture so I’ll go ahead and use the destination theme and Link the data so there we go so here is our chart let’s take a look at uh week one here so this is the week one for Sarah so Sarah Week 1 27520 let’s go ahead and make a change here in Excel for Sarah’s Week 1 and to do that I need to go right here sah Week 1 I’ll change this to 5,000 we can see the chart has updated here for Sarah let’s take a look at [Music] PowerPoint and there we go we can see that it updates right away as well right so that’s pretty much how that works so if I want to make any edits I simply need to edit the data on the Excel file and as long as I have PowerPoint open it’s going to go ahead and update that for me automatically very good welcome back let’s go ahead and move on to lesson eight so we’ll just talk about preparing to deliver a presentation now when it comes to doing this what we want to do is we want to run our spell checker now we’ll notice that the spell checker is already kind of running in the background so if I had any grammatical errors I would have already caught it for me but I I’ll go ahead and run the spell checker anyway spell check is complete I’m good to go the next thing to do is to check our animations and our transitions right now we don’t have any transitions in here let’s go ahead and run the presentation let’s go ahead and save it first so I’ll press contrl s make sure it’s saved to my computer and then I’ll go ahead and run the presentation so remember if I want to run the presentation I can either press F5 I can go ahead and click on the start slideshow from the beginning from the slideshow tab I can also click on the slideshow icon here as well so whichever one you want to I’ll click on the slideshow Tab and I’ll run this from the beginning there’s a shortcut right there F5 to start the show from the first slide so here’s my slide that I animated really nice slide everything is nicely aligned there as well here’s my table here’s my Excel table here’s my chart there’s my Excel chart here’s lesson eight and then that’s the end of the slideshow here as well let’s add a transition I’ll click on transitions here and the transitions basically allow us to have some kind of entrance effect as we go from one slide to the the next so I’ll choose a there’s some there’s a lot of transitions here I want you to go ahead and try them all and choose the ones that you like some are very simple some are very complex if we scroll down we can see we could even have the previous slide folding into the shape of an origami bird here so lots of transitions that we can use I tend to stick to the simple ones something like wipe or push I like the push trans position that’s what it looks like almost like you’re scrolling through a endless web page if I use the wipe this is like you’re kind of reading a book turning the pages as well I’ll go ahead and choose the push transition and now after I after I’ve chosen the push transition what I want to do I want to make sure to apply it to all of my slides right so I’ll click on apply to all because right now if I were to run this slideshow so I can see it only applies the transition for the first slide so what I’ll do is I’ll click on apply to all make sure that’s checked off and let’s test that here there we go so it’s pushing down to each slide so pretty nice I’ll press this escape to exit the slideshow here and here we go right so that is pretty much how that works let’s go ahead and animate our chart so let’s go ahead and click on the chart that we inserted here so I’ll click on the chart let’s go to animations and let’s use the wipe animation I want to show you something pretty cool here so notice if I apply an animation to the Chart the entire chart comes in all at once I it’s not really helpful it would be nice if I can have the chart come in you know kind of one by one like maybe M Jones’s total first and then J power and so forth and so on well let’s take a look and see what we can do depending on the animation that you choose sometimes you’ll have effect options which means you can determine how the animation works well let’s take a look at this if I click on effect options here again this is for my chart so by default it’s coming in as one object let’s see what happens if I choose to come in by series look at that that’s pretty cool so it’s coming in by quarter 1 then quarter 2 and then quarter 3 let me preview that again pretty nice the other effect option is by category so there there we have the sales rep M Jones and then J power e Cohen and then R Gupta I’ll try one more now I’m going one by one in sequence which is pretty cool so we do have options when it comes to animating our chart as well we don’t have the same for our tables though but we can do it for our chart here as well so very good so go ahead and just run through your slideshow go ahead and apply a transition make sure to apply to all of your slides choose the one that you like go ahead and add an animation for your chart go ahead and choose one of the effect options five to choose from and come right back and we’ll take a look at the morph transition welcome back now let’s finish up lesson 8 by talking about the morph transition so if I click over here on the transitions tab I can see that I have the morph transition this is a pretty nice transition really adds some nice flare um and some Dynamic content to your presentation here as well let’s go ahead and take a look and see what the morph transition is all about I want to discuss three different planets Saturn Mars and Earth but when I want to emphasize Earth I want Earth to appear bigger than the others and when I’m finished discussing Earth I want to focus on Saturn so Saturn will get bigger and my other two here will get smaller it’s going to appear as if I’m still working on one slide as you can see down here I have one two three slides let’s go ahead and run the presentation and let’s see what this looks like I’ll go to reading mode here okay so here’s my slide I’m getting ready to discuss these three different planets if I click next so look at that so Earth kind of morphs into shape increasing in size while Saturn and Mars morphs into a smaller shape while I’m finished discussing Earth let’s focus on Saturn now so I want Saturn to increase in size while Mars and Earth decreases in size so if I click next to go to the next slide still appears that I’m on the same slide but things are just kind of morphing into shape here as well so that is the morph transition position so pretty pretty cool so let’s go ahead and work on this together first I want you to go ahead go ahead and insert three text boxes and go ahead and insert three icons so just click on the insert tab go ahead and insert an icon and we have one for Saturn we have one for Mars now we have one for Earth as well let’s go ahead and insert those three icons and insert those three text boxes right now in terms of uh size I have my icons are all about 2.58 high and wide as well so go ahead and add those six objects and come right back let’s go ahead and apply the morph transition so it’s a three-step process if we hover over the morph it tells us the first thing we need to do is duplicate a slide and then step two on the duplicated slide just move things around and then step three apply the morph transition so let’s go ahead and do that we already have our slide this is what it looks like so I’ll go ahead and duplicate this slide to duplicate a slide we can click on the slide here on the left pane if we right click on it we can choose the duplicate slide command we can also press contrl D and that will duplicate it for us okay so here’s the original slide and here’s the duplicated slide so let’s focus on the duplicated slide so for here I’m simply going to resize things so for my two for Saturn and Mars I want to decrease these to one one by one so for the height I’ll just do that that takes care of that for Earth I want this to grow to four so I’ll type four here so again just click on the icon on the graphics format in the size command group just type a number for the height and it makes it 4×4 going to increase the width of my text box here so it’s just a little bigger and that’s about it want to keep it simple don’t want to do too much so I do want to be able to duplicate this slide as well I want to keep it going because on the next slide I want to make everything else smaller and increase the size of Saturn so all we’re doing right now on the duplicated slide we’re just following the the steps we’re moving things around resizing them I’ll go ahead and duplicate the slide as well so I’m duplicated the duplicated slide and for this one I’ll put the put this back to one inch for Earth I’ll fix my text box here as well and then for Saturn I’ll increase this size to four we go now I have to kind of move things around I’ll move this to the left a little bit so it’s not overlapping with my Mars here and I’ll increase the size of the text box as well and there we go so the transition from slide from this slide to this one is going to be morph and the transition from this slide to my last one is also going to be morph so what I’ll do is I’ll click on that second to last slide and I’ll click on the morph transition here’s a nice little preview of what it would look like I’ll go to my last slide and I’ll also apply the morph transition as well I don’t want to apply the morph transition for my first slide because there’s nothing to morph yet so I’m just morphing my two duplicated slides here as well so let’s run this in reading mode see what this looks like so here’s my slide if I click next in the sequence there it is my Earth and my text box is growing everything else shrinks and there we go so pretty pretty cool now I could I could even move things around in this case I just resized them but I could have actually moved things around and we will see it morphing into its shape let’s actually do one more I’ll go ahead and duplicate this one and let’s move them around this time so right click I’ll go ahead and duplicate this one because I duplicated it it automatically inherits the morph transition so no need to do that and on this last slide here I’m going to go ahead and move things around so I’ll go ahead and let’s see maybe I’ll going to make this smaller actually don’t need that to be that big we go going to resize this just to make a little room for my other items here as well maybe what I’ll do is I’ll go ahead and stagger these so s will be here Mars will be here and Earth is going to be down here somewhere and I’ll put everything back to one in not perfect but we just want to go ahead and kind of see how this transforms into here as well so let’s go back this time I’ll run it slideshow view okay so here’s the first slide here’s our first morph our second morph and let’s see what our third morph looks like pretty pretty cool so everything is moving into into shape here as well all right very good so go ahead and run the morph transition go ahead and duplicate at as many as you like what I’ve seen a lot of professionals do they morph a few times and come back to the original slide as the last slide so you can do that if you want to and come back and we’ll wrap up welcome back well hopefully you had fun with the morph transition the next thing to do here is to print our presentation if we do decide to print it via paper we can press contrl plus p and that will open up the print dialogue for us I’ll go ahead and press contrl P here’s the print dialogue here’s the true preview of what of what the printouts would look like as long as we’re using a color printer and I can scroll through my slides I can see what they look like and I can make any changes if I need to and we have all the basic print dialogue settings that we need to be able to use if you do have the Microsoft printed PDF printer we can actually save this as a PDF file and that we can distribute that’s a good idea maybe your recipient does not have a copy of Microsoft Office any modern browser can read a PDF as well so very good going to go back here and we’re good to go now we covered a lot here in this introductory course and we have all the essentials that we need to create a dynamic presentation as a a quick recap we’re able to in module one understand the PowerPoint interface we’re able to design a presentation we’re able to insert and format text we spend some time inserting and formatting images then for module two we’re able to work with objects grouping aligning inserting and manage tables charts as well then we’re able to take a look at different different types of animations and transitions as well so congratulations on completing the course and I look forward to seeing all of you in a future course at learn it hello and welcome to Microsoft PowerPoint Advanced you’re learning with mojones it professional and educator for our Advanced course we have two modules so module 3 and module 4 for module 3 we’ll take a look at how we can customize the PowerPoint envir we’ll take a look at how we can customize design templates it’s all about the slide Master we’ll save a design as a template that we can either share or reuse over and over again we’ll also go ahead and take a look at creating infographics with smart art no need to search the web for infographics we can make our own there’s an extensive library of capabilities right here inside of Microsoft PowerPoint let’s go go ahead and dive in please open up the PowerPoint module 3 exercise file and come right back we’ll Dive Right into customizing the PowerPoint environment I currently have my module 3 practice file open here and here we have a few slides and here is lesson one customizing the environment so one of the things that we’ll do is we’ll go ahead and create our own ribbon Tab and then we’ll add our own commands to it and then we’ll also go ahead and set some Global options just some useful options that may help us as well in particular what I would like to do is add some of these tools that will help me as I’m designing my presentation such as the animation pane the Beloved ey dropper the selection pane that helps us to organize objects on a slide and of course the slide master so to do that right now in order to get to the eyedropper I could add it to my quick access toolbar that’s one thing that I can do or I need to be interacting with an object and then I can go ahead and pull up the ey dropper from there as well but what if I don’t feel like clicking on the contextual tab clicking on shape fill and clicking on the ey dropper well let’s go ahead and add our own ribbon tab I’m going to right click on any one of these tabs and just click on the option that says customize the ribbon so I’ll click on customize the ribbon we get to this PowerPoint options dialogue and on the left we can see that we can customize the ribbon here are all the commands well at least the popular commands I’m going to change this to all commands so I’ll change this to all commands now I can see all the commands that are in PowerPoint over here on the right I can see that I have some I can see the the tabs that I have here so for example here’s the Home tab and the Home tab as the clipboard command group paragraph so forth and so on well I want to create my own as you can see I do have a couple of pre-made ones here as well so for example I created a tab called my designs and let’s see what that looks like here so when I created this tab it comes with a tab and then a command group and then I have my commands down here as well going to turn this on let’s see what this looks like here and then we’ll go ahead and recreate it so if I enable that I’ll go ahead and find it here in my ribbon here it is my designs so now if I click on my designs I can quickly access the animation pane I can turn on the eye dropper right away and apply a particular color to that content placeholder there if I want to and I can also turn on the selection pane take a look at all the different objects on my slide I can also access the slide Master right from here as well so that’s what we can do so let’s go ahead and create our own let’s go back to customize the ribbon here and to do that the first thing we need to do is click on the new tab option here so we’ll click on new tab so here is our new tab right here has a generic name new tab it has a generic command group let’s go ahead and rename both of those so for the new tab I’ll click on rename maybe I’ll call that design 24 go ahead and press okay and for the command group I’ll rename that as well I click on rename you can also choose an icon if you want to go ahead and choose this here and the display name it’s going to be called design tools go ahead and press okay so I’m good to go I have my design tab here’s my command group the next thing for me to do is to go ahead and actually add commands to that particular command group so I want to make sure I have design tool selected here and I’ll change the commands from popular commands to to all commands so now what I can do is I can type the letter e this will bring me down to the E commands I want to look for the ey dropper here it is I’ll add the ey dropper in there so we can see how this works so here’s level one which is the actual tab level two which is the command group and then we have level three which is the actual command so let’s go ahead and add some more going to go ahead and add the slide master so I’ll type the letter S and I’ll look for the slide Master here and again you can pretty much add any any command that you want I’ll just click on slide Master I’ll also turn on the selection Pane and here we go I’ll add that and I’ll keep it simple I’ll just add add one more I’ll go back to the a group and I’ll add the animation Pane and I’m good to go here are my four commands I’ll press okay and I’ll go ahead and locate design 24 here it is right here and from here I can go ahead and I could even create another command group name that and add my own commands in here as well well and I can keep going as well so that’s what we want to do so go ahead and customize your Ribbon go ahead and create a ribbon tab rename the command group go ahead and add some commands there as well and come right back now that we are able to create our own tab so here are my two tabs here the next thing we can do is turn on some useful options I’ll go back here I’ll rightclick on any of these ribbon tabs and I’ll go back to customizing the ribbon this brings me to the PowerPoint options dialogue here so I’ll go back to the general here and some of these are turned on by default but I find these to be pretty helpful when you’re designing your presentation so the first tab here on the general tab I can see that I have some user interface options now if you’re using two monitors you may notice that when you move your application from one window to the next you may have some appearance issues here as well so you may want to go ahead and optimize for best appearance when you’re using multiple displays if you just kind of hover over the little information icon it gives you some more information um here as well right so you can toggle it back and forth optimize for compatibility or optimize for best appearance I like the mini toolbar on selection this is pretty much whenever you highlight a chunk of text it gives you the mini tool that allows you to do some quick formatting a big part of Designing in PowerPoint is live preview so for example before we apply a particular style or some type of feature we can get a preview just by hovering the mouse over it so I like to leave that turned on there as well for those of us who like to collapse the ribbon remember we can always change the ribbon display options I like to see the full ribbon so I’m good to go you may want to collapse the Microsoft search box as you can see I do have it over here it is currently minimized and this allows me a little more room if I’m using my quick AIS toolbar I have some more room over here to work with as well so I can do that if I want to I’ll scroll down a little bit here’s the PowerPoint designer so when you’re designing you’re either using the a theme you’re using the slid master or you’re using the PowerPoint designer I have it turned off right now because I’m going to be using the slid Master to design my presentation as well if we go down to the save go down to The Preserve Fidelity when sharing this presentation if you’re using special fonts in your presentation if your recipient does not have that particular font or set of fonts they will not be displayed properly so you may want to embed the fonts in the file so that even though they don’t have those fonts installed they will still be able to view them as well so that’s another nice option to be able to use there the other ones here in terms of advanced when it comes to printing we can print true type fonts as Graphics so that’s another nice option there as well um that we can use and of course if we go to the quick access toolbar here just like how we can add any command to the the ribbon tab that we created here are the current commands that are on my quick access toolbar but I do have access to the entire Library so if I change this to all commands I can add any command to my quick access toolbar and because I minimized the search box here I have a lot of room over here to be able to add some of those commands as well so those are just some options that may help you as you continue to create designs in PowerPoint let’s move on to lesson two designing with the slide Master now what is the slid Master let’s go ahead and take a look at the slid Master to get there I need to go ahead and click on The View Tab and get to the actual slide Master once I’m there I can do something like insert a layout I can rename a layout and I can insert content placeholders as well let’s do something simple in the slide Master let’s go ahead and make Universal changes to our entire presentation for example we often do this for each slide maybe we want to go ahead and change the title maybe we want to go ahead and do something like change the [Music] font I’ll go for this one and change the color and then go ahead and change the size we go to our next slide we do the same thing well we don’t have to do that instead of going to every single slide and changing the formatting options for all of our title placeholders we can do that in the slide master so I’m going to go ahead and undo all those changes I’ll press contrl z a few times here now I’m back to normal let’s head on over to the slide Master I’ll click on The View Tab and once I’m on The View tab all the way to the far left we’ll see the slide Master let’s hover over the slide master and see what it says so slid Master it controls the look of your entire presentation including colors fonts backgrounds effects and just about everything else so I can insert a shape or a logo and it will show open all of my slides automatically well that sounds pretty good going to go ahead and click on the slide Master here now here we can notice that we have a different view now we are in the slide Master view we can see that we now have the slide Master Tab and we have some command groups here that are specific to our slide master now important to note on the left we’ll have different types of slides what I want to do is scroll all the way to the top here and you’ll notice all the way at the very top we’ll notice that a slide is bigger than all of our other slides so in fact this is the actual slide Master the other slides that we see here these are the different layouts so here’s the title and content layout here’s the two content layout here’s the comparison layout so that’s what that is I’m going to go ahead and click on the actual slide Master here and let’s just get a good understanding of how this works so whatever changes I make to this slide it’s going to affect all of my slides regardless of what type of layout it is so I’m just going to do something simple I’ll go ahead and I want all of my title slides to be a particular font color color and size so I’ll go ahead and highlight these I’ll go back to the Home tab and I’ll go ahead and apply the formatting there once we apply the formatting we’ll close the slide master and take a look and see how our slides have been updated okay I’ll change this font here I’m going to go with the Georgia font right so here’s Georgia and I want it to be that nice Georgia Blue and I’ll make it 40 and that’s it now if you take a look you’ll notice take a look at my different layouts so here’s the title slide we can see that the title slide is already incorporating that formatting that I just applied here’s the title and content slide layout and we can see it’s also incorporating that format that I’ve made to the slide Master let’s go back to the slide master let’s go ahead and close the master view this will put our presentation back to the original or normal View and let’s take a look to see if our slides were updated and we can see that they were so here’s my title slide here’s slide number two so all of my slides now have that Universal formatting for my title let’s take it a step further let’s go back into the slide master and let’s see what else we can do here again I want to make sure I click on that very top slide here and what I’m going to do is for all of my level I’m going to change my bullets actually so I’m going to highlight these five bullet levels here and I’ll go to the Home tab and instead of having those regular bullets maybe I want something like Hollow squares so I’ll go ahead and choose Hollow squares and and for my level one item maybe I want that to be let’s say orange my level two items on the list maybe I want that to be I’ll go with purple that’s it let’s go ahead and analyze our slides and see if it incorporates these formatting changes I’ll go back to the slide Master I’ll click on close Master View and look at that all of my level one bullet points are orange and it has the hollow squares here as well if I go back to slide number two we can see all of those formatting changes have been applied here the title Georgia 40 blue level one orange with the hollow squares level two bullet items or list items purple with the Hollow Square as well so those are some of the universal changes that we can make with the slide Master now just one more thing to note I’ll go back into the slid Master here so I have two options what I did initially is I chose the master slide so this applies the formatting to every single slide what if I only wanted to make some changes to my let’s see if I hover over this one so this is title and content it’s currently being used by slides 2 to 3 and 5 to 7 so if I wanted to format only this particular slide layout I can do that here as well so for my third level here I’ll go ahead and make this uh let’s see I’ll make this green like that it’s only going to affect my Tittle and content layout so let’s go back here I’ll close the master View and so this is a let’s see lesson one this is a title and content let’s add a third level item and there you go we can see that it’s already it’s already green if I go to a another layout let’s see do I have a two content layout in here well let’s just insert a two content layout slide okay so here’s level one here’s level two and here’s level three so we can see that level three item only applies to that particular type of slide so we can either make Universal changes to the entire presentation or to specific slides as well go ahead and make some simple changes in the slid master and preview it and come right back let’s continue fun with the slide Master well what I want to do now is create a custom slide layout if I click on new slide here here are the different layouts that are available based on the current theme that I’m using now I don’t have the particular layout that I’m looking for basically what I want is a three content layout so I have titling content I have two content I want a slide that has three columns that way I can easily ex Express three concepts or three main keys or three main ideas here so I don’t have one so what I can do is create my own layout let’s go ahead and do that I’ll click on The View tab here and I’ll click on the slide Master now I have two options I can either just kind of duplicate an existing slide and just make a basic update or I can insert a new layout I’ll keep it simple I’ll use it based on the two content layout here so in the slide Master I’ll click on the two content layout so we have two content here but I want three so what I’m going to do is duplicate this slide and just resize these placeholders and place one here in the middle so I’m going to write click on this layout and I’ll choose the duplicate layout option here I can see it’s duplicated it’s the exact replica of the one above so on the duplicated layout I want to rename it first so we’ll duplicate it rename it and then we’ll go ahead and format so I’ll right click on it I’ll choose rame I can also click right here to rename it I’ll right click I’ll rename and I’ll call this one three content I’ll press rename and I’m good to go so now what I can do I can just go ahead and resize these so I’ll go ahead and grab the content placeholder on the left here and just going to resize it I do have the Footers down here in the bottom so I’ll make sure it’s the same width as my Footers one on the right I’ll grab the resize handle and I’ll snap it to that footer on the bottom right here now I have space in the middle to put a a bigger one I could resize them make them all the same size if I want to but I’ll just insert one here in the middle so to do that I’ll click on where it says insert placeholder so under the master layout command group under the slide Master I’ll insert a placeholder now here the different placeholders that we can insert the content basically we can add anything text picture chart table smart art media text is just for text only picture chart table well I want a content placeholder that can pretty much add anything so I’ll click on content and just like a text box I have to draw it so I’ll go ahead and draw it here we can always resize it later right now I just want to use those temporary guides to make sure they’re the same height as the other two and I’ll snap this right here and I think I like to go ahead and Center a my title as well so there we go let’s go ahead and close the master view let’s go ahead and insert this slide and let’s see what this slide layout looks like so now how do I find it if I click on new slide I can see here is my three content layout so pretty pretty cool so now I can always use this slide layout whenever I want to I’ll go ahead and insert that here and there it is so I can add my title and I have my content Place holder here on the left middle and on the right so pretty pretty nice as well go ahead and create a three content layout go ahead and insert it into your presentation and come right back welcome back let’s go ahead for lesson two let’s go ahead and create a custom SL slide that we can use over and over again going to head on over to my title slide now I did insert a image on my title Slide the reason I do that is because I want to gain some insights from the designer so the designer really likes pictures so if you add an image to your slide you’ll get some more vibrant looking options here as well I’m not going to insert any of them I just want to get some insights in terms of what is modern and what looks pretty cool so we can see it tends to put either a big picture left big picture right or even a big picture on the top and then add our title and subtitle here as well so these look pretty good I’m going to go ahead and create an actual slide let’s see see more designs now we can see if we actually break down this particular slide here so how can we recreate a slide like this this slide basically we have a picture we have what looks like a either a shape or a text box here we have a triangle shape down here as well that’s pretty much what these are they’re a combination of content placeholders images and different types of shapes now when you create a custom slide in the slide Master when you’re actually insert that slide you will not be able to interact with the picture or any of the other objects that you insert on there let’s go ahead and head on over to the slid Master I’ll close the designer here I’ll click on The View tab I’ll go back to slid Master now what I want to do is I want to go ahead and insert a layout if I hover over that tells me that I can add a custom layout to the master slide set once it’s created I can easily add slides that match the new layout to my presentation well I’ll go ahead and click on insert layout here and we can see that it inserted a new layout for us all it has on here is just the title it’s blank we have the the Footers down here as well date custom message and page number in here I’m going to rename this right away again I want this to be a custom title slide that I can reuse over and over again so I’ll right click on here and I’ll rename this layout and I’ll call this one title two and there we go so I’m going to I think what I will want is a big picture on the top and then I want my title on the bottom right and then my subtitle maybe I’ll go ahead and add a logo over here as well so that’s what I’ll do so to do that I’ll go ahead and click on the insert tab I’ll look for a stock image and I want something related to learning I know exactly the picture I want so I’ll scroll [Music] down here it is nice chalk board here beautiful colors that are in here I’ll go ahead and insert that one you can insert any picture you want so this picture is actually very very good it actually takes up the entire slide sometimes you insert a picture and it’s more fit to either align it to the left or to align it to the top so I do want to what I’m going to do is crop this picture because I don’t have any space down here I I do not want to Overlay the text on it so I’m going to cut out I don’t want to cut out the chairs though they look really nice I’ll cut out maybe I’ll crop the bottom and just a little bit from the top here as well that will give me a little bit of room to be able to add my title subtitle and my logo as well so I’ll click on the picture format and I’ll click on the cropping tool here there we go and I’ll crop it from the bottom go to about here and I’ll come down to about here I’ll click away from it there we go I’ll move it up to the top here and that’s pretty good I could probably even crop it a little more but I’ll keep it simple here now I want to go ahead and find my title so my title is hiding behind my picture so if I move my picture I’ll see my title there so what I’ll do is turn on the selection pane I can click on picture format and turn on the selection pane I also have it under my designs here so I’ll just turn on the selection pane I’ll go ahead and locate my title and once I have it selected I can use the arrow keys on my keyboard just move it down I can also just bring it forward if I want to but for now I’ll just go ahead and move it down here to the bottom I do want to align it to the right so I bring it to the right here doesn’t need to be that big either maybe I’ll go to about the middle of the slide and as far as the text I’ll make that 32 and I’ll also bring it up here as well going to turn off my Footers so if I go back to the slide master I can toggle the Footers off here just going to turn them off for now don’t really need them right now but that’s pretty much how you would insert Footers from the slid master so here we go going to go ahead and insert another placeholder this will be for my subtitle so I want a text placeholder I’ll draw it down here this is going to be just a level one item so I’ll delete all of the other levels here and this is not a bulleted list I’ll use my quick toolbar here to remove the bullets and as far as the text I want to pick up one of the colors from the picture here so I’ll use the ey dropper and I’ll pull in the color here as well so I’m good to go that looks pretty good I’ll go ahead and align this a little more to the right now I’ll go ahead and insert a I’ll insert an icon something something to do with learning I’ll go ahead and grab this one so this is another type of object and this one is giving me issu issues as well so I’ll click on the graphic I use my arrow keys to kind of move that around here and maybe what I’ll do is align that to the to the bottom and then to the left here I’m good to go if I wanted to do something else like add a little accent I can do that so I’ll just insert a shape to kind of show what that looks like I’ll um put a little let’s see let me just a line I’ll draw a line right [Music] through here there we go all right that looks pretty good going to go ahead and close these the slide master and let’s go ahead and insert that so I’ll click on new slide and here’s my title to if I insert that that’s what it looks like and it looks pretty good so if I wanted to make any changes I can simply go back into the slide Master click on this slide and move things around but here I can go ahead and add my content and I’ll say community day I’ll say something like learn with us as well notice I cannot interact with the icon here or that line shape or that picture the only things I can interact with are the content placeholders so when you’re designing if you add any shapes or images or any objects they remain flat on the canvas which makes it possible for us to create these types of designs here as well go ahead and create a custom title make any changes if you need to for example if I wanted to go ahead and go back to the slid master so if I wanted to maybe align my text to the right and once I close the master View and go back I can see now it’s aligned to the right as well go ahead and insert a custom title slide or two go ahead and insert it and come right back welcome back let’s go ahead and move on to lesson number three customizing design templates now when you’re creating a template in PowerPoint typically you’re saving a a couple of slide layouts you’re also creating and saving a theme and a design as well we want to go ahead and lock in the layouts that we’ve created so far so if we click on new slide here’s our title our custom title slide and here’s our three content layout as well but what if we wanted to make some other changes such as change the color scheme that’s available and maybe change the font for the entire presentation I did apply the Georgia font to all of my titles we can see it’s Georgia but for everything else it’s the default font style here for PowerPoint so what I’m going to do is I’m want to go ahead and create my own Theme by choosing my own colors and fonts and then we’ll go ahead and save this as a template I’ll head on over to the slid Master I’ll click on The View tab go back to slidemaster so at this point what I want to do I want to go ahead I can either choose a theme so let’s preview those first if I click here and I simply choose one of these themes I can see how the theme will update all of my slides for me but what if I’m not finding a theme that I want what if I want to use my own colors and my own fonts typically that’s what we will do in the slid Master I’ll click on the colors here and you can see I have some different paletts to choose from so depending maybe I’m try maybe I’m trying to Brand this presentation and I want a particular color set I can go ahead and choose one of these existing ones here as well additionally if I want to I can even take it a step further I can create my own color palette the way to do that is by clicking on customize colors once you’re here we just need to go ahead and name it and go ahead and choose all these colors that we want so this is typically where you would put your company colors to be able to Brand the presentation once you do that it will appear in the custom area as you can see I have a couple of color pellets here okay right now just want to choose an existing pallet and I’m going to go ahead and I’ll choose I’ll go with the blueto so I’ve chosen my color set now every time I want to modify something I’ll see that those colors are now available I want to choose my own font as well so I’ll go ahead and click on fonts and I want to use the Georgia font not just for this particular slide but all of my slides so I’ll scroll down to I already have Georgia here I’ll click here now we can see everything now is Georgia if I go back to my slide Master here I can see it’s Georgia here as well so basically I chose my own color palette I chose my own font if I want to I can even add a an effect I’ll go for a glossy effect these effects they’re very subtle they appear in things like charts and tables and other types of visuals not really for text here as well so that’s it so from here what I can do is I can go ahead and lock all this in by Saving this as a template so that’s what I’m going to do going to go ahead and click on the file tab then I’ll go ahead and click on save as and I can do it there if I want to or I can press the F12 key on my keyboard now once I’m here what I need to do is simply change the presentation type so I want to save the type not as a PowerPoint presentation but as a PowerPoint template so I’ll click on this drop down first I’ll scroll down to PowerPoint template here it is now notice when I change this to a template save type automatically jumps to the folder the default folder that houses all of my custom office templates here as well so we don’t want to change that location the only thing we want to do is go ahead and rename it and press save so I’ll go ahead and leave this as the name I’ll press save and that’s it so this has been saved as a template the next time I open PowerPoint right from my start screen I can see that template and now I’ll have all of the colors fonts effects slide layouts custom slides any changes that I’ve made will be locked into the template going to go ahead and close the master view then the next thing to do is to be able to find our templates I’ll click on the file tab here and you’ll notice it appears right here on your recent files from the home button there so what I like to do is I I like to go ahead and pin it right away so I it will always show up on my pen files I’ll go ahead and pin that there we go so now it’s pinned if I click on my pin files I can see it in here it’s right here so I can always access that file the traditional way to access your templates is to click on the new tab here and when you go down we’ll notice that we have office templates so this is from Microsoft’s Gallery we want custom so if I have existing templates click on the new tab click on custom and then I’ll I’ll have my custom office templates if I click right here here are the different templates here’s the recent one that I created and basically the way that this works is if I were to open this file PowerPoint will produce a copy of that presentation for me the original template will remain untouched here as well so that’s the benefit of working with a template we can reuse it over and over and over again if we want to make any changes to the template we can go ahead and open it for from the folder structure on our computer and make any changes and resave it and that template will be updated here as well so go ahead and go back into the slid Master go ahead and choose a color scheme choose a font go ahead and save your presentation as a template and just confirm that you can see it in your custom templates folder welcome back let’s go ahead and move on to Lesson Four creating infographics we’re going to create smart art and then we will go ahead and modify smart art and once we’re finished we’ll have the capability to animate smart art as well now what exactly is smart art smart art is a way of creating infographics in Microsoft PowerPoint so really there’s no need to search the web for an infographic we have an extensive library in PowerPoint that you can use to create your own infographics we want to get to this library of smart art Graphics that we can create we can see that we have different sections such as if you want to express an infographic as a list a process a cycle so forth and so on what we’ll talk about is how we can convert smart art from existing content we’ll also take a look at how we can go ahead and insert a smart art graphic and then add our own content to it so an infographic is basically text accompanied by either shapes or images so in this example I have a basic list here just step one step two and step three very generic we’re going to convert this into an infographic and we’ll watch it evolve as we do that so I can either express my steps here in the form of a bulleted list as such or what I can do going to go ahead and highlight my list and then I’ll use Microsoft to convert this into an infographic to do that I need to First highlight my my list and on the Home tab in the paragraph command group here is smart art if you hover over it tells you exactly what it does converts text on your slide to a Smart art graphic such as a diagram flowchart so forth and so on if I click on the drop down I see see just a short list of infographics that I can create for example here’s the first one a vertical bullet list so as you can see if I were to choose this one I would get those really nice rounded rectangle shapes there to accompany my text here’s another type vertical block list so we have smaller rounded rectangles and if we wanted to add a picture to it we can go ahead and do that here as well so lots of different Graphics in here it’s time to explore and see what is a available some of these are different here’s an or chart so if you want to create an organization chart you can pretty much do that in PowerPoint here’s another variation hierarchy so we can express something as a list a hierarchy a process a cycle so lots of different options that we can use here going to go ahead and click on more smart art Graphics let’s take a look at the library to get an understanding of what we can do so here’s the full smart art library and basically PowerPoint is asking us to choose a smart art graphic well we can choose whether we want to express something as a list something as a cycle or even as a matrix so different ones here when you click on the list so so in this case I want to express something as a process step one to three I have a basic process here here’s a preview of what this would look like on the bottom we have a brief explanation of how this smart art graphic Works here’s the second one a step up process we have a step down process here as well now when you’re creating an infographic you can keep it very simple or you can make it more complex so as we can see down here we have some more complex infographics or smart art and we can see that we have a more indepth explanation of how this works it’s all based on levels so when you’re creating a list it’s all based on level one two or three items so different smart art Graphics will incorporate different levels some some only allow one or two some will allow more than two as well for for relations we can see we have some really complex ones in here such as a balance scale and we have a lot of verbiage here kind of explaining how that works so what I’d like for you to do go ahead and highlight your text and then go ahead and try out some of the different smart Arts we can always change it once we select one so if I select the vertical bullet list here I can always change it a little later so go ahead and check them out if you’re feeling adventurous click on the more smart art Graphics here and take a look at the different options that are available and come right back welcome back let’s go ahead and create an infographic here going to go ahead and highlight my text and going to I’ll start with a vertical bullet list here now when you start with your smart art graphic you’ll notice that we have a smart art design contextual tab so just like all of the other objects we can change the layout we can change the style so as you can see we have an a white outline we have a glossy effect here a shadowy effect so there’s a lot of different things that we can do here we can change the colors and over here on the far left is where we can basically control our smart art Graphics so if we wanted to add another shape or move things around we can do that as well but I want to introduce you to our little text pane here on the left and basically this is how I prefer to manage my smart art graphic so again it’s based on the levels here I only have level one items in here if you’re not seeing this text pane just make sure to go ahead and click on this little arrow here and this will open up the text pane for you so I’ll click here and there we go if I wanted to do something like add another step I can just add another bullet there and as you can see it’s already adding that fourth shape for me so if I say step four I can do that as well now if I continue working with the list if I press the enter key after step one and I press tab over so now I have a level two item the level two item has its own not really a shape but just a a small area here that we can use so I’m going to keep it simple I’m going to remove step four so I’ll delete step four from my list you’ll notice the shape goes away and for step one I’m just going to go ahead and put a level two item for each of my steps here I’ll keep it simple here and as a matter of fact if I already had a bulleted list I can copy and paste it in here if I wanted to and that will actually create the smart art graphic for me as well but for here I’ll keep it simple I’ll just go with a project management template here so I’ll Define the project step two I’ll tab over and I’ll say identify Stak [Music] holders and for step number three we’ll go ahead and add tasks so that’s how the smart art graphic works so so we have three here so that’s the simple way that we can modify it now what I can do if you want to move things around well what you can do is click on one of the shapes here and on the smart art design tab over here on the far left this is where we can do things like move this down on the list or we can move it up or we can promote or demote or we can add a shape so we can either manage the list here to manage manage the smart art or we can use the create graphic command group to manage the smart art as well so for example if I wanted to move step one down notice how it moves the level one and the level two item down as well I can go ahead move that back up and maybe I want to promote defined project as a level one item so it does it here and it gives gives its own shape as well I’ll go ahead and demote that and I’m good to go so that’s the basics of how we use the text pane to modify smart art now let’s take a look at something else here let’s click on the smart art design Tab and what if I want to change the colors I’ll go ahead and change the colors I’ll click on the color palette here and we have three options for the primary colors based on the theme that we currently have selected just get the preview see what that looks like then we have five colorful palettes to choose from so these are all incorporating the accent colors based on the theme that you have selected if I scroll down we have different variations of each accent color so it’s really up to you what you want to use I typically like to use the colorful scheme here as well once we change the colors we can head on over to Smart art styles and as you can see there’s a few styles to choose from here the first one gives a white outline and a little Shadow as well so it makes it look pretty nice and then we have a subtle effect here’s the moderate effect and it gets more intense as we go to the right so this one has a gloss and it also has a shadow and we have polished and gets a little more interesting as we go through here as well so different orientations of the smart art graphic I’ll go back I’ll just choose the moderate effect here as well so that is how we insert and modify smart art go ahead and create your own smart art graphic and come right back in our last lesson we saw how we can create an infographic from existing content let’s go ahead and move on to the next slide and this time we’ll go ahead and insert smart art and then add our content now I can click on the smart art right here inside of my content placeholder that will insert my smart art for me I can also click on the insert Tab and in the illustrations command group here’s the smart art here as well I’ll go ahead and click on the insert a smart art graphic right from my content placeholder and again here’s the entire library of what we can go ahead and insert I want to express something as a process so lots of different processes here that I can I can use we can integrate pictures in there as well we’ll get to pictures in just a little bit let’s go ahead and keep it simple I’ll go ahead and insert a step up process I’ll go ahead and press okay so here’s the shell of our smart art again we have the smart art contextual tab and over here we have our little text pane now what I can do I can either type the information in here or I already have the information I want I’ll go back to my other slide I’ll open up the text pane for this smart art graphic and I’ll just copy and paste this list right into here so if you have you already have an existing list you can simply copy and paste it in here what I want to do first though is press control a inside of my text pane here and delete everything first because if I paste it in it’s going to just append that to the existing smart art so I’ll go ahead and right click and I’ll go ahead and use the destination theme and there’s my smart art graphic so all my levels are intact here as well so that looks pretty good but what if I want to go ahead and change this smart art graphic to something else I’ll go ahead and click on the smart art design tab here and right over here under layouts I’ll get some similar layouts that I can choose from so I’ll go ahead and maybe choose this first one here here’s the step down process that’s what that would look like here’s the accent process that looks pretty good as well and here’s the picture accent process so this actually incorporates pictures I’ll go ahead and click on this one and so now we’re given another shape with a picture placeholder so I’m going to go ahead and take it a step further I’ll use three images that kind of communicate defining the project identifying and tasks here as well so to do that I’ll go ahead and click on the placeholder either here or on my text pane here doesn’t matter I’ll go ahead and click here and I can either insert in a picture or I can use an icon I prefer to use an icon because they’re always the same size 1 in by 1 in pictures we may need to crop the pictures to make them fit inside of our smart art graphic so I’ll go ahead and grab an icon here here’s my icon Library so I want something that represents defining or yes finding the project so I’ll search for let’s see Target there we go like this graphic I’ll go ahead and choose this one I’ll choose the fill colored one as opposed to the outline so I’ll go ahead and choose this here here’s my graphic behind it for the next one I’ll look for a search icon search or find and because we want to go ahead and identify the stakeholders so maybe I’ll maybe I’ll use this one a little hard to see it maybe I’ll change that and the last one should be pretty simple to find I’ll just type tasks I’ll get a couple of task lists here as well I’ll go for I’ll go for this one that looks okay go ahead and insert that so here my three icons I think I’m going to go ahead and change my second icon here here we go have to first select it now I can right click on it and I can change the graphic from icons and I’ll type find probably going to have the same issue you know what let’s see look for Community here we go maybe I’ll go with this one identify stakeholders and there we go so that’s how we can change the smart art graphic to another layout and this is how we can integrate pictures in here as well now I want to make this look a little nicer so I’ll go ahead and change the colors I’ll give it a colorful the color ful pet here there we go so that looks pretty nice now I can if I wanted to I can make changes to the individual objects here so the arrow all these I can go ahead and change so if I wanted to go ahead and change the color of this icon notice that we have the graphics format tab here that’s available if I wanted to do that I can simply go ahead and recolor it by applying a style or giving it a different different graphic fill color if I wanted to here if I wanted a standard color I can go ahead and do that as well so that’s what we can do so we can change the color we can have Smart art just kind of update the colors for us I’ll go ahead and give this a I’ll give this a white outline that looks pretty nice and now the beauty of this is once I have my smart art if I want to go ahead and change it I can so if I wanted to change this graphic it’s a matter of just hovering over the different ones and see which one I like here that looks pretty nice as well sometimes the when you add a picture and you change the smart art any type of arrows will will show up in the form of that picture it’s not really happening here but so pretty nice let’s see if there any other picture ones here here’s another picture so this is a ascending picture process so there we go now if I wanted to I can go ahead and just click on more layouts this looks pretty nice this gear icon here as well I’ll go ahead and click on more layout s and I’ll look for some of the other smart art Graphics that are available in the picture command group and I’ll take a look at those so here’s a another type here don’t really like that not all these will work because again some of them have their own type of requirements and they only allow certain amount of levels so it’s just a matter of once you incorporate those pictures choose the layout that you like and we’re good to go I’ll go ahead and stick with this one and maybe I’ll change the colors here as [Music] well and there we go so go ahead and insert your smart art go ahead and insert some icons or even some images see what they look like and come right back welcome to module 4 for module 4 we’ll go ahead and explore working with media and animations video collaborating on a presentation we customize our slideshow Behavior so what are some of the things that we can kind of establish before we run our slideshow and then we’ll wrap up by using some of the newer tools to automate a slideshow go ahead and open up the module 4 practice file and come right back we’ll Dive Right into module 4 here’s my module 4 practice file I’ll jump into slide number two which is lesson five so for lesson five it’s all about working with media we’ll go ahead and insert a local video file and then we’ll insert an online video here as well to insert media we want to get to this media command group that can be found on the insert Tab and over here we can insert videos from our device from the stock Library also online videos we’ll take a look at the different sources that we’re able to stream videos from when it comes to audio you can either record your own audio using your microphone or you can go ahead and upload a audio file from your computer as well and we also have the screen recording tool which we’ll take a look at just a little bit here I want to take advantage of the content placeholder here and I’ll insert my video by clicking on the insert video content placeold holder so this allows me to basically upload a video from my computer locally so I’ll go ahead and insert this video here and here is my video now once we insert the video we can resize it it’s an object just like all of the other objects that we’ve been interacting with so as expected we have a contextual tab we actually have two one is for video format and one is for playback well if I click on video format I can do things like you know choose a quick style I can place it in an oval if I want to or maybe give it a nice reflection a simple Shadow or just a simple frame here as well so I can do any of those things well I want to go ahead and just run this slide and let’s see what this actually looks like so I’ll go ahead and I’ll run this in reading mode and I’ll go ahead and play my video so as we can see I can have some basic controls here such as I can play it I can skim through it and I I can also adjust the volume here as well so this is kind of the default out of the box let’s go ahead and make some formatting changes to it here as well press Escape come back here so if I click on here maybe the first thing I’ll do I’ll click on video format I’ll go ahead and put this in a frame maybe I’ll put it in a we go for this rounded rectangle here so put it in that frame I can make it bigger if I want to as well so I’ve placed it in a frame and over here I can go ahead and play it to get a nice preview of what it would look like just like with our image tools I can go ahead and give it some corrections make it brighter or have more contrast as well I can even recolor it if I want to then we have some other pretty nice tools here as well but that’s about it for the video format I just want to give it a quick style I’ll go to the playback here and when we click on the playback contextual tab we can see that we have some editing tools here that we can use such as trimming the video fading in and out and then we have some other video options here this will basically establish how the video behaves once we get to this slide let’s take a look at the trim video feature I’ll click on trim video and in this particular video there was a lot of white space in the beginning so maybe I don’t want to start maybe I want to start maybe right about here I’ll start with that question what brought you to learn it today so maybe right about there right so just by moving that slider I’m starting at 14.9 seconds here as well at the end I had a little some more space in here as well maybe I’ll stop right here as soon as the learn it logo appears that’s it I can even use these little arrow arrows to kind of determine the starting point that helps a little better I’ll go ahead and press okay and let’s preview it there you go so it started with the question as opposed to starting from the very beginning there as well all right so already trimmed the video I’ll go ahead and establish the volume I’ll make sure that the volume is medium don’t want it to be high for my audience and I want it to play automatically so whenever I navigate to the slide this will play automatically here as well and I want to play it in full screen mode so I can go ahead and do that and I’m good to go so let’s go ahead and run this and reading view let’s see what this looks like so there you go so we can see that the volume has been set to medium and it’s playing in full screen here and it all Al played automatically so I’ll go ahead and escape and go back to my slide here as well so go ahead and insert a video hopefully you have one go ahead and insert it take a look at the different tools under the video format Tab and go ahead and trim the video make it start automatically and also go ahead and play it full screen and come right back in this segment we’ll go ahead and insert online video now I’m actually going to insert a new slide so I’ll just press crlm insert a new slide I’ll change this layout to title only because I want to insert a nice big online video here from our YouTube site so this will be an online video so to insert an online video if I click on the insert Tab and here is video so I have the option to insert video from the online stock videos or I can grab from various sources here as well I’ll click on online videos we’ll kind of just preview what’s available in the stock video library I’ll click on online videos here and we’re giving some information so these are the different sources that we can stream video from so YouTube SlideShare Vimeo stream and flip so we basically need to grab the address or the URL of that video and paste it in here once we paste it in here we’ll get a nice preview of the video just inuring that we have the correct one so I’m going to go ahead and jump over to our YouTube page with the video that I want to stream here here we go so this is the video we’ll go ahead and play this here Lear training the exercise files for today okay so to grab the video address I can just right click here and I’ll copy the video URL once that’s on my clipboard here I’ll head back over to my PowerPoint so right here I’ll go ahead and and paste the video so I can you can right click and paste the video in there or you can press contrl V and we can see it shows up here so here’s my little tutorial on Microsoft 365 Basics we can preview the video right here welcome to learn and there we go so even though it’s an hour and 26 minutes long we’re streaming it so as long as you have an internet connection you should be good to go it’s this is not being stored in our PowerPoint so it’s not taking up space as is the video that we uploaded from our computer I’ll go ahead and click on insert and here is my video so I can either have it take up the entire slide like that or I can go ahead and resize it if I click on the video format I can still do things like I can correct it I can recolor it if I want to I can even go ahead and place it in a frame so maybe I want to place it in a frame like this I can do that or a simple frame now if I click on the playback tab here notice that these options over here they’re grayed out so none of the edits and controls the only thing I can do really is to decide whether I want this to play in sequence mean meaning I have to click on it or if I want it to play automatically here as well I’ll go ahead and choose automatically so we don’t have all the tools because we don’t really you know this is this video is being streamed we don’t own the video so we cannot edit it here as well I’ll go ahead and click on my reading view here let’s see what this looks like welcome to learn at training the exercise files for to there we go so we can kind of fast forward right so depending on your internet connection you should be good to go all right I’ll go ahead and press Escape here I’ll press escape again to go back to my slide so that is how we insert an online video from those different sources as well again we can play it it works well right from the stream we just don’t have all of the normal bells and whistles that we have if we actually own the video I’m going to go ahead and delete this I’ll just press the delete key to get rid of it and let’s just take a look at the the stock of online video I’ll click on the insert tab I’ll go back over to video and let’s take a look at some of the stock videos here so these are not really long videos they’re pretty short maybe in the range of 9 to 15 seconds and let’s see I’ll go ah and grab this one here I’ll go ahead and insert this so it took up the entire slide but again you can always resize it we can just like with their our other objects we can resize them I’m okay with it taking up the entire slide though that’s perfectly fine so I can go ahead and play it here and this is going to be about 9 seconds just a little over nine seconds here as well so if I were to preview this I’ll go on reading mode so there you go pretty cool I’ll press the Escape key and let’s see what options we have available so this is from the stock so we can still do the same things with the video format we can place it in a frame if we want to maybe I’ll put it in a frame like that we have the corrections that we can use as well and as far as playback because this is from the stock we do have the capability to trim the video so we can actually trim the video if we want to we can specify when it starts when it ends we can also opt to play it full screen so all of the other options that we have there are pretty much good to go here as well right now one of the things is the we have what’s called a poster frame and this allows us to basically put a poster on the first first glance at the video here so if I wanted to maybe show this part I can go ahead and click on poster frame and I’ll say this will be the starting frame for my actual video here you can also go ahead and insert an image so if you wanted to insert an image from file that’s basically what you’ll see before you actually play the video so if I click play Here There we go so that’s what it’s all about inserting videos into your PowerPoint presentation either the stock Library Online sources or a video locally from your device the screen recording is a really nice tool in Powerpoint Point many of us are not aware that we we can actually record our screen no need to buy an expensive program we have one built in right here after we record our screen it will insert the recording right onto our slide for us here as well so if I click on screen recording it’s going to minimize my PowerPoint window whatever is in the background will be brought to the front here as well I’ll click on screen recording let’s take a look at the what’s available so as you can see see when we’re recording the screen we can select the area of our screen that we want to record mine is already pre-selected if you want to record your audio your voice VI your microphone you can go ahead and turn on the audio and if you want to record your mouse pointer you can go ahead and record that as well I’ll record my audio I’ll record my pointer here as well and I’ll go ahead and select my area but first what I want to do is I’m going to go ahead and just kind of resize my my window here for Microsoft Edge and going to bring it down one of the things that uh happens with the screen recorder this old toolbar here gets in the way sometimes when you’re recording so I want to make sure that my recording area is below that box so I’ll go ahead and reselect my area I’ll just draw a around my Microsoft Edge window here like that and there we go so what you can do if you want to record your entire screen when you want to stop or pause your recording you can use the shortcut key so Windows logo shift plus q that will stop the recording for you this way you don’t have to go back to the top of your screen expose this little toolbar here and click on stop recording because that will show up on your recording at least the last time I did it that’s what happened I’ll go ahead and click on record I’ll get a countdown I’ll get a quick reminder of what the shortcut is to stop the recording let’s go ahead and do that so in this case I’ll just demonstrate how to sign up for a course at learn it.com let’s get started on how to sign up for a course at learn it.com let’s first go to http://www.ar it.com once we’re here we can either go ahead and sign in or register or if you want to go ahead and view all classes we can click here once we’re here we can search for a class of Interest or we can scroll down to see our upcoming courses here as well here’s an Excel introduction course I’ll go ahead and click on here so it gives me the details what will be covered and it also shows the upcoming schedule for these classes as well maybe I’ll go ahead and take a little break and then in February I want to go ahead and take this course so I’ll click on my little plus icon here to add this to the cart and I’ll remove the other one I’ll go to checkout and from here I simply just need to go ahead and click on the next step and and continue the login registration payment and Confirmation process and I am good to go and that’s all to it so there we go I was able to do a just a small recording there about a minute and 15 seconds you can see it inserts the recording for us right here onto the slide again we can resize this if we want to doesn’t necessarily have to take up the ENT ire screen May what I’ll do is I’ll just go ahead and Center it kind of align things a little better here on the slide there we go and so we can go ahead and play it and as we can see it records my voice records my let’s first go to my cursor as well w. learn.com so really really nice tool now because we inserted this screen recording we have all the tools all the editing tools right so if we wanted to trim the the video we can kind of preview it make sure everything looks good if it doesn’t we can always go ahead and just trim different parts of the video here as well we have all of the other tools that we can go ahead and use as we mentioned before if you have offline captions you can go ahead and insert captions for the for the the video as well so it’s a really nice tool really nice tool to use as a learning or as a help aid right so really nice option here as well go ahead and take advantage of the screen recording tool go ahead and upload one or two the good thing is once we’re done we can go ahead and save this so if you make any changes to it on the playback tab we can click on Save media as you can do the same thing by right clicking on the video and clicking on Save media as we can save it as media file or we can even save it as a picture here as well so we can save it as a picture we can save the media as a media file so pretty cool go ahead and play around with the screen recording tool and come right back welcome back and let’s go ahead and move on to lesson number six so we’ll talk about collaborating on a PowerPoint presentation here so there’s a couple of things that we need to do we first need to go ahead and Save our presentation to one drive and after we do that we can go ahead and share the presentation and on once we have uploaded it to either one drive or SharePoint we can share it and we can go ahead and view different versions of the file here as well so you can either click on the file Tab and click on save as go ahead and save it to one of your one drive spaces or if you have the share icon here you click on share it’s going to first ask you to go ahead and upload it to your one drive and then you can share it I’ll go ahead and save it and then I’ll come back once I have that saved now that I have it saved what I can do is click on the share icon here so I’ll go ahead and click on share and we get to this dialogue box now this dialogue box has had some changes recently looks a little different but this is the modern version of it here so what I can do is I first need to decide well who do I want to share this document with how do I want to share it and what type of access do I want them to have right so I can either copy a link and send that link out via email or by teams chat or any other medium and anyone that has that link they can either edit or they can view the particular file here well this is collaboration I want to go ahead and send it to Adele who’s on my sandbox account so I’ll go ahead and type in Adele here I’ll make sure that Adele can edit to make changes and I’ll just say please edit and that’s pretty much it once I go ahead and press send I’m good to go if I want more advanced options I can go ahead and click on the sharing settings here and I’ll have some other options but I have everything I need just on this very first window here I’m sending this via Outlook to Adele edit access and I’m going to go ahead and send it here right so I’ll go ahead and close this out let’s head on over to Adele’s mailbox see if we get that message here we’ll go ahead and refresh here it is so it just came in this is what the message looks like a file has been shared with you here’s the custom message I’ll go ahead and click on open here and this will open up online now my recipient will have the option if they want to open in the desktop app they can do that as well but to keep it simple we’ll just open the file here in the web and here we go so here’s the here’s ad Dell’s version of the file and Adele can see that I’m working in here my avatar appears here because I’m currently in the file and I’m working on it if I scroll down we can see exactly I’m currently on this slide for lesson six well that’s where we need to go so I’ll go ahead in here and I’ll add a task so I’ll say task two and the owner here will be Adele and I’ll say that this um has not yet started and progress is 0% so let’s see what that looks like I’ll go back to my desktop copy here now we can see the changes have already been made I can see that Adele is showing up as a guest contributor and I can see Adele is right here on slide number five right so I’ll go ahead and put myself in here and we can keep on editing here as well right so task three is going to be Nester now what I can do if I click on the review tab I can add comments in here right so maybe I want to add a comment regarding task number three I’ll go ahead and put a comment in here and I’ll say please confirm with Nester so this is the whole concept behind collaborating you can comment in here we can work on the file together and we’re good to go let’s go back to the and let’s see here let’s click on the review Tab and let’s click on show comments right so here here are the comments here as well that we we can see so that’s pretty cool so we can go ahead and make some changes I’ll go ahead and reply to this and I’ll say I will take care of that go ahead and post the reply here as well and so there we go so it’s a matter of saving to one drive and or SharePoint sharing the document with edit access and being able to mark up the document at the same time here as well I could even see the notes that are in here let’s go ahead and take a look at the different versions of the document I’ll go back to here I’ll click on the file Tab and I’ll click on info and now what I can see is the version history right so on the info tab here is the version history of the document let’s see what versions have been captured so far I’ll click here and so far since I uploaded it and saved it I can see that three versions have been SA saved here’s the version as of 1105 1109 and 1111 as well right so what I can do is I can go ahead and open a older version here let’s see what this one looks like so right now we have three tasks so this kind of opens up the that version so we can see the current version has three tasks this version only has two tasks in here so this is pretty helpful because sometimes some changes are made that are just too drastic and you want to be able to fall back to a prior version and so the fact that the versions are being saved automatically is a really really big help here as well if I wanted to restore this version I can click on restore this would make this the current version here as well but I don’t want to do that just want to go back to the to the other version here so I’ll go ahead and close this out and it brings me back to my updated version I’ll go ahead and close this pane here and I am good to go now what I can do is let’s see if I go over to the file tab click back on info and I click on protect here so what I can do is I can mark this as final but everyone will need to be logged out first so I can let all of my collaborators know that there’s no more changes being made to this document we’re marking it as final here as well right now while we’re here it’s good to take a look at these things we can see the on the info tab here we have the media size and performance we can see that we have 68 Megs here the entire presentation is currently 71 Megs mostly because of the screen recording and that video that we uploaded earlier as well I’ll go back here and so that’s how you collaborate on a document for lesson seven we’ll talk about customizing slideshow Behavior so what we’ll discuss is some of the things that we can do before we run our slideshow and some things that we can do during our slideshow as well so sometimes you may notice when you’re running your slideshow your presenter Windows either turned off or turned on or it’s showing up on the wrong monitor well those are things that we can use to set up a slideshow to set up a slideshow let’s click on the slideshow tab here and we have an entire section here devoted to setup now we can go ahead and click on setup slideshow and it’s going to be a combination of all of these different things here using timing timings using the presenter viiew things like that here as well let’s click on setup slideshow and we’re presented with this dialogue box here and there’s a couple of different areas so how do we want to run the presentation by default when you run your presentation it takes up the entire screen but if you wanted to kind of have it run in reading mode you can choose this second option right it just runs in a window that way it doesn’t take up your entire screen you can resize it and then if you wanted to just kind of loop on maybe a big TV you can go ahead and use the browse at a kiosk so it’s full screen you’ll notice if you when you check that option it’s automatically going to Loop until you stop the slideshow right so you may walk into a building at a corporation you may see the same slideshow running over and over and over again it’s in Kiosk mode all right I’ll go back to presented by a speaker full screen and then over here for show slides you can determine which slides you want to show you can leave it just for all or we can say I only want to show slides one to five or we can do that or show everything here as well we don’t have any custom shows in here we’ll talk about that in just a little bit if we create some custom shows we can choose to run the custom show as well so these things just kind of gives you some some confidence as you’re running your slideshow because maybe you don’t want certain slides to show up on this particular presentation now in terms of of advancing slides right now by default it’s going to use timings if any timings are present so we can either adjust the timing for each slide but we we’re going to go ahead and record the entire presentation so there’s really no need to rehearse the timings down here if you’re using multi multiple monitors you want to make a choice do you want to use presenter view presenter viiew is a really nice thing to use because while your audience is seeing your presentation you are taking a look at your presenter view so you can see what’s coming next either a slide or an animation you also have notes that you can use as talking points as well so I’m going to go ahead and use presenter View and my slideshow is going to run on my primary monitor I’ll I’ll leave that as is for now I’ll go ahead and press okay and I’ll go ahead and run my slideshow here so here we can see my slideshow is running I’ll go ahead and switch the presenter view so that it’s showing on this Monitor and let’s take a look at the presenter view I’ll press Escape I’ll go back into setup slideshow and I want my slideshow to run on my internal display I’ll press okay and now I’ll run my presentation so on my other screen I have the slideshow but here’s the presenter View and as you can see it’s pretty nice because we have any notes that we have in here we can see what’s coming up next so this is our next slide lesson number eight and right here I can just kind of navigate through my slides if I have any animations I can see what’s coming up next as well and so pretty nice what I can also do if I want to jump to a slide I can open up my see all slides pane right here now my audience will not see this only I can see this they’re still seeing the current slide so if I wanted to navigate to this slide if I click on it now that is being displayed on my audience screen here as well some other things I can do I can go ahead and turn on the pen and Laser and pointer tools right so I can go ahead and just kind of use those here as well we’ll talk about these in just a little bit and if I wanted to go ahead and toggle my camera I can go ahead and turn on my camera I can turn on the subtitles right here so a lot things we can do right from the presenter window so if I toggle the subtitles now it’s going to be writing whatever I’m saying here I’ll go ahead and turn that off then we have some other tools here as well right if you wanted to hide the presenter view you can go ahead and do that but we’re good to go I’ll go ahead and end the slideshow from here and those are just some of the basics when it comes to setting up a slideshow I’ll go back down to lesson number seven here and let’s go ahead and create a custom slideshow so over here on the slideshow tab um we have the custom show in the start slideshow command group right if I click on this drop down here I don’t have any custom shows I’ll go ahead and click here so I want to create a new custom show well why would would you want to create a custom show maybe you just have one really long you know slide deck you may have 30 slides but maybe you divide that slide that slide deck into three different sections so instead of showing all 30 slides you maybe just want to show the first 10 so what I can do is click on new and I’ll just call this lesson five so I want my title slide here’s lesson five so here the three slides that make up lesson five I’ll go ahead and add those and now I can reorder them if I want to move them up and down but I’ll go ahead and press okay now I can see I have lesson five in here if I go ahead and click on show it’s only going to show those slides so here’s my presenter view as you can see it’s only showing those four slides that make up that particular show and we’re good to go so that is a custom show now keep in mind when we setting up the slideshow we can also say well let’s just go ahead and run that lesson five custom slideshow here as well so pretty good okay let’s go ahead and stop here I want you to be able to practice go ahead and just set up your slideshow go ahead and practice make sure that your presenter view is turned on it’s showing on the on the screen of your choice and go ahead and take a look at some of of the different tools here we’ll come back and we’ll go ahead and take a look at some of the annotating tools that are available while we are presenting welcome back let’s go ahead and set up navigation for our slideshow now remember when you were presenting if you rightclick you can pretty much go to a slide of your choice if you want to once we have the presenter view turned on we can kind of jump around but it will be nice to kind of give our audience really nice feature called the zoom feature okay so what the zoom feature is and I’m actually going to insert a slide here so right after my title slide and this will be I’ll just call this my Landing slide what I’m going to do I’ll just quickly insert some links to my different lessons here so to do that I’ll go ahead and press contrl K on my keyboard so this will insert a hyperlink right so just like in the other office documents Excel and Word we can link to a place in the document so instead of linking to an existing file web page I’ll click on place in this document and now what I can do is I can link to different slides so I want to be able to link first to lesson five and for the text it says lesson five working with media that’s perfectly fine I’ll go ahead and leave that as is and just like that we have a hyperlink I’ll go ahead and press enter I’ll repeat the process for 67 and 8 so I’ll press contrl k to a place in the document I want to go to lesson six I’ll accept the text I’ll press okay I’ll do that two more times crl K this time less than seven and I’ll go ahead and press okay one more time control K and this will be for lesson eight right so I have a nice little Landing slide here so basic basically if I go into if I run this in reading mode what I can do is I can click on this link while I’m presenting and this will take me to that particular slide now it would be nice if we can go back to that Landing slide have a little button that we can click on so we can always go back right I want to be able to get back to this Slide by just clicking on a button so we have what’s called a zoom feature now check this out look what I’m going to do here I’ll go to lesson five and from lesson five I want to be able to go back to the landing slide I’m going to drag my Landing slide just going to click and drag it I can drag it right onto my slide here maybe I’ll put it right right here okay and then I’ll move this other icon out of the way I’ll put this down here somewhere right so you’re saying W what just happened what did you just do just going to position this up here at the top so this is called a zoom feature so now I have a link to a slide and another slide let’s go into reading mode and let’s see how this works here we go so I’m here on this particular slide and now if I want to go back to my Landing slide if I click here so it zooms in to that slide for me and now what I can do is I can go ahead and jump to another lesson here as well right if I press the back key it goes back to lesson five or I can just go ahead and click back here and jump back to lesson five as well so that is the zoom feature as well now what I can do if I wanted to I can go ahead and change this so right now is it’s just a picture of my slide if I click on here I’ll notice that a zoom tab appears here as well so maybe I’ll what I’ll do is I’ll go ahead and change this image to something else and maybe I’ll grab an icon and maybe I’ll look for an home icon maybe I’ll use this one so I’ve converted this to a home icon now I can resize it I could even put it add a style to it if I want to I’ll keep it simple I’ll just put it here on the top right of my slide there you go so that’s my zoom feature now what I can do I can actually copy this and I can paste it on lesson six I just need to move this out of the way so I’ll go ahead and paste this here on lesson six and I just copied and pasted it well let’s see if this still works I’ll go ahead and run this slide in reading mode if I click on it it brings me to my Landing slide I’ll go back to lesson six and I’m good to go so that’s the zoom feature right so go ahead and create your first Zoom go ahead and change it to an icon of your choice again to do that just click on the zoom click on the zoom Tab and you can change the image here as well go ahead and add that home button to each of your lesson slides and now we’ll be able to navigate back and forth as we are presenting now that we’ve added some navigation and we’ve set up some of the basics it’s time to go ahead and present and take a look at some of the tools that are available we already discussed the presenter viiew so now what we can do let’s take a look at how we can annotate a presentation and we can enable these subtitles as well now we can accomplish these as well through the presenter view going to go back to my slideshow let’s just make sure that I’ll turn off my presenta view and I want my slideshow to run on this screen so everything is good to go I want to make sure all of my slides are selected and from here if I want to I can go ahead and choose my laser pointer color I will be using the laser pointer I’ll be using the pen as well so I can actually select my color ahead of time I’ll leave them both on red I’ll go ahead and press okay you can press F5 to start your slideshow so here’s my slideshow I’ll go ahead and head on over to my next slide here just by clicking and so here’s my Landing slide I’ll just go to lesson five here and here’s lesson five now on the bottom we have some kind of grade out tools tools so we can go to the last slide we can go to the next slide here are the pen tools down here so if I click here I can either choose my laser pointer right so I can go ahead and just kind of point on my screen if I go back down here I can change that to the pen and the pen basically allows us to just kind of Mark things up so I can do things like that terrible error right so we can do that if I want to go back I’ll just uncheck the pen now I have my pointer back here and now I can go ahead and either play my video or go to the next slide I’ll go to my next slide here as well and what else do I have here here’s the highlighter so if I wanted to highlight something turn on my highlighter go ahead and highlight it here and of course we can change the color so we can change the color for all of the ink down here as well so for my highlighter if I wanted instead of yellow maybe I want orange here’s my orange highlighter here as well that I can use right now let’s go ahead and I’ll get my pointer back here so unselect my highlighter if I move over to the right here’s the slid Sorter and here are the subtitles so I can go ahead and turn those on and this is what my screen now looks like this is very helpful and we’re good to go right turn on my video if I want to and then here are some other tools so if I wanted to transition to a custom show I can even though I’m not running presenter viw right now I can still go ahead and turn that on here as well and for the subtitle settings I can either show them on the top where it’s overlaid on my presentation or I can change the location of it as well right maybe I’ll put it be uh above the slide the top like that so we have different options that we can use here now if you did Mark up your slide we do have an eraser here as well so you can erase them in individually or you can choose to go ahead and erase all of the ink on a slide right now keep in mind when you are marking up your slide here all of the ink will remain unless you remove it so if I were to close my presentation here and go back to this slide this arrow and this somewhat of a circle will show up as uh shapes here as well so you want to make sure it will ask you anyway before you close the presentation do you want to remove all the ink as well but while we’re here let’s test out our navigation right I’ll get my pointer back here and I’ll jump to the let’s jump to lesson number eight and from lesson number eight we can go back to that Landing slide and jump to lesson number five so pretty cool so we’re zooming in and out of our Landing slide right if you press the back key after you go to your Landing slide goes back to the slide that you were on before here as well all right I’ll go ahead and end the show I’ll just go ahead and press the Escape key and it ask me right here do do I want to keep my annotations I do not because again they will appear as shapes on your slide I’ll go ahead and discard them and I am good to go right so a lot of things that we just accomplished annotating turning on the subtitles we can use the presenter view for that as well and we’ll see those options are also available so go ahead and run your slideshow when we come back we’ll put it all together we’ll take a look at how we can record our slideshow so that it can run automatically welcome back let’s go ahead and move on to lesson number eight what we want to do here is we want to go ahead and automate our slideshow right so we don’t want want to sit and click through our slides as we’re presenting what we’d like to do is to kind of record our slideshow and then we can go ahead and play it back and run it so that all the slides will transition automatically so let’s take a look and see how we can do that here if I click on the slideshow tab I have the record option here so I can record from the beginning and notice what it says so records narrations animations transitions ink and laser pointer gestures so everything that I’m doing will be recorded here as well so we don’t necessarily need to rehearse timings because now we have the recording feature that will record everything for us so what I’m going to do I want my recorder window to show up on here so I’ll just change this here and then I’ll go ahead and press okay just so we can see what that looks like I’ll go back to the first slide and I’ll click on record from the beginning and this is going to open up my my recording view here now before we do that I highly recommend that you use this feature called rehearse with coach this is a really really nice tool basically you can practice with the AI coach and it’s very very intuitive and very very robust it’s going to provide you feedback to let you know if you’re talking too fast if your pace is too slow if your voice is monotone if you’re speaking too loud too soft if you’re using filler words so gives you a really really nice report kind of coaches you along the way it’ll say great job keep it up so I highly recommend you use the rehearse with Coach it will allow you to go through your entire slide and you can practice with it there as well once you’ve done that we’ll go ahead and click on on record right we can also record our slideshow from the record tab so here’s the record from the beginning now there’s a lot of things that we can do in here we’ll just touch on a few of them so here we can see here is the window for our recording once we’re ready we just need to go ahead and click on the record button just a few things to note if you wanted to turn on your camera you can your camera will appear down here on the bottom right so your image will appear down here on the bottom right as well at the very top when you have notes we have a little teleprompter here that will help you as you’re going through your actual slides now this is one view down here on the bottom right they’re different views so right now this is the teleprompter view let’s click on this drop down the other one is the presenter View so the presenter view this is the one that we’re accustomed to we can kind of see what’s coming next either an animation or next slide and we can see what our audience is seeing here as well right then we have other things down here laser pointer highlighter they’re all here for us as well the other view is the slide view so this is just you’re operating just with the slides and you can go through it there as well I’m going to go back to teleprompt review and here we go so if you want to record your microphone you can either turn it off or you can turn it on um as well if we click here for more options you can select the microphone that you want to use you can select your camera and if you’re using Cameo which is a newer feature you can use Cameo as well I’m just going to do a simple recording just so that we can see what the finished product will look like here so not going to spend too much time on each slide here we go welcome to PowerPoint module 4 my name is Mo Jones let’s go ahead and learn together here’s our Landing slide we have four lessons lesson number five lesson number six lesson number seven and then finally lesson number eight automating a SL slideshow lesson 5 is all about working with media we can either insert local video or we can insert online video here’s my video I can go ahead and play this here once I’m done I can go ahead and move on to my next slide here I’ll go ahead and turn on my where is my pen so I can go ahead and just draw some shapes in here if I want to I’ll go to my next slide here’s my notes at the top so I can refer to that as I’m going through my slides here so when we’re inserting the screen recorder it’s a matter of getting to this particular icon here or this command group the media command group on the insert tab remember after you insert your screen recording to take a look at the playback options and the other formatting options as well lesson six is all about collaborating as we can see we can go ahead and share a file Grant editing access and we can go ahead and mark up the file together we can see who’s in the file where they’re currently working on and we can add comments to the file as well lesson number seven is all about some of the other default settings that we can establish for our presentation as well don’t forget about the zoom feature we can always click on that button to go back to the slide of our choice and then finally for lesson number eight I highly recommend that you record your presentation and use the rehearse with Coach tool here as well now when we finish the slideshow it tells us to click here to export our video so I’ll go ahead and click there and I can go ahead and Export it to to the location of my choice here I’ll go ahead and click on browse typically you want to upload it to your one drive space I’ll just put it on my desktop here I’ll just call this copy and I’ll go and Export that as a MP4 video and that’s going to take a little bit of time to record once it’s finished I’ll come right back so finally I get the message that my video was exported successfully so from here I can click here to view the video and share with others as well I’ll go ahead and click here and it’s asking me I do trust it I’ll go ahead and press yes and just giving me some security messages here I’ll just go ahead and press okay to open the file opens up in my default media player and here we go so there we go so we can see everything has been recorded as well and we’re good to go I’ll go ahead and close this out and we’re good to go so that is how we record a slideshow so notice now for each slide we’ll see the actual voice note that was left on each slide so every slide has a little recording here so in the past we would have to do these things kind of manually insert the audio insert the timings as well but now the recording takes care of everything for us as well so go ahead and record your your show go ahead and Export it and then go ahead and play it make sure everything is okay if you want to go ahead and share it feel free to do so as well now that we have recorded our slideshow we see that everything was recorded well we did did have the option of exporting it to a media file but something else happened as well so if I were to go ahead and just run my slideshow it’s going to run automatically so the timings for each Slide the voice narration on each slide and any ink or markup that I use will be played as well so if I did not want to play the video I just want to go ahead and run this slide I’ll go ahead and run it here and we can see the voice narration is included we can see the slides are moving automatically without my interaction okay now I can still jump in if I want to but for the most part everything is happening automatically here as well so I’ll press escape and we’re good to go so you can either share that video or play the video or you can you can just come in and actually just run your slideshow and here’s a little bit of ink that I left when I was kind of annotating my coffee cup here so I’ll just click on here and I’ll just go ahead and delete that from my slide as well if you go back to the record tab now you’ll notice that some of these other options are available because we did perform a recording we can do some other things like clear the recording on the current slide or we can clear the recording from all the slides maybe we just want to go ahead and redo it right we can save it as a show right so we can create a separate slide with the ppsx uh extension there as well we can export it to video from here as well we can learn more to see what’s new what else we can do here as well we can also use the cameo feature as well with our camera feed so that’s the benefit of recording a show we can automated and we still have the capability to kind of interact with the slides even though it’s automated here as well just to recap we’re able to customize the PowerPoint environment we saw how we can create our own ribbon Tab and add our own command groups and our own commands as well even add more commands to our quick access toolbar we took a look at the slide master we’re able to customize design templates we’re able to save a design as a template then we’re able to create some infographics with smart art we’re able to work with media we’re able to collaborate on a presentation after saving the presentation to a cloud space we’re able to customize slideshow Behavior establishing some of the default settings for our slideshow and then we’re able to automate a slideshow as well remember to use the rehearse with Coach tool and then go ahead and record your slideshow congrats on completing the course and look forward to seeing you in a future learn it course hello everyone and welcome to co-pilot from Microsoft PowerPoint my name is Joe I’m going to be facilitating this course for you today today we are talking about Microsoft PowerPoint with co-pilot capabilities co-pilot is amazing with PowerPoint and it allows us to start to create presentations within seconds of just telling it what we want to see in our presentation now before we get into Microsoft PowerPoint we have to understand what is co-pilot co-pilot is a powerful add-in tool for Microsoft Excel that allows users to automate repetitive tasks improve efficiency and also save time now it utilizes machine learning and AI technology to analyze your workflow and then suggest code Snippets based on your specific needs and with co-pilot you can automate data manipulation formatting calculations and so much more without actually needing extensive programming knowledge now a couple things with co-pilot is the way that it comes out with outputs an input is when you ask it a question and then the output will be the result or the answer to that question and the way that it randomizes this is known as stochastic process now stochastic process in AI models can lead to slightly different results each time the model is run so even though we put in the same input right I can say hey how much does this equal out to my total sales it might not be word for word the same exact output and this is awesome what is desired right we often want Randomness so that none of us have the same answers so just know that if you’re following along with this video that you will never get the same answer as me unless it’s something really straightforward like give me the total sales that I’ve made it will give you the total sales that’s not random but if you asked it to give you insights it might give you something totally different than the insights it gives me another thing is a couple of the pros and cons of using C pilot so we’re going to start off with the pros productivity boost right it aims to enhance productivity by automating various tasks such as writing emails or creating presentations or even taking meeting notes which is great we can also integrated with Microsoft Suite which is what we’re doing today we are going to be looking at excel’s version of co-pilot we also have to understand that is a natural language process which means we’re able to just put put in inputs naturally and then we get results and the best part about co-pilot is learning and adaptation it’s always designed to learn from our user interactions so the more questions we ask over time it starts to understand how we think about our data now some of the cons of using cop pilot are first off potential bias and in accuracies right of course this is a new technology so sometimes it might generate an accurate information based on the data it was trained on and you’ll notice that throughout the course that sometimes I might not get the exact answer I want and I need to teach it what I want you also see here that there’s an adoption and a learning curve as with any new technology you’re going to have to get used to using the interface or even certain input commands that you’re going to ask it or certain prompts that you want to look at so that’s why this video is going to be super helpful for you because it’s going to allow for you to understand those learning curves and last but not least ethical concerns of course you know it’s an AI assistant so we want to make sure that we’re not just using it to generate misinformation or plagiarized content now the last quick note before we actually dive into this is that Microsoft co-pilot is still in development and its final capabilities the pricing availability is yet to be determined so as with anything else that is AI powered it’s crucial to approach it with a critical mindset right we want to be sure that we’re maintaining our privacy and security we’re going to comply with any of our company’s rules right and this AI is definitely not a replacement for human expertise or decision making so we are actually using it as a tool not a replacement I’ve opened up PowerPoint and just created a blank presentation now we’re going to use co-pilot to actually create a presentation for us so in order to do this we’re going to go to the Home tab and inside of the Home tab we’re going to go all the way at the end and you’ll see co-pilot now funny enough you’ll see co-pilot next to designer we’re going to talk about this in a later section but they go hand in hand together but for now let’s just open up co-pilot paint and you’ll see once you click on co-pilot it opens up the pan now right away when you open up co-pilot pane you can see here that there’s some things you can try so they give you a couple of prompts right away like create a presentation or create a presentation from a file that already exists or add a slide about something so you can use these three prompts right away or you can ask questions about the presentation or if you want to view more of the prompts you’ll see at the bottom there’s this little book icon this is actually where we can view prompts or PowerPoint so if you click on it you’ll see we can either create and if you click the little parot icon it shows you create a presentation from a file create a presentation about something add a slide about something you can go to edit where you can add an image of something that’s pretty cool one we can go to ask where we can give specific examples for something and if you want to view more prompts just click on view more prompts and it’ll open up prompts from the co-pilot lab we’ll talk about co-pilot lab in a little bit but this is where we can see other prompts as well I’ll just click the X so let’s try it out let’s actually create a presentation from scratch so you can either just click create a presentation or you could just type it out here I like to just click it because it automatically fills it in for you and let’s create a presentation uh we could do it about anything but what I’m interested in is creating a presentation about Health we’ll just say health let’s see what it what it comes up with create a presentation about health and it’s going to take a moment it’s just thinking about everything going through all the different information and data that co-pilot has access to and you can see at the bottom it’s starting to work it’s downloading media and there we go it says okay here you go a presentation about health has been created with multiple slides slides if you like I can help you rewrite slides or you can use designer to adjust the layout once again designer is going to come in handy in the way that you want to change the design now what I love about this is that look how amazing this presentation looks first off we get this starting page here in the starting slide where it says tips for a healthy life it has a nice little background picture and believe it or not we also have access too yeah speaker notes so we can quickly talk to um you know an audience and have those speaker notes you’ll also see here you could press play and it has a movement yeah it’s a media how awesome is this I just love this so much I really do so that’s another fun thing and it just stays on a loop until you stop it if we go to the next slide it says eat a balanced diet eat a iety of fresh fruits and vegetables include whole grains and lean protein in your diet and limit your intake of sugar salt and saturated fats so yeah that makes sense and then you have your speaker notes at the bottom here as well on the next page we have stay hydrated drink at least eight cups of water a day avoid sugary drinks limit alcohol consumption go to the next slide it just has a awesome amount of information regular exercise is good for you and manage stress as you can see within seconds it has created a full presentation for us with speaker notes with images but you might be wondering Does it include animations well let’s take a look we see here the nice movement’s go to our next slide so right now there are no animations here go to the next one so that’s the one thing that we would need to include so if I ask it to include animations let’s see what it says I don’t think copilot can do this yet but I want to see can you add animation to my bullet points let’s see what it says here I’m going to say that it’s going to probably come back with it can’t do it yet but I’m always curious because they’re constantly updating these apps pulling things together okay so yeah I can’t do it I can answer general questions or those about presentations but they can’t add animations so that’s just one little thing you have to do which is simple enough I’ll just go to animations and just fly them in real quick boom done go to the next one just click flying done go to the next one click fly done and we have a fully created presentation with speaker notes and we are all set to go now why I love speaker notes so much for me personally is because I use them while I’m presenting for instance when I’m presenting I actually don’t see this view I see my presenter View and what this presenter view does for me is it’ll ows for me to see my speaker notes on the other side so I’m going to Showcase this to everyone there it is so now I have my speaker notes right here I know exactly what people are seeing currently and also I can see what I’m getting ready to talk about next so I would say hey everyone my name is Joe we’re talking about tips for a healthy lifestyle health is wealth and nothing is more important than taking care of your body incorporating these tips into your lifestyle can lead to a healthier happier life see what I did there I didn’t even have to think about what I was going to say the notes are already there for me and then when I’m ready to go to the next slide here now I can say eat a balanced diet this is one of the most important things you can do for your health and then I can go through eat a variety of fresh fruits and vegetables whole grains right so those speaker notes I always say are some of the most important things that you need yeah this is amazing we asked it to create a presentation and it went above and beyond we just went over how we can create a presentation from scratch with just a sentence and co-pilot now I’m going to show you how co-pilot works with templates that are pre-existing so the first thing I want to do is select a template so you can go to more themes on your startup page and you can look for whatever makes sense to you let’s go with I really like this design right here this minimalist presentation so I’m going to use that one and click create now at this point it all has some sort of theme here with different topics and I’m actually going to use copilot once again to create another presentation but what I’m interested to see is is it going to keep my existing theme or is it going to replace it so can we use our template with creating a presentation so I’m going to see if I can do that create a presentation about lions but keep my same them and let’s see if it can do this it’s looking over it it’s going to be very exciting and I love exploring like this with co-pilot this is something you can do too see what works what doesn’t work it’s a learning an ever learning let’s see what it says okay so it says that creating a new presentation will replace your existing slide so you may want to save a copy first or I can say create a new Drive let’s create a new draft and let’s see what it does with this like I said it’s an ever learning system so this is what’s most exciting so it did replace it but I mean it kept some of that coloration there once again we do get the lines the king of the jungle I love that line behaviors line physical characteristics we get a bunch of notes with it as well and we’re just ready to go the one thing that we have to do as always is add in animations so while this presentation looks really amazing it is not using my original thing so it’s better off if you’re going to use co-pilot for presentations I would say just simply use a blank presentation because choosing a template’s just not going to work anyway for those of you that might have companies that need to really think about branding and they might have pre-existing slides for you let’s say what I would do in that case is after you get the presentation then I would just strip away everything so you’ll see here that the slides or here we could change this to a title slide or we can change this layout look like this so they still exist your original themes your original layouts your designs you’re going to have to change each slide so for this one once again I want this to just be the section one or an agenda or content so I’ll call this agenda I’ll do this one as an agenda layout as well and just be careful because you see what’s happening with the text boxes and everything we’re going to have to switch those back so you can still switch these to what it needs to be if I want to change the layout to let’s say two content it keeps your content there it’s just the other way it wasn’t showcasing and you can still have it be a similar to your branding or to your layouts that already exist as you can and there it is all right so that’s one way to sort of overcome that template if you are forced to use some sort of template like that do I see this for you know changing in the foreseeable future maybe you know we’ll we’ll see I know Microsoft is trying to be as accommodating as possible so you will notice designer keeps popping up like I said before co-pilot and designer are working together very well we’re actually going to discuss that in our next section so what we’re going to talk about next is how co-pilot and Designer work so well together so the first thing I’m going to do is create a presentation with co-pilot I want to talk about shark so I’m going to say create a presentation about sharks they’re interesting right so create a presentation about sharks it’s going to work on it look over the things for us all the stuff that it always does and then once it comes through we’ll take a look at what sort of design it does for us so it looks like for this one it’s not working it says I’m sorry I’m not able to generate those slides for you is there something else I can do to help you build your presentation let’s do the same prompt because it’s funny to see as I explained before that this process is randomized so all the outputs are always randomized see if it does it for the next time I say it and it looks like it might not work for a second time oh actually it’s working this time and look at that so funny enough this is a prime example of how young co-pilot truly is that’s why I always say to you if it doesn’t work the first time try it again this is just proof right here that sometimes it’s not going to work the first time around but it will work the second and look how amazing these speaker notes are too it has so so many different things so and I love this look at this the media background that’s always so cool now at this point I’m going to also open up my designer because some of these slides I might not like for instance I do like this this looks great but it doesn’t look like the rest of it there’s a lot of like pink and light colors purples but then there’s just this dark color here this would make more sense for me I actually like this one more and then I can have it like that so that just looks a lot nicer for me and that other one so that’s why the designer just comes into play right away it looks so great so at this point let’s take a look at what they actually put in here pictures I like the little pluses in those sharks and their behaviors remember we always have to go in and add the animations shark Anatomy you know I really don’t like the way this looks so once again I’m going to go over I’m going to go to my home Tab and choose designer and let’s see what else it could come up with okay this looks a little lighter I do like this the reason I don’t like the way that this one looks is it sort of looks less like content and it looks more like a section change and I’m not changing you know talking about the topic of sharks so that’s why I want to change this design it’s important to do that have similar designs going through same thing here I wanted to look a little more similar to what we have let’s see if I could do this one too y there it is and now we have everything looking super similar it looks very consistent and once again I’m just going to add in here all of my animations and then I’ll tell you what the overall outcome is it’s just going to look great and let’s see what it looks like so here we go the wonders of sharks sharks and their behaviors three points about that shark Anatomy there sharks and conservation shark myths and facts sharks and popular culture I love the sharks in the clouds I don’t even know why the sharks in the clouds like that but there we go we have an amazing presentation right away and we were able to then sort of make it more consistent with the designer so that’s why I always say co-pilot designer go together well and what I love about this new system is that you’ll see co-pilot up top you can switch to designer at the bottom so you can switch between the two quickly the next thing I want to talk about is how we can actually add slides to our presentation so we have this presentation here we’ve been talking about chks and what I want to do is you can click on change topic if you like what this does is it refreshes all your past prompts so when you’re asking about things and you sort of want to change gears or change topic you can click change topic it’s going to reset all your history of prompts and then it’s like what would you like to do now now this is going to go back to our original Three prompts we’ve created a presentation we’ll actually talk about creating a presentation from a file in a moment but we want to talk about how can we add a slide about so I’m thinking I have sharks their behaviors Anatomy conservation myths facts and popular culture but I don’t really have anything about the relationship between sharks and humans so I’m going to choose to add a slide about or you could just type it I’m going to say add a slide about the relationship between sharks and humans let’s see if it can do that for us remember if it doesn’t work the first time I always just try again up there we go so you’ll see here once again it keeps the design which I love we don’t have to worry about design issues it continues to stay consistent it adds a ton of fun little notes here that we can use and then we see the relationship between sharks and humans sharks are not usually aggressive towards humans sh attacks are rare and often the result of mistaken identity human activity has greatly impacted shark populations so now we have a little more information if I want I can add even more to this I can ask it to edit this slide so let’s say that I do want to edit this slide I can say to please edit slide seven to include two more facts about relationships between sharks and humans and let’s see what it does and it’s always important to get a little more specific for instance I’m saying please edit slide seven I’m not just saying please edit you know to include two more facts about relationships between sharks and humans I’m I’m specifying that I wanted to add this information to slide 7 so we’ll see what it can do so right now it says I’m sorry but I can’t do that let’s ask it to do something a little different let’s say please rewrite the facts on slide seven I did forget the S on slide so we’ll see what happens but hopefully it’ll understand what I meant okay so it couldn’t do that neither let’s keep trying let’s say please add more info or more information to this slide let’s see if it can do that and I’m saying this slide now to see if it knows that I’m selected on slide seven but once again this is just stuff and I’m not sure which slide you’re referring to could you please specify and I’ll say um what is the average LIF span of a shark what is the different types no we’ll actually answer this we’ll say please add more information do slide seven I think it was almost there it was almost ready to go so and it also started giving us prompts to ask more questions about sharks which I think is awesome so let’s do this what are different types of sharks let’s ask that question and see what it comes up with and see if we can actually add this to this slide deck oh wow look at all of these that’s pretty cool so it gives us all of this and we can quickly copy this information and then put it on a slide or we could have just said you know please add in how many different species of sharks there are as a slide so as you can see editing slides aren’t as easy as it looks you know you can’t just say hey edit my slide because it’s not understanding what I want but we’re going to just try one more time see if I can please add more information to slide seven because as you can see some sometimes it works sometimes it doesn’t sometimes you just have to repeat yourself because you always get a randomized output so you can ask the same question three times and get the different answer each time except when it comes to data if you’re asking for instance you know how many words are in this presentation that’s going to always be the same so yeah it looks like it’s not going to allow us to do it for this one but that’s okay let’s see other prompts that we can actually use use in terms of edit add an image of something or organize this presentation so even though we can’t really edit the slid so well we can edit by adding images or even organizing what about understanding says summarize this presentation we’re actually going to talk about being able to do this a little later create we can create a presentation or add a slide about we just did that so try out different prompts for adding and editing your slides and see what you come up with so you’ll see here that I have this healthy eating habits document and I decide that I actually don’t want to just have this document like this I actually want to turn this into a PowerPoint presentation we can take a file from our computers and transform them into PowerPoint presentations with co-pilot now it is amazing so let’s see what it comes up with we have healthy eating habits we have an introduction then we talk about balance nutrition portion control hydration fiber rich foods and that’s it it’s just a quick onepage document but let’s see what happens so the first thing I’m going to do is switch over and let’s switch over to PowerPoint I just opened up a blank presentation and I’m going to use the prompt create presentation from file when it does that it pulls up all these different files that we have access to and it tells you to type or search a copy or paste the link of the word document now we know what the word document is called so I’m going to type in a couple of words here and I’m going to grab my document word intro example once I have that document I’ll then click Send and let’s see what it comes up with now it is looking through an entire document and then it’s going to transform it into a presentation so it might take a little bit of time here but it shouldn’t take more than two minutes and you’ll see that it’s starting to outline the presentation that it’s going to generate so it’s saying here’s the outline we’re talking about healthy eating habits introduction balance nutrition portion control hydration fiber rich foods so everything we just read about in that document and now it’s generating the slides adding speaker notes as well and look at this I mean this is amazing we now have our entire Word document transformed into a slideshow introduction I love this balance nutrition all the things we’ve talked about portion control all the pictures hydration I mean this is just within second it’s it’s not even taking us that long it just looks awesome now I will say this isn’t perfect as you can see here these last slides are a little weird vegetables I kind of split it nuts and fruits so I’ll probably delete those two and just add these in and change this bullet point too I don’t know what that bullet point was so even though it came over and it was pretty much perfect there are a couple of things we still need to edit so add in the nuts here and fruits and then we could get rid of these ones and I think that looks great let’s see old grains fiber rich fiber rich so we’re going to have to make a change here let’s see what we can do I’m just going to take this and copy it or even cut it let’s paste it here let’s make this into a slide tuck and okay and let’s make this the same I’ll use my format painter those all look good I want them to all be on the same level and this is going to look amazing and then we’re going to use that Designer tool just like before I do want them all to I mean it won’t matter once we change the designer delete the this out and let’s see what designer comes up with with this one actually like this a lot but it doesn’t really stay consistent I mean a little bit yeah I guess we can still use it it’s pretty much the same but I do like this all right and there we go we have now just taken our Word document right here and change it into a PowerPoint presentation I think that’s just amazing I don’t know it has speaker notes the only thing we really had to do was a couple of edits add animations and we’re good to go now that I have a slide deck presentation with a lot of information what I want to do is go to change topic and I actually want to start to ask some questions about our presentation so it’s going to say what would you like to talk about I want to view some of the prompts that we have where I can understand it’ll say summarize this are there any dates I also can go to ask to see give me a specific example from this presentation on how I can improve it for a leader that’s actually really good one let’s see if I could do that how I can improve it for my stakeholders let’s see if it can give me specific examples on this and this is is pretty amazing you’ll hear me say that a lot because co-pilot really is I mean there’s just so much you can do with it so it says this response isn’t based on the presentation does add visuals use images charts so it’s just giving me some feedback on overall how to make a presentation better it’s not actually talking about this specific presentation but if I do want to talk about this specific presentation you can just add ask questions about it like how many slides do I have how many slides do I have and let’s see what it does or are there enough images in this presentation according to this presentation your presentation has seven slides now I can even get prompted for more questions about this specific presentation for instance what is the topic of this presentation and then it’s going to work on it let’s see what it comes up with so this is great here’s a summary of the deck so I didn’t ask for quite a summary but this kind of brings us into our next topic which is being able to summarize our entire presentation but here’s a couple of main ideas here healthy eating balance nutrition you’ll even see where it’s linked to and you can click straight onto the slide which I think is pretty awesome let’s say what is the agenda of this presentation according to this presentation introduction balance nutrition now it starts to pull out even more information so now I’m getting deeper into our co-pilot and to the relevant questions to this presentation so now I’m going to ask what is the importance of portion control now this might not pull a reference directly this is directly from my presentation even from references slide one right or introduction slide if I was to ask what is the importance of portion control it might actually pull this data but it’s pulling it from presentation so this is pretty awesome look at that pulling it from the portion control and it makes a link straight to it so it says according to the presentation portion control is crucial for maintaining a healthy weight if I want to see where that is listed I can click here it brings me right to it or what are some common portion sizes we can ask that as well see if it can answer that from this presentation or it has to actually pull information from the web because I don’t really see anything about portion sizes I just see be mindful of quantity so even though this referenced my present it’ll tell you that this response isn’t based on the presentation it had to go outside of it to find the answer which it did still it gives you a common portion size how awesome one cup of raw leafy vegetables 2 to 3 ooun fish or lean meat one tablespoon of oil or Salad pretty cool now once we’re done asking questions like what are some fiber rich foods or what’s the importance of hydration if we want to reset all of this always remember to Click Change top and that will actually reset the whole thing and then it says okay let’s change the subject it’s not going to actually ask any of those prompts anymore we would have to prompt it itself but ask questions about your presentation have fun with this so we’ve seen how many different prompts there are for co-pilot and it could be a little overwhelming but one of the great things about co-pilot is it offers us a way to learn about the different prompts and if you click into view prompts you can go to view more prompts and it’s going to open up this prompts from co-pilot this is where we can see all different types of prompts and also examples like add an image of a puppy dog to the slide or create a presentation about Hawaii or add an agenda slide or create a presentation based off of a file there’s so many different ones get a head start create a presentation generate ideas or organize your thoughts and there’s just so many different ones but if you wanted to see all the different prompts from all the different applications you would go over to the co-pilot lab so you’ll see here this link see all prompt in copilot lab and you’ll give that a click now that we’re co-pilot lab this is where we can explore the in products so where co-pilot exists for example 365 word teams Outlook PowerPoint Excel even in OneNote or Windows Loop whiteboard or forms you’ll see all the prompts to try and remember that co-pilot lab is here to teach us what sort of prompts exist now in the prompts to try we can save prompts by clicking the little ribbon icon and we quickly save a prompt so if I want to save this one just click it and now I have all my saved prompts here so that’s a nice little flag system right next to it you’ll see we can filter for whatever app we’re using this for whether we want only Excel or word or even Outlook prompts and then what sort of category do you want what prompt do you want to create something or edit it or understand it ask questions about it or even just just catch up and get summaries you’ll notice that when we’re looking at the prompts it’ll explain what the prompt is a nice little category what’s new and then you can see an example of what you would write for the prompt you’ll see in the bottom left hand corner what the prompt is coming from so which application in this case this would be Microsoft 365 this one’s a OneNote prompt this one’s an Outlook prompt a loop prompt and you can go through and find PowerPoint and this is also what’s really cool about this system is that you’re learning right so if you’re like how do I add an image to a slide it’ll showcase add an image of and then you can say for example a puppy dog to the slide so if you don’t remember that you can always just save this and then use them later on in your applications once you’re there and there’s so many different ones like get in shape that’s a pretty cool one Microsoft pre-created a bunch of for us we can click on show more show more and there’s just so many different ones now once you go through the different prompts and you choose which ones you want to save and use inside of co-pilot in those applications you can then go back to the app and start using them you’ll see down here we do have a couple of articles for quick tips for better prompts so summarize this email and two bullet points you’ll see that you’re giving more detail and you’re specifying that you want two bullet points that’s something that we’re going to learn about for co-pilot is that we need to really be specific on what we’re asking it because well it’s still a computer right we’re still talking to computer language underneath it we have FAQs what is co-pilot prompts or what can I get done with co-pilot how can I get the best responses or resold you’ll see a bunch of different articles here now going back to the top you can go into the get started and there’s so many different ones they have for home users Business Leaders or for admin let’s say that I’m a business leader and I click into that if you notice the service is unavailable right now so these are services that are starting to come out slowly there are slow roll out so just you know be patient with it you’ll see this one’s still unavailable and I believe admins is unavailable too oh no they finally got the admins up so just wait for the Business Leaders that should be coming out soon and then we’ll see here Microsoft co-pilot 365 documentation get ready for co-pilot with 365 it started with manage it get trained on they have so many different resources for you to take a look at and utilize another thing that’s really important with co-pilot that I always say is the plugins this is going to plug into different apps and Integrations not only with just Microsoft with other Technologies as well so take a look at some of the things that are coming up and once again enduser co-pilot resource co-pilot lab is one of those resources this lab is where you meet co-pilot you understand what it can do you can see it in everyday apps and those are once again those prompts and you can click the little save prompt so this is more like that main page here this is the landing page for copilot lab but it’s pretty much the same if you go to prompts to try it’ll just bring us back to where we were what’s new that’s always something that’s important I’m always reading up on the latest updates for Microsoft co-pilot so you’ll see here prompts of the month what were the most important ones or what were things that weren’t working that they’ve now updated transform a doc into a presentation that’s a really cool one and you can upload document files we’ll actually talk about this in one of our other classes when we get into using co-pilot with word and also using it with PowerPoint but as you can see here improvements based on our feedback before we talked about how you can submit feedback it is important remember this technology is Young still so we need to really Express what’s working or not working first to make sure that co-pilot can evolve into the tool that we need it to be you can take a look at some of the previous updates as well our February updates January December just click on the little carrot icon you’ll see all of them and I just love the way that they display like all of the icons you know that this is specifically for work it tells you you know what it’s for we’re actually going to be talking about word for the web so transform your text into a table this looks like it’s only available for word for the web so not for the desktop app that’s another thing that’s really important with using copilot there’s going to be different things that work in the online version versus the desktop version and there we go so always remember that this is still C pilot lab we can have all the same tabs up top we can switch between prompts to try getting started remember for business leader is one that’s not available right now but it will be rolled out sooner than later and there you go one of the next things we’re going to talk about is using co-pilot with the online version of PowerPoint so I went to my Microsoft 365 account and I’m going to open up the online version you’ll even notice co-pilot is here 4 365 which we’ll Showcase in another video but if I click into PowerPoint and I create a blank presentation I can now use my copilot and you’ll see just like before there is a little bit of a difference with the ribbon but if I click on co-pilot which is in my hom tab still it’s going to give you the same prompts as before so create a presentation create a presentation from a file or even add a slide about so let’s say that I want to I don’t know maybe create a presentation about let’s do a presentation about co-pilot right so I’m going to say create a presentation about copilot and let’s see what it comes up with we’re using co-pilot to create a presentation about co-pilot a lot of fun pulling things together remember that we do need to add animations but one of the things that I love about co-pilot is that it adds in the speaker notes for us the imagery for us as well so there we go let’s take a look so right away we have the power of GitHub co-pilot how does GitHub co-pilot work so I don’t want to actually use GitHub co-pilot I’m actually going to change it I’m going to say um create a presentation about Microsoft co-pilot and I’m very curious to see if since I’m doing another creative presentation if it’s going to erase everything that has already been resulted here so it’ll say create a new presentation will replace your existing slide so you may want to copy first save a copy and I’m like no that’s okay create a new DFT see if it’s going to do it for me all right there we go it replaced them look how cool this is once again so introduction to Microsoft co-pilot it says uses AI to suggest code Snippets trained on massive code base saves time and increases productivity benefits of using Microsoft copilot and then limitations of it requires internet connection may not work for all coding scenarios I also want to add in a couple of slides here so let’s do this let’s say add a slide about co-pilot with PowerPoint and then I’ll do add a slide about copilot with Excel and also word are three main Microsoft Suite applications let’s see so why use Microsoft co-pilot co-pilot uses AI so it’s now saying why instead of giving us what I wanted it just says a slide about co-pilot but really I want to add a slide about co-pilot with PowerPoint so let’s I I’ll keep this one but I’ll say add a slide about PowerPoint working with co-pilot something like that that way that I’m a little more specific and hopefully it’ll understand what I mean and then put that information in there and then we’ll work with the other ones out a slide about Excel working with co-pilot and word okay there we go that makes it exactly what I wanted I don’t know what this extra one was for so we can delete that one out that’s just kind of came up with a random one but now I’m going to do the same thing I’ll just copy this it’ll be a lot easier and let’s paste this in and then we’ll do one more word and then we’re going to see it all come together and I do want to change a couple of things here I don’t like all of the designs It’s always important to add animations and Designs but as you can see the online version works very much much the same as the desktop version let’s do our last one here where we talk about word working with there we go it is going to come through there it is all right so Microsoft co-pilot and word PowerPoint and co-pilot and Excel and co-pilot so now that I have this I’m going to open up my designer and let’s see if we can change the designs cuz this kind of all looks a little all over the place um let’s see what we can do here I actually do like this design so I’ll use this one let see what it has on this one I like I like the line like this I think this looks good uh let’s go with this one once again keeping things consistent I always think that’s the most important thing all right and let’s go with a couple more and then we’ll add our animations and take a look at our final product and last but not least all right so I think that looks good it’s more consistent with our theme and let’s just see if they have any other ideas that looks great so we got our line here then we have the line going across for the rest of them with our little Plus in circle the last thing we have to do is just add animations for this and we’ll do the simple flying for all of these and then we’ll run the presentation and let’s take a look at some of the notes that they gave us just to Showcase how consistent the notes can be as well it shouldn’t make you sound like a robot with these notes but you never know we always got to take a look so for now let’s take a look at what this presentation will look like I’m just going to edit it in the desktop app even though we did it in the online version just so we can take a look at my notes there we go now let’s actually take a look at our presenter view so this is what it looks like we have here introduction to Microsoft co-pilot and this is how I would present it reading my user notes that AI used for me so here we go a little fake presentation hello everyone my name is Joe today we’re talking about introduction to Microsoft co-pilot Microsoft co-pilot is actually an AI powered intelligence code completion tool and it uses machine learning to help developers write code more efficiently it uses natural language processing to suggest code Snippets functions and classes as developer types make it quicker and easier to write the code there we go so that’s pretty cool and then you go to your next one and you have boom all the information there and then you can talk about each one awesome so as you can see we just built a presentation we’ve changed the design we’ve added some animation and we’ve done this all in less than 10 minutes as you can see co-pilot is so amazing and there’s so much you can do with it I hope you all enjoyed this course and I’ll see you all next time thanks welcome to PowerPoint tips for amazing presentations you’re learning with Mo Jones IT professional and educator we have two modules for this course and module one will answer three main questions the first question we’ll answer is What story do we want to tell second question is what retention techniques will be used and then third what are some of the common mistakes that we will avoid we’ll answer these three questions as we navigate through module one and we’ll learn some pretty nice tips along the way as well let’s answer our first question What story do we want to tell well why are we talking about storytelling here where storytelling is a big deal in the business World currently and we all like stories now remember story has three parts primarily we have a beginning we have a middle and we have an end there’s some other elements of Storytelling in here as well but we’ll go ahead and keep it simple for our presentation so the story that we want to tell is well how can we go from boring to [Music] engaging so how can we go from a boring presentation to engaging presentations so basically we’ve seen some boring presentations lately and what do they consist of well they consist of low [Music] engagement they also consist of low [Music] retention and then what happens in contrast when we experience some let’s say awesome presentations what does that look like well you’ll give the opportunities to engage and what else do we have well we also have increased retention so there’s my actual Story how can we go from boring to engaging let’s first talk about boring presentations and the effects of boring presentations and then let’s talk about some awesome presentations and the effect effects of awesome presentations as well well what I can do now I want to go ahead and convert this into a presentation I’ll go ahead and apply the heading style here so remember we do have the capability in PowerPoint to insert slides from an outline so I’ll go ahead and create that here and I’ll go ahead and save that to my computer and then I’ll go ahead and open up PowerPoint so here’s my PowerPoint I’ll go ahead and delete this first slide here I’ll go ahead and click on where it says new slide and from there what I want to do is I want to insert slides from outline so I’ll go ahead and click here and here is my outline that I saved so I’ll go ahead and click here I’ll go and click on insert and let’s see what happens so my story that was in Microsoft Word I can see it’s now become my PowerPoint presentation well that first one this is the title so I’ll just go ahead and change the layout here to the title slide and I’m good to go if I click on The View tab I can head on over to the outline view I can get a really nice outline here as well and I can see so this is a really really nice tip start your presentations in outline view you can go ahead and either create your outline in here or you can do like like I did create your outline in word as long as you convert them to The Heading one Styles then you can reuse slides from outline right in here as well but we have our story so we have seven slides that will tell a story and now it’s just a matter of adding context to each of these right so for boring presentations we can insert some some visuals in here and some context for low engagement we can add some context in there as well as a matter of fact since I’m here I’ll go ahead and do that right now I’ll just go ahead and add some context I’ll worry about the design a little later so for low engagement what does low engagement look like well you’re typically listening and I’ll just keep it simple I’ll just use keywords here you’re listening you’re waiting maybe waiting for something interesting or waiting to go home and you’re probably wondering what’s going to happen next or wondering what’s happening outside of this presentation right so we good to go low retention what does that look like well typically you are [Music] uninterested and the value that’s being offered is low so low value and as a result you basically forget everything that was a part of the actual presentation so you can see just by putting our story on paper here we’re getting a nice little outline for our presentation okay now if you experience awesome presentations opportunities for engagement well what does that look like well we have what’s we have activities I’ll just put activity here another way to engage with your audience is to use a poll or something like a whiteboard pretty good what about retention how do we increase retention well we want to use visuals we want to use images and very important we want to be concise we’re good to go so just like that I’ll go back to the normal view here and I already have the structure for my entire presentation so that is the concept of Storytelling in the beginning we had boring presentations that were resulting in low retention and low engagement and while we transition to awesome presentations we experience opportunities for engagement and increase retention as well now let’s go ahead and add some content to our presentation going to go ahead and use the designer one of the reasons that presentations are boring is because they all look the same this title slide we don’t have to go with this we can use the designer to get some ideas so I’ll go ahead and click on the designer here and I’ll get some ideas now the designer likes a couple of things it likes keywords and it likes clean slides and it likes images so I’ll go ahead and insert some images in here I’ll go for a stock image and I’ll use these cutout people from the Microsoft stock here and I’ll just grab a couple we’ll grab this board gentleman here and then I’ll grab this engage gentleman here I’ll insert those two now the great thing about the designer I don’t have to worry about placing these and aligning them the designer will take care of that for me so I have some a couple of options here that I can use I can also change it a little later uh this one here just has a little orange accent so from boring to engaging that’s a pretty nice title slide I can always change it to another one here if I want to have some other ones so this way we have a little bit of variety in here I’ll go ahead and stick with this one here and I’ll move on over to my next one here so boring presentations so why do we have boring presentations well again it’s because they all look the same right or maybe it’s just too much text or maybe it’s too too much content there different reasons here as well so I can go ahead and add some information in here I don’t have any visuals here the designer sometimes will provide visuals for me so let’s see if I can get anything in here in terms of a visual I just want to make sure it’s consistent with the first design that I chose here so I’ll go ahead and look for something meaningful now what I could do as well is I can go ahead and delete delete this text here and I can just focus on boring presentations so I can just create a visual so I’ll copy and paste this picture in here and let’s see what design options I get now so this slide will just be about boring presentations we don’t necessarily need to have any content in here I’ll go ahead and delete this content placeholder and here we go so almost like a section header so we’ll talk about boring presentations I’ll use this one and there we go go ahead and move on to the next one and now that we have some keywords in here listening waiting wondering the designer is going to provide us with some opportunities to incorporate some graphics that represents those keywords as well so I’ll continue this pattern until I have really nice visuals either icons or images for all of my slides and just by doing doing that we can increase engagement because we’re incorporating text with visuals and we’re keeping the information the content on the slide we’re keeping it to a minimum or we’re condensing the actual information so the reason that we have boring presentations is because we have low engagement everyone is listening and waiting and wondering instead of engaging during the presentation well what does the psychology say about all of this well according to the Stanford Graduate School of Business an article by Matt Abrahams people retain structured information up to 40% more reliably and accurately than information that is presented in a more free form manner what does this have to do with storytelling well remember when we’re telling a story we’re using a structure in this case we used a simple beginning middle and end we have some type of compare some type of contrast and so just by incorporating storytelling into our presentation we have the capability to provide more structure we can take our audience on a journey and we can complement our presentation by using the story that we’re actually telling so keeping this in mind we can see the immediate benefit of applying storytelling to our presentations what does the psychology say about retention before we start applying retention techniques it’s important to understand what the psychology says well after the initial 10 minutes of a presentation ending only 50% of our audience will remember what was said that’s pretty interesting what about 24 hours later only 25% of our audience remembers what was said and when we get towards the end of the week only 10% remembers what was said here are some other statistics we remember 10% of what we hear 40% of what we hear and see and we remember up to 90% of what we hear see and do let’s take a look at an example here we have two pictures picture on the left picture on the right picture on the left represents Elementary School read picture on the right Middle School reading so an elementary school love to read what is it about the content that is in the book that makes us like to read in contrast what happens to the books in middle school where we don’t like to read well we can see you know it’s more academic once we get to middle school but the main reason is that the pictures were removed so we don’t have pictures anymore in elementary school reading books have really nice pictures we can make connections we can draw conclusions in middle school they replaced with charts tables and a lot and lot of heavy heavy text so we can use this information to our benefit it’s the first step to understanding how we can increase retention how can we increase retention well if we take a look at our visual here 10% if we provide our audience with text when we provide our audience with a visual we increase it to 30% and when we provide a simple text and a visual we increase retention to 65% now remember the question we want to answer is how can we prevent our audience from just listening waiting and wondering well we need to find different ways to make the presentation personal actionable conversational and a couple of things that we can do is first we want to make sure that we are providing simple text and visuals in the form of infographics our brain naturally likes infographics we like to make connections and that’s what infographics allows us to do so instead of using a lot of text we can just provide a really nice infographic to get our point across as well as an example let’s take a look at this slide so we have a lot of text here you’re probably already reading what’s on this slide here that’s naturally what we do so this is just a little snippet from Microsoft in terms of what smart art is so it’s saying quite a lot here so one of the things that we can do is how can we convert this heavy text how can we condense it so that it will be more meaningful to our audience well what I’m going to do going to separate this into a few sentences here so I’ve broken up those three sentences on different lines and then I’ll go ahead and convert those to bullet points so now I have three bullets and now what I’m going to do is condense each sentence now what I want to do is I want everything to fit on one line I don’t I do not want my bullets to wrap to the next line right so try to keep your bullets on one line do not have them wrap so I can accomplish that by just just condensing this information here so what is it actually telling me it’s basically telling me that I can quickly and easily make a visual representation of my information so I’ll go ahead and rephrase this sentence here so I’ll get rid of some of these fill words in here here I’ll just say quickly make a visual representation of your information there we go the next one here is just telling us that we can choose so I’ll go ahead and condense this as well choose from among many different layouts this is actually saying two things so I’ll break this up a little further so we can choose from among many different layouts and it helps us to effectively communicate our message or ideas for the last one here it’s kind of saying the same thing twice it can be used throughout office for example Excel Outlook PowerPoint and word so I’ll just say can be used throughout office and there we go so we can see just by condensing it to four bullets here our bullets are not wrapping just four lines it’s much easier to decipher this information now think about an email if you have an email just have four lines like this you can easily decipher the message and move on as opposed to having a paragraph it’s a little more work to be able to decipher that as well okay so that’s the first step I’ve condensed my information now what I’m going to do is convert that to a Smart art graphic we can either use the designer to do this it will create some for us but let’s take a look at how we can create our own smart art graphic I’ll go ahead and just choose anyone that I want want right here here’s the short list some will have pictures I do want one with a picture so I’ll go ahead and choose this one so now what I’ll do for each placeholder I’ll just choose an icon that represents a visual Choice communication and office so I’ll click here I’ll go for an icon and I’ll look for a visual here [Music] we’ll grab this one second one refers to choice so again we can use the designer for this as well but we’re just going through smart art here the next one is communication or [Music] communicate I’ll grab this uh loudspeaker here icons are great they come in pairs either have a filled color or an outline color which is pretty cool all right this one is office you could use a picture as well but I’ll just go ahead and use an office here and there we go so here’s my smart art graphic well a lot of empty space here I want to see some big visuals and big text so I’m going to go ahead and change it so I’ll click on the layout options here and I’ll just look for some other layouts that incorporates pictures as well I’ll choose from more layouts I’ll go down to picture and let’s see I’ll try let’s try this one see what that one looks like see this looks a lot better now I can go ahead and change the colors if I want to I can make it colorful I can o go ahead and give it a nice intense effect as well so this is a pretty nice smart art graphic we went from heavy text to creating a nice visual here we could even take it further and convert it to another type of visual if we want to so condense your information convert it to a Smart art graphic we’ll get that 65% retention let’s discuss some other retention techniques while you’re presenting to your audience you can actually pull up the Whiteboard you’ll notice on the bottom left that we have some tools that we can use we have things like the laser pointer we have the pen as well but we also have a whiteboard if you press the W key on your keyboard that puts us into whiteboard mode and now we can just use that space to mark up and maybe maybe collect some some responses from our audience there’s a lot of different things that we can do maybe we can have three columns and then we can just ask our audience everyone can raise their hands right so here’s option a option b and then option C so for option A maybe we had five responses option b maybe three and then maybe option C is the winner where we had 10 responses so that’s a simple use of the Whiteboard and PowerPoint so just press the W key on your keyboard that puts us into whiteboard mode now if you’re using other apps like teams teams actually has its own built-in whiteboard as a matter of fact there are several different types of whiteboards that you can use from mind maps and other things there as well now another really cool feature in teams we actually have what’s called PowerPoint [Music] live so check out PowerPoint live so this basically allows us to share our PowerPoint presentation with our audience and it’s interactive so our audience can pretty much navigate through their presentation at their own speed they can always come back to where the presenter is actually add as well so that is a pretty pretty nice option other applications they have their own versions of whiteboards that you can use so you can either start with a blank whiteboard or you can go ahead and use a built-in one they’re all really really good options for interacting with your audience now I’ll go ahead and press the W key to get rid of my whiteboard here let’s go ahead and talk about another thing so we actually have the capability to add forms forms is a really great way to interact with your audience I’ll go ahead and end my slideshow here and I’ll go ahead and click on the insert tab now you notice when you click on the insert tab we can insert a form we can even take it a step further if you use powerbi you want to share a visual you can insert powerbi into here as well but for now I want to go ahead and use forms it’s a great way to collect data from your audience it automatically connects to the forms that I’ve created from the Microsoft forms app I’ll go ahead and insert this PowerPoint form here so it’s asking me do I want to collect responses offline or do I want to present for interactive meetings well I want to see realtime feedback so I’ll go ahead and choose this option so my form is loading right here inside of my PowerPoint slide and we can see this is how it looks so this is pretty nice it comes with the the QR code we can also copy and paste the link so different ways for us to be able to engage with our audience over here on I’ll go ahead and show you this is what the form looks like so I’ll be filling out the form so I’ll go ahead and click on start now I’ll put in my name and my favorite feature in PowerPoint so there are different types of responses so this one is going to be a word cloud so I’ll say smart art and ideal amount of slides in the presentation I’ll say 12 I’ll go ahead and submit the form and it should show up there you go so we can see the first response is Mo I’ll go ahead and put this into full screen mode here and as a matter of fact I’ll go into I close this out and I’ll go into presentation mode I’ll go to reading view to keep keep it simple so this is pretty nice so as everyone starts entering the form you’ll see the information here if I click on the next response here I can see smart art I’ll go ahead and add another response to see how that’s collected so I just added another response so we can see we have two responses now in the wordcloud and we can see that we’re collecting so this is a wordcloud so so if we have many participants that write smart art this will appear bigger than the others so that’s pretty cool and then of course the last question this is a multiple choice so 50% says 12 50% says 18 I can change it to a bar down here on the bottom if I want to we get a nice bar there or I can also change this to all responses kind of see all of them here as well so pretty pretty nice so those are really two ways that we can engage with our audience and increase retention get your audience active allow them to have some opportunities to participate and to engage as well so we have Microsoft teams whiteboard we have Microsoft teams PowerPoint live we have the PowerPoint whiteboard we also have Microsoft fors that we can integrate as well let’s go ahead and answer our third question well what are some of the mistakes that we are going to avoid well some common mistakes that we see in PowerPoint just to name a few all the slides look the same You’re Expecting the same type of delivery the same type of of content and you’re expecting to not be engaged so we’ve already seen how we can overcome some of those issues as well but some of the common mistakes is is not taking our audience into consideration so we do want to present based on the audience that we are presenting to now one of the things that we’ kind of strike out on is our audience is looking for key conclusions so they want some summaries they want some insightful data right how is this beneficial to me so when you’re building a presentation you need to consider who is your audience and how will they benefit from your actual presentation what are some of the key insights that you want to provide to your audience we want to provide conclusions and not a lot of just random information also looking for insights so what is the takeaway what is the benefit and a really big one here a lot of times we use PowerPoint to present a lot of data which is very very difficult to do so to overcome these what we want to do is if we need to represent data we do not want to use text we want to use tables or we want to use charts as well now one of the things that we can do if we do want to represent some type of data again if you using powerbi we can insert a powerbi report right here and that makes it much more efficient for everyone to see the data and be able to interact with the data as well we can also insert a chart so we can insert a table we can insert a chart in here as well but if you already have an existing chart or table in Excel you can actually just copy and paste it right here into PowerPoint I’m going to go ahead and insert a new slide and I’ll change the layout I just actually this is fine I’ll put my table and my chart on here I’ll open my Excel so here’s my Excel I can see I have a table here and I also have a chart so I can just copy this chart and I’m going to paste this chart right into this content placeholder and there is our actual chart now if I wanted to add the table in here I can go ahead and do that as well but I don’t necessarily need the table because I already have the chart here I’ll go ahead and delete this content placeholder now I can make my chart a little bigger and I am good to go so I’ll just go ahead and and call this sales data now the really nice thing about this chart as well is we can actually you know create a little bit of intrigue here so we can animate the actual chart so I’ll go ahead and click on the animations tab here and I’ll use a simple animation the chart comes in as one but what I can do if I click on the effect options I have a lot of options in here in terms of the sequence so I can reveal the chart piece by piece Maybe by series or by category or by element in the category this is super useful if you have a chart that has a lot of data you don’t want to just present all of the information to your audience at once you can break it down piece by piece so I’m going to choose the by series and let’s see what that looks like so we can see q1 comes in first and then Q2 comes in second and then the total line comes in third it’s also interactive so if you move your mouse over it it shows you the actual numbers I’ll choose the next one by category so it comes in the first cluster here is M Jones q1 Q2 and total and then Cohen and then Sanchez and Gupta the next one here is by element in series so it’s q1 for each and then Q2 and then the total so that is pretty cool so we can go ahead and just kind of animate our chart we can pause before we move on there and then finally we have by element and category so it’s just literally going from left to right one by one I think I like by element in the series I’ll go ahead and choose that one I’ll go into I’ll go into reading view let’s see what that looks like so here’s my chart and on each click I can reveal a q1 for Jones Cohen Sanchez Gupta now we’re in quarter two and then we have our totals as well so we can animate our chart we can also animate our smart art as well so pretty pretty cool another mistake is not using the presenter review the presenter view is a really really good option here I’ll go ahead and click on slideshow and I’ll go ahead and make sure that I have presenter view turned on and I want to show my presentation on my other monitor I want this current screen to show my presenter view so the presenter view comes with a lot of really really nice tools we can use subtitles if you want to and that’s very very helpful for our audience I’ll go ahead and turn those on we can always turn those off later and we have the different settings here that we can set as well I’ll go ahead and run my presentation so I’ll go ahead and from this current slide so here’s the actual presenter view we can see on the bottom it’s actually translating my speech into text so that’s very very helpful for our audience I’ll go ahead and turn that off I’ll just click on toggle subtitles here so this is really nice the presenter View allows us to do some really really nice things but overall it allows us to own our content because the presenter view we can see this window the only thing that our audience can see is what’s inside of this Frame so I’m my on my other screen they can only see whatever is being presented in here they cannot see all of my tools down here that I have they cannot see the notes for my slide and also once I go back we can see that we can see what what slide is coming next so this is a really really nice tool for us it helps us to own our content well what does that mean well we’re in control we can see what’s coming next we can see the slide that’s coming next we can see the animations that are coming next for example if I go back here I can see that my chart is going to be displayed next if I click here and I can see the animations before they come up so when you have a lot of detail on your slide is pretty difficult to remember the sequence of events so the presenter view allows us to take control of that now for each of the slides we have our notes so now notice I only have three Graphics in here but here are my talking points I can use my notes for My Talking Points so this way I’m not reading necessarily what’s on my slide I’m just giving context to what’s on my slide here as well right so I can say well what we can do is copy and paste tables from Excel or other applications we want to use animations in a clever way by breaking down our content and we want to keep it concise so we want to try to stick to three concepts per slide well why three concepts well because our brain naturally understands things and threes breakfast lunch dinner right morning afternoon night so the presenter View allows us to own our content the notes area allows us to provide talking points for each of our slides so that way we’re just summarizing the slide instead of reading everything that’s on our slide as well and then of course when we’re using the presenter viiew it helps us to keep the slide simple we can add our contents in our notes and that way it’s not overloading our slides as well now in here we have a lot of other tools that we can use sometimes you want to be able to navigate to another slide if I click here my audience is still seeing this slide they’re not seeing my my slide layouts here I can go ahead and just jump to another slide if I want to and I’m good to go right some other things that we can do so we can go ahead and black out the screen and we have a lot of different things in here that we can use as well so definitely use the presenter view because it gives us some really really nice benefits helps you to own your content now when you own your content your audience will have more confidence in you and they’ll be more engaged because you own your content when you’re summarizing your slides instead of reading it verbatim that also increases retention and when you’re keeping your slide simple keeping it to three concepts per slide you’re helping out your audiences as well for module 2 we have a few questions that we want to ask as well we have three questions just like module one the first question that we want to ask is well what do we want to customize second question is what layout Concepts do we want to create and third which new tool would we like to use so a lot of this will be about customizations we’ll take a deeper dive into the slide Master what do we want to customize well let’s go ahead and make our own theme and then we’ll go ahead and customize some of the existing layouts that we have here and we can also make consistent changes to our presentation so to customize the theme so I can click on the design Tab and I can choose one of these themes so basically what is a theme it’s a set of colors fonts and effects so all these different themes they have their own set of colors their fonts and effects as well well what if I wanted to go ahead and maybe brand my PowerPoint I can go ahead and do that or maybe I’m just not you know I just don’t want to use any of these existing themes well let’s make our own I’ll click on The View Tab and then I’ll head on over to the slidemaster and this is where I can make all kinds of changes to my presentation but for now let’s just go ahead and make a theme if I scroll to the top I’ll see that this slide make sure to click on there so this is the actual Master slide so notice that they’re significantly larger than the others these are the different layouts for example here’s the title slide title and content to content I’ll click on that slide here on the very very top and once I’m in the slide Master there’s a lot of things that we can do we’ll explore but for now what we want to do is we want to go ahead and choose a set of colors a font and effects for our entire presentation we can even go ahead and change the background Styles so instead of choosing one of these existing themes I’m going to go ahead and make my own so I’ll choose a color palette here now notice you can actually make your own color palette as well so here’s some different colors that we can make I’ll go ahead and scroll down so here’s the newer office theme here’s the older office theme so maybe I just want something like a blue green I’ll go ahead and choose blue green here and I’ll go ahead and choose my fonts so maybe I’ll go for let’s see I’ll go for the that font and for the effects I like a glossy effect so that’s it I’ve chosen my color palette I’ve chosen my font and I’ve chosen my effects here as well if I click on the fonts drop down I can go ahead and customize the fonts and I can basically specify what I want my headings to look like and what the body to look like so I can actually change the headings if I want to to something else maybe I’ll make this see not the best many to kind of scroll through here I’ll go for Georgia for my headings and I caramon here for my body I’ll go ahead and press save and I’ll close the master view to kind of see what that looks like just to confirm so I can see I now have the Georgia font for all of my headings and titles and I have the gamon here so mission accomplished so I’ll go back into the slid master and I want to go ahead and save this theme so I’ll go ahead and click on the themes drop down here and on the very very bottom I’ll click on save current theme and I’ll just call this [Music] one gamond and Georgia I’ll go ahead and press save and I’m good to go so that’s how we make our own theme I’ll close the master View and now if I were to open up a new power Point file and I click on the design tab I’ll see I should be able to find that so it’s right here is the gamon and Georgia theme so that’s how we can make our own theme in PowerPoint let’s go ahead and customize the existing layouts so many of us do this you know we’ll come here and we’ll change the font color we’ll change the font size we’ll come in here and change the type of bullets as well and then we’ll go to the next slide and we’ll do the same thing there again well we don’t have to do that let’s go ahead and customize the existing layouts here so that we can have a uniform font color size effect and maybe we want the check marks here for our bullets instead of the original bullet points I’ll click on The View tab I’ll head on over back to the the slid Master now the current layout that I have selected this is the title and content layout so if I make any changes to that layout all of my slides that are title in content will inherit these changes so I’ll go click on the slide Master here if I scroll up here so notice that I’m currently on the title and the content layout if I hover over it it tells me that it’s being used by slides to 2 through 11 so all those slides 2 through 11 is going to inherit any changes that I make to the to the layout here I’ll keep it simple I’ll just go ahead and click on the title here and I’ll make this a blue color I’ll make it bold as well now for the first uh I’ll go ahead and change my my list here so I’ll change these to check marks instead of those big basic bullets also go ahead and click on that first line and I’ll make that another color as well I don’t have a lot of colors to choose from just some basic colors here so maybe I’ll go for maybe darker different shade of blue I’ll go for this one and that’s it so I’ll go ahead and close the master View and let’s see if that that will affect that layout and there we go so we can see slides 2 through 11 they have all inherited the changes that I made to that layout here as well so that looks pretty good but maybe I want something else like a little accent down here I’ll go back into the slide master and I’ll go ahead and insert a basic shape I’ll just put a little accent down here something like that I can also remove the Footers don’t need those right now so just a nice little accent down here and let’s see what that looks like I’ll go ahead and close the master View and there we go so all of my layouts title and content layout now has those changes that I made to the title the bullets and now I have my little accent in here as well maybe I’ll change that accent let’s see what other the colors I have available not a lot because again this this was a pretty not a lot of colors I’ll go for something that gives a little bit of contrast let’s see what that looks like it looks a little better so there we go so that’s how we can go ahead and customize the layouts when it comes to customizing what we want we can see that the slide Master allows us to customize our own theme we can customize existing layouts to make Universal changes to all of the slides that has that particular layout and we were able to make some consistent changes as well such as specifying the name of the font for our headings and the font for the body of our slides as well but let’s answer the next question so what layout Concepts do we want to create now we did talk a little bit in module one about the rule of three so basically the rule of three we want to keep everything simple want to keep it to about three concepts per slide again because we naturally understand things in threes breakfast lunch dinner morning noon and night so if we can go ahead and just kind of keep everything to then we’ll be helping our audience out so I’ll go ahead and head on over to the slid Master I’ll click on The View Tab and but before I do that if I click on the drop down here for new slides I can see that I have title and content I have two content and I have comparison but I don’t have one that has three content so I’ll click on The View tab I’ll go back to the slid Master now I have two options I can go ahead and duplicate this slide and then just go ahead and add two more content placeholders and just kind of align them so I can do that I’ll have less work to do that way or what I can do is I can actually just go ahead and insert a new layout and that will allow me to pretty much position everything in the way that I want to let’s go ahead and do both I’ll go ahead and duplicate this title and content layout here it is I want to rename it I’ll just call this one three [Music] columns and what I’ll do is I’ll just go ahead and reduce the width of this current placeholder I’ll click on the shape format here I want it to be about 3.3 so I’ll put it there and I’ll line it to the far left or actually what I’ll do is I’ll line it to the middle and then my others will be based on the position of this one so I’ll go ahead and insert a placeholder so I can be very specific just for text just for picture chart well I want content I want to be able to insert anything there so I’ll go ahead and draw this one here and I’ll just make sure it’s the same width 3.3 same height good to go I’ll align this one to the the left all right one more to go just use those temporary guidelines and I’ll align this all the way to the right so there we go so there is our three content layout now I do want to go ahead and Center align the title so I’ll Center align that I can see right now that I have check marks here for bullets I have the regular bullets for my others remember we’re editing an existing layout so I’ll just go ahead and change the bullets keep them consistent so I’ll go for the check marks here and the check marks here good to go I’ll go ahead and close the master View and let’s go ahead and insert that slide I’ll click on new here is my three column layout and there we go so now I have three content placeholders I can add an image icons anything I want to and these here as well so this will be my three column [Music] layout I’ll go ahead and just add some detail in here let’s see I’ll go for a quick chart I’ll just go with the defaults so there’s my chart right there in that first content placeholder uh over here I’ll go for I’ll go for an icon go for a chart as well right icons don’t really fit inside of our content placeholders so we just need to kind of make them a little bigger and then over here I can go ahead and insert uh let’s see I’ll insert a stock image [Music] there we go that one fit really nicely here so that is how we can create our own three column layout let’s go ahead and create another one here I’ll go back to my view tab I’ll go back to the slide master and now what I want to do is I want to go ahead and insert another layout right so I’ll click on insert layout and this one will also be I’ll have three concepts in here but I just want to move things around here so I’m going to go ahead and move my title over here like that and also just make sure that it’s centered and I’ll click on the shape [Music] format and let’s see I’ll go back to the Home tab I want to make sure the text is aligned to the middle so I’m good to go there right so there is my text I do want to change the color so I’ll make it that nice blue here or a little darker blue I’ll go for that so I want to go ahead and insert three content layouts this time it will be a little different I’ll go ahead and add kind of stack them like this so it’s going to be one column but three rows so I’ll go ahead and go back to the slide Master I’ll insert a place holder and I’ll just go for Content so same as I did before and I’ll go ahead and draw this out I’ll use my Footers on the bottom as a guide in terms of the width I’m going get to go right now I’ll make the height 2 in and then I’ll go ahead and repeat that process here so two more placeholders same width and height there we go and then one more to go and so there we go so that’s a pretty nice layout as well I do want to fix this to move this up just a little bit right there and that looks pretty good I’ll go ahead and rename this one so I’ll rename the layout and I’ll call this one 1×3 right so one column three rows and I’ll go ahead and click on rename right I could change the bullets here as well if I want to but I’ll leave them for now and I’ll go ahead and close the master View and I’ll go ahead and insert that layout so here’s my 1×3 so pretty cool now I can go ahead and do the same thing let’s see if I can convert this one to the other layout here so if I change the layout of this existing one to 1×3 so did a pretty good job right so just kind of used the existing placeholders and stack them but um I would need a wider picture to take advantage of this placeholder my chart is okay I can go ahead and just um enlarge some of these other other items here as well so pretty pretty cool let’s go ahead and create a clean slide we’ll continue the concept of the rule of three another concept of the rule of three helps us to create clean slides we’ll take a look at the rule of [Music] thirds so the rule of thirds is pretty popular and prevalent in photography and film making as well so how can we apply the rule of thirds to our presentation here I’ll go ahead and insert a blank slide and then what I’ll do is I’ll go ahead and turn on the the grid lines so I’ll click on The View Tab and I want to turn on the the guides first of all and then I’ll turn on the grid lines and the ruler as well so if I turn the guides on this gives me the the vertical guide here and the horizontal guide I can actually add more guides if I want to which I’ll I’ll do that in just just a little bit here is the ruler so the ruler shows me where I am horizontally and vertically so right now I am on the three horizontally and two vertically well what the rule of third says is that when you have a frame you want to go ahead and divide it into into three right so we want three rows and three columns so if I were to draw a line let’s say right here here this is not exact we we’ll get the exacts in just a little bit here so I’ll go ahead and just put two lines here so we now have three columns we also want three rows I’ll go ahead and draw another line here I’ll go ahead and draw another one down here as well so now we have three rows and we have three columns the intercept section of these different points here so these four points guess what these are called These are actually called PowerPoints so these are actual Powerpoints and what the rule of third says is that when we align our objects on those points then it’s a great way to design our slides and to just capture our audio is attention visually so that’s the idea behind the rule of thirds so if I have an object I want to make sure to place that object right so if I have three objects on this slide have one here have one here and maybe the big one here right so that’s a more natural kind of layout to capture our attention so that is the concept of the rule of thirds so we need to go ahead and just identify those different points as you can see did a pretty good job in terms of the columns here but my rows are too spaced out so let’s go ahead and establish where those PowerPoints are on our canvas I’ll keep it simple I’ll go ahead and add a guideline here at the 2 and 1/2 Mark horizontally on each side so 2 and A2 on each and then we’ll go for one and a half on the vertical so I’ll go ahead and insert a guideline so I’ll right click here and I’ll add a vertical guide now I can move this over to the two and a half right there go ahead and add another one another vertical guide I move this one over here to two and a half as well and then I’ll go ahead and add my two horizontal guides this one will be at 1.5 and the other one be at 1.5 up here as well so by doing that I could go ahead and highlight my PowerPoints here’s one here’s two it’s not exact but here we go so here are our four PowerPoints so just turning on those grid lines and now if I go to any slide I can see those grid lines so now I can leave them turned on and now I can go ahead and just make sure that I’m aligning my different objects to those PowerPoints as well so that’s how we can set up our slides for the rule of three and then we can actually create a layout that has content placeholders on these four different PowerPoints now here’s an example of putting the rule of thirds into practice here I have three objects here on my slide and this is typically how we see them laid out out we always have on the top we always always have our placeholder and then we’ll have our content placeholder then we’ll have another one here to the left but I want to go ahead and apply the rule of thirds so I’ll move my picture here on the Powerpoints I’ll actually increase the size of the picture I’ll place that right here on my Powerpoints and for this one here I’ll place this on the PowerPoint down here on the bottom right and for this one doesn’t need to be that big I’ll go ahead and resize this one and I’ll place this on this PowerPoint I’ll go ahead and increase the font size here make sure they’re consistent and I’ll just go ahead and do that so I’ll go ahead and turn off my grid lines here my guides on my ruler and if we take a look at this particular layout we can see that this makes a lot more sense because I’ve placed them on the actual PowerPoints just need to align them here a little bit and this looks much more balanced than the traditional you know title content here and all of this empty space over here as well so this is a really really nice concept again just identifying those Powerpoints and aligning our objects on those PowerPoints helps us to really create really nice and balanced slides let’s create a reusable slide now if I click on my new slide here I can see that the slides that we’ve created so far we have layouts in here so we have the different content placeholders and they’re laid out in different ways but in this case what I want to do is create a reusable slide so it will have the layout it will also have the contents in there as well I want to create a custom title slide now I did use the designer I just added a title in the subtitle inserted a picture here and the designer kind of gave me some pretty nice ideas these are what the modern title slides look like they incorporate pictures we have our text and we have some little Accents in here some little shapes for example for this particular one so here’s our picture we can see that the picture is in a frame so that’s one of the picture styles that we used it’s overlaying an actual rect angle shape that has that grayish fill color over here to the left this is either an image or three individual rectangles with that gray shape here as well and then of course we have our content placeholder for the title and the subtitle as well so that’s pretty much what that is whenever you add an object like an image a shape or an icon to the slid Master it it gets locked onto the canvas so notice I cannot interrupt with these different shapes I can interact with this picture because I inserted that picture but all of these here are just our Basics remember when I inserted this little accent down here for all of my title and content placeholders just a little shape we cannot interact with it so I want to go ahead and insert a custom title slide because they don’t all have to look like this let’s surprise our Audience by providing the with a really really nice opening slide I’ll click on The View tab I’ll go to the slid master and I want to go ahead and insert a new layout so I’ll click on insert layout here and I’ll go ahead and rename this right away this is going to be title two there we go I’ll go ahead and hide the title and the Footers for now I can bring them back later and I’ll go ahead and look for a really nice picture now I’ll have a couple of options when I insert my picture I can either choose a picture that will take up the top two3 of the slide and then down here I can have my title and my subtitle maybe even my my logo down here somewhere or I can go for a more of a two column orientation maybe the left 2/3 and then third column right I’ll have my title subtitle and then maybe my logo down here so it all depends on the dimensions of the picture that I that I get here so I’ll look for a really nice picture I’ll click on the the insert tab here I’ll look for pictures I’ll grab a stock image and once I find the picture I’ll go ahead and start working with it so I have my picture here go ahead and align this to the left now with this picture is pretty big so what I can do is I can go ahead and get some ideas I can either crop this to a shape to kind of get an idea here so that’s one thing that I can do I can crop it to a shape give it a nice modern looking feel I’ll go ahead and undo that I can also crop it to a particular ratio so if I wanted this to be more of 16 by 9 it will crop it for me and offer me that’s 16×9 ratio that actually looks pretty good I don’t need much of the detail that’s at the bottom of the picture here so I’ll go ahead and leave it like that so at this point it’s still taking up a lot I would need to kind of trim it so that I can at least see the 1/3 of the right column there so what else can I do well I can probably crop some of the detail over here on the left so I’ll go ahead and do that don’t want to crop too much though CU I do want to catch some of these nice colors from that that monitor so let’s see I’ll align this to the center now I can use one of the I can put this in the frame maybe like that right then I’ll go ahead and just insert a basic shape so I’ll go for a rectangle I’ll put that over here just to kind to fill out that space I’ll send it to the back so my picture’s overlaid on it and for that rectangle I can give it a give it its own formatting here so what a nice contrast so I’ll go for that that looks pretty good so far and now I can go ahead and return my title and so here’s my title and now I can put that over here like that I want to make sure it’s Center align so I’ll Center it and make it a little smaller doesn’t need to be that big so 40 and as far as the color I can leave the color as is right now or I can use the ey dropper to pick up one of the colors from inside of here I think that’s what I want to do or maybe I’ll just go with this nice blue dark blue over here not the color I was looking for let’s see I’ll go for this one I’ll insert another placeholder here for text this will be for my subtitle I’ll get rid of the bullets and I’ll also delete the second third fourth and fifth levels I’ll go ahead and Center Aline this as well and um at this point it’s just a matter of what color do I want and what size do I want this to be so 28 that’s perfectly fine and let’s see what other colors I have here let’s see if I can pick up one of the colors from the picture maybe let’s see I’ll go for there’s a white background I’ll go for this one no not too much need a better contrast for now I’ll just leave it as black right and I’m good to go so there is my custom slide I’ll go ahead and make sure this is renamed properly title two there we go I’ll go ahead and close the master View and I’ll go ahead and insert that new slide so we can see here it is has the content in there already there we go so that’s a pretty nice looking title slide and I’ll just say present like a [Music] pro and I’ll just say learn with us so there we go so pretty nice so that’s how we can create a reusable slide now if I want to make any other changes to this I can I can just go back into the slide Master maybe I’ll change the color of this one maybe I can go ahead and add a logo down here as well I’ll go back into the slide Master going to go ahead and insert just a basic logo here I’ll go for this I’ll go ahead and make that really small I’ll just put it down here make sure it’s centered yeah I have that gray background in there maybe I’ll change the background and I’m good to go once I close the master review I can see that that slide has been updated let’s take a look at a few tips and or some of the newer features that are available in PowerPoint if we click on the review tab we have the check accessibility and if we click on the slideshow we have the rehearse with Coach option these are two tools that will run they’ll analyze your presentation for you and provide you with some feedback we also have the high contract mode that’s available I’ll start with the high contrast mode first it will be available depending on the type of colors in the background that you’re working with I’ll go back to the Home tab here I’ll click inside of my content placeholder now I do have a I do want to change the color of the content placeholder so if I click on the shape format here I can change the shape fill and typically we’re dealing with we can change the color to an existing theme color but newer feature allows us to choose only colors that may be easier for others to read so I can turn on high contrast here and now we can see it just kind of filters out the colors that will look pretty that will work well with this background so I can go ahead and apply one of these and I’ll be good to go so at this point I don’t have that much to choose from I’ll go ahead and choose this blue accent six we can see that works pretty well with this background here as well and I’m good to go as far as the text let’s see if I were to highlight this chunk of text here let’s see if I have the so I do have the high contrast available for the text here as well now that I’ve changed the background color and so it’s telling me that this color works well so these are all the colors that will work well with that particular background because they are high contrast notice at the bottom we even have additional colors that we can use here as well so that’s a really really nice tool a big help when it comes to just selecting the right colors in our presentation it’s not always available for example let’s see if it will be available here right so it’s not always available it’s only available for non-transparent colors so that is a pretty nice option so the next time you’re choosing your font or you’re changing the color of of an object go ahead and turn on the high contrast only the other tool that we can take a look at is the accessibility tool now if I click on the review tab here is the check accessibility tool and this is a pretty nice tool um offers a lot of insight and provides a lot of feedback and a lot of fixes as well I’ll go ahead and click on the accessibility here if you hover over it it tells you exactly what it what it does it says let us make sure that your file follows accessibility best practices and it’ll help us fix issues along the way so I’ll click here it opens up the pane over here to the to the right so a lot of the feedback that we’ll see here is things that are missing for screen readers now typically what I like to do in here is look for any text that’s hard to read so any kind of color contrast is difficult to read I don’t have any right now which is good so that means for my entire presentation all the text um can be read easily so so if I click here it says missing alternative text if I click here it brings me right to that place in my actual presentation so I don’t have a caption for this shape here and the screen reader is going to try to figure out exactly what this shape is so what I can do is go ahead and add a description here the recommended actions right or I can just mark it as decorative so I can go ahead and do that if I go ahead and click on another item here so I’ll go ahead and add a description and I’ll just say a horizontal [Music] line and I’m good to go right so then we have the reading order so this is basically telling us that we need to go I’m missing the title so that’s why it’s giving me an issue here so I can verify the order in which it actually appears here as well what I want to do going to go ahead and purposely create a hardto read text contrast here let’s see I’ll go for another color I’ll change the background actually change this to let’s say here we go so we finally triggered it showing us that we have hard to read uh text contrast so if I click here it brings me right to that place if I go to another slide if I click here brings me right to that slide and it’s giving me recommended actions to change the font color or to change the fill color so if I do something like change the fill color to let’s say black it’s corrected and so it disappears from here as well so that is the accessibility Checker um a lot of really robust features but those are the the basics of how the accessibility Checker works if you are creating presentations and you’re Distributing them you want to make sure that you run the accessibility Checker to check all these errors and correct them here as well let’s take a look at one more tool and this is a really nice tool it’s the rehearse with Coach tool I’ll click on my slideshow tab here and I’ll go ahead and click on rehears with Coach the rehears with Coach will give us real time feedback so this allows us to rehearse with the built-in PowerPoint coach we will receive a detailed report giving us constructive criticism and feedback so it’s like rehearsing with a colleague and they’re giving you feedback I’ll head on over to my first slide and I’ll just cover the first couple of slides I’m not going to cover the entire presentation here I’ll just cover the first maybe four or five slides here I’ll click on rehearsal coach here we go it’s going to show me real-time feedback I’ll go ahead and start rehearsing welcome to PowerPoint tips for amazing presentations if you want to present like a pro make sure to come and learn with us in module one we’ll answer three questions and once we answer those three different questions we’ll take a deeper dive into them as well first we want to talk about the concept of Storytelling So What story do you want to tell the main concept of Storytelling is being able to add structure to our outline and adding slides for additional context storytelling takes our audience on a journey and it also increases engagement because we are providing structure to our presentation now what retention techniques will be used it depends on what the science says and based on that we can gather some insight in terms of how to increase retention when it comes to retention it’s all about well what do we remember how much are we retaining and what opportunities will we present will we Pro provide our audience with text speech visuals or all three here are some of the common mistakes that we want to avoid pretty much too much content we want to condense content as much as possible and use our notes as talking points for our individual slides so I’ll press the Escape key there just to kind of take a look and see so here’s the actual report that pops up so we can see it’s pretty exhaustive so it gives me a summary the amount of slides I rehears the total time I did not use any filler words like um and okay and actually no repetitive language so I used a variety of word choice that was pretty good uh inclusiveness my pace is just right so 132 words per minute so this is a really really nice tool so I highly encourage you to make use of this tool before you present you can practice over and over um you can click on rehearse again and you can really nail down your presentation right originality I avoided reading the text out loud on my slides right so again this is a huge tip right here so the rehearsal coach gives us some really nice feedback and allows us to implement some of the tips that we’ve talked about here as well right my pitch got a little low so I need to pick that up a little bit I’ve been talking a lot losing my voice but need to go ahead and pick that up just a little bit here and I’m good to go so that is the rehears with Coach tool let’s take a look at some other tips here we did kind of mention them but here one of the first tips is that bullets have their own rules so when you’re working with bullets on your slide three bullets are ideal four is okay five may be a bit much also want to make sure that you keep bulleted items on one line we do not want to wrap them to another line so so that means that we need to condense the information that we’re providing to our audience also when it comes to font size the minimum font size should be around 20 there are different professionals that have different opinions on this but in my experience at least 20 anything smaller than 20 will be very very difficult to see depending on the type of display um that’s being used now keep in mind that some fonts are naturally taller and wider than others and some are actually thinner and shorter than others as well so depending on the type of font that you you select you may need to go ahead and make it even larger than 20 in order to be able to see them properly and then use the ey dropper the eye droppers are really really nice tool it allows you to keep the color scheme uniform so you can use the eyedropper for text you can use it for for shapes text boxes and even content placeholders as well so use all those tips and we’ll be able to really create some really nice engaging and dynamic presentations let’s recap our learning together here we want to be able to tell a story for our presentation we want to prepare for engagement and retention using some of the techniques that we learned through this course we want to avoid common mistakes mainly providing too much content on a slide we also want to be able to customize our presentation efficiently by using the slide Master saving a lot of time by making Universal changes we also want to create the appropriate layouts that works best for our audience and what we’re trying to communicate and how we’re trying to communicate as well and then make sure to utilize the newer tools that are available and feel free to always check out what’s new maybe there is a new tool that was not discussed for this course here as well thanks for watching to earn certificates and watch our courses without ads check out learnit anytime.com [Music] audio jungle [Music]
Affiliate Disclosure: This blog may contain affiliate links, which means I may earn a small commission if you click on the link and make a purchase. This comes at no additional cost to you. I only recommend products or services that I believe will add value to my readers. Your support helps keep this blog running and allows me to continue providing you with quality content. Thank you for your support!
Title: The Art of Effortless Cooking: Exploring 34 Oven-Baked Dishes and Casseroles for Every Meal
Morning Delights: Breakfast Casseroles to Start the Day Right
Balancing Convenience and Nutrition Breakfast casseroles are a culinary solution for busy mornings, combining ease of preparation with nutrient-dense ingredients. Dishes like the Sausage, Kale, and Mozzarella Egg Bake or Blueberry Quinoa Breakfast Bake exemplify how oven-baked meals can integrate proteins, greens, and whole grains effortlessly. As chef and nutritionist Rebecca Katz notes in The Longevity Kitchen, “The magic of casseroles lies in their ability to marry convenience with nourishment, ensuring even the busiest individuals don’t skip a balanced start to the day.”
The Science of Make-Ahead Meals Many breakfast casseroles, such as the Hearty Fiesta Egg Hash Brown Breakfast Casserole, are designed to be prepared the night before, leveraging the oven’s consistent heat to meld flavors overnight. This approach aligns with food scientist Harold McGee’s observations in On Food and Cooking, where he explains how slow, even cooking enhances texture and flavor diffusion in layered dishes. Meal prepping not only saves time but also reduces morning decision fatigue, a concept endorsed by productivity expert Cal Newport in Deep Work.
Cultural Adaptability From Mexican Breakfast Casserole with its tortilla crust to Sourdough French Toast Casserole, these recipes reflect cultural diversity. Culinary historian Jessica B. Harris, in High on the Hog, emphasizes how casseroles have historically adapted to local ingredients, making them a global comfort food. By incorporating regional flavors, these dishes offer a customizable canvas for culinary creativity.
Savoring Comfort: Lunch and Dinner Casseroles for Every Palate
Family-Friendly Versatility Lunch and dinner casseroles, such as Cheesy Chicken Enchiladas or Lazy Lasagna Casserole, cater to diverse tastes while minimizing cleanup. Food writer Mark Bittman, in How to Cook Everything, praises casseroles for their “one-dish wonder” appeal, ideal for families juggling busy schedules. Recipes like Taco Casserole and Chicken & Wild Rice Casserole balance protein, carbs, and vegetables, ensuring a wholesome meal.
Dietary Inclusivity Gluten-free and vegan options, such as Gluten-Free Black Bean Enchiladas or Chicken Broccoli Cauliflower Rice Casserole, highlight the adaptability of oven-baked dishes. Dietitian Ellie Krieger, in Weeknight Wonders, underscores how casseroles can be modified to meet dietary needs without sacrificing flavor. The use of almond milk in Easy Tuna Noodle Casserole or cauliflower rice in place of grains exemplifies this flexibility.
Economic and Sustainable Cooking Casseroles like Leftover Chili Cornbread Casserole transform leftovers into gourmet meals, reducing food waste. In Waste-Free Kitchen Handbook, author Dana Gunders advocates for such practices, noting that repurposing ingredients saves money and resources. Dishes like Sloppy Joe Casserole also stretch budget-friendly proteins like ground beef, aligning with frugal cooking principles championed by Tamar Adler in An Everlasting Meal.
Sweet Endings: Dessert Casseroles to Satisfy Every Craving
Indulgence Meets Simplicity Dessert casseroles, such as Persimmon and Almond Crumble or Strawberry Crisp, offer decadence without complexity. Pastry chef Dominique Ansel, in Everyone Can Bake, argues that baked desserts thrive on simplicity: “A few quality ingredients, layered and baked, often yield the most memorable treats.” The Pear Cobbler Recipe, with its buttery topping, embodies this philosophy.
Seasonal and Wholesome Ingredients Recipes like Blueberry Rhubarb Buckle highlight seasonal produce, a principle emphasized by Alice Waters in The Art of Simple Food. Using fresh persimmons or summer strawberries not only enhances flavor but also connects eaters to seasonal cycles. The Vegan Gluten-Free Taco Tater Tot Hotdish even reimagines comfort food with plant-based ingredients, catering to modern dietary trends.
Nostalgia in Every Bite Dessert casseroles evoke nostalgia, a sentiment food psychologist Brian Wansink explores in Slim by Design. Dishes like Mac and Cheese Recipe (though savory) and Baked Ravioli blur the line between main courses and desserts, offering comfort across meal types. The warmth of a Lemon Butter Baked Tilapia or Bacon-Wrapped Chicken similarly taps into emotional connections with home-cooked meals.
Conclusion: The Timeless Appeal of Oven-Baked Meals
Oven-baked dishes and casseroles remain a cornerstone of home cooking, bridging tradition and modernity. From their practical benefits—minimal cleanup, make-ahead convenience—to their capacity for creativity and inclusivity, these recipes exemplify what food writer Michael Pollan calls “the democratization of good food” in Cooked. Whether whipping up a Ranch Chicken and Potato Casserole for a weeknight dinner or a Strawberry Crisp for dessert, these dishes prove that effortless cooking can still be extraordinary.
References
Bittman, M. (2008). How to Cook Everything. Wiley.
Gunders, D. (2015). Waste-Free Kitchen Handbook. Chronicle Books.
Waters, A. (2007). The Art of Simple Food. Clarkson Potter.
Katz, R. (2013). The Longevity Kitchen. Ten Speed Press.
Affiliate Disclosure: This blog may contain affiliate links, which means I may earn a small commission if you click on the link and make a purchase. This comes at no additional cost to you. I only recommend products or services that I believe will add value to my readers. Your support helps keep this blog running and allows me to continue providing you with quality content. Thank you for your support!
The provided text features a conversation discussing human rights and the political landscape of Pakistan. It explores the suppression of fundamental rights, particularly for women and minorities, and how societal norms and state actions contribute to these violations. The speakers analyze the role of the military establishment and religious extremism in stifling progress and creating a climate of control. They also critique past and present political leaders, including Zulfikar Ali Bhutto, Nawaz Sharif, and Imran Khan, for their actions and policies that have impacted human rights and the country’s standing on the international stage. The dialogue further touches upon the need for awareness, systemic changes, and the potential for conditional aid from international powers to promote improvement in Pakistan’s human rights record.
Human Rights in Pakistan: A Study Guide
Quiz: Short Answer Questions
According to the source, what are some ways that fundamental human rights are denied at the social level in Pakistan?
The speakers discuss the concept of a “Mullah Military Alliance” in Pakistan. What is this alliance, and how does it impact human rights?
How does the lack of financial independence for women in Pakistan contribute to their diminished standing in society, as discussed in the text?
The text mentions the incident of couples being killed for marrying by choice. What does this exemplify about the state of human rights and societal norms in Pakistan?
What is meant by the concept of the “system” as the speaker describes its role in the U.S. and why does she think it’s not working in Pakistan?
What is Tehreek-e-Labbaik Pakistan (TLP) and what does the source suggest about the reasons for its creation?
According to the text, how did General Zia-ul-Haq contribute to religious extremism in Pakistan?
The text discusses the potential for Pakistan to improve its standing on the world stage. What steps does the speaker suggest Pakistan take to achieve this?
What is the speaker’s opinion about Bilawal Bhutto’s slogan “Modi’s friend”?
According to the text, how did the Nawaz Sharif government improve quality of life for the average Pakistani between 2013 and 2018?
Quiz: Answer Key
Fundamental rights are denied at the social level through practices like honor killings, where couples are murdered for marrying by choice, and through the suppression of women due to a lack of financial independence and deeply ingrained patriarchal norms.
The “Mullah Military Alliance” refers to an informal partnership between religious groups and the military establishment. This alliance is said to stifle liberal voices and viewpoints, enforce religious orthodoxy, and restrict fundamental rights.
The lack of financial independence limits women’s agency and power within their families and society. Without economic autonomy, women are more vulnerable to oppression and control, and their social standing remains lower than that of men.
These killings highlight the prevalence of outdated and oppressive societal norms that prioritize tribal or family honor over individual rights. The act of killing couples for marrying by choice reflects a deep disregard for the basic human right to choose one’s own life partner.
The “system” in the U.S. refers to the awareness the state has provided for its citizens in the form of consequences, so that they can operate within the rules of the country. She believes this system is stagnant in Pakistan because the military is too focused on controlling things.
TLP is a religious political party that was created by the military establishment to break the vote bank of Noon League. After the TLP’s creation, it held violent demonstrations that lead to the death of police officers and ordinary citizens.
General Zia-ul-Haq is accused of creating religious and sectarian extremism in Pakistan. In the 1980s, Zia worked to promote religious extremism and break the stature of political parties.
The speaker believes that Pakistan must work to improve its human rights record, end extremism, and foster peace and friendship with its neighbors. She also suggests that international powers should encourage Pakistan to create an atmosphere where media is not controlled, but she doesn’t support those powers adding conditions to economic or student aid.
The speaker calls Bilawal Bhutto’s slogan vulgar and nonsensical. She believes that the slogan reinforces orthodoxy and conservatism in Pakistan, while the world is seeking peace and friendship.
The Nawaz Sharif government decreased prices of cooking oil and gasoline and increased the earnings of the salary class. They are also praised for rapidly improving infrastructure and creating overall economic improvement from 2013 to 2018.
Essay Questions
Analyze the role of the military establishment in Pakistan and its impact on human rights, as depicted in the source. How does the establishment’s focus on control, rather than upholding constitutional principles, affect the rights of citizens?
Discuss the challenges faced by women in Pakistan, considering both social and economic factors. How does the lack of financial independence, coupled with prevailing societal norms, contribute to their marginalization and vulnerability?
Examine the relationship between religious extremism and human rights violations in Pakistan, referencing specific examples from the text, such as the rise of the Tehreek-e-Labbaik Pakistan (TLP).
Evaluate the effectiveness of external pressure, such as conditionality from international powers, as a means of improving human rights in Pakistan. What are the potential benefits and drawbacks of this approach?
Compare and contrast the leadership styles and legacies of Zulfikar Ali Bhutto and General Zia-ul-Haq, particularly in relation to their impact on democracy, human rights, and religious extremism in Pakistan.
Glossary of Key Terms
Fundamental Rights: Basic rights and freedoms guaranteed to all individuals, often enshrined in a country’s constitution.
Human Rights Violations: Acts that contravene the Universal Declaration of Human Rights or other international human rights instruments.
Minority Rights: The rights of groups that are numerically smaller than the dominant population in a country, including the right to practice their religion, culture, and language without discrimination.
Tribal Patial Society: A society that is influenced by a tribal system in which the leader of the tribe exerts control over the political and economic system.
Mullah Military Alliance: An informal partnership between religious groups and the military establishment, often used to suppress dissent and control society.
Tehreek-e-Labbaik Pakistan (TLP): A religious political party in Pakistan known for its hardline stance on blasphemy and its use of protests and demonstrations.
Meritocracy: A system in which advancement is based on individual ability or achievement.
Stagnation: A state of inactivity or lack of progress.
Fanatical Space: An environment characterized by extreme religious or political zealotry and intolerance.
Conditionality: The attachment of conditions to aid or loans provided by international organizations or countries, often related to human rights or governance.
Pakistan: Human Rights, Politics, and Society
Okay, here’s a briefing document summarizing the main themes and ideas discussed in the provided text excerpt.
Briefing Document: Analysis of Pakistani Societal Issues and Human Rights Violations
Source: Excerpts from an interview/discussion featuring Professor Dr. Farzana Arshad and Afzal Saheb.
Date: Unspecified, but references events from 2017 onward.
Main Themes:
Human Rights Violations in Pakistan: A central theme is the pervasive and multifaceted violations of human rights in Pakistan. This includes suppression of fundamental rights guaranteed by the Constitution, such as freedom of expression, association, and the right to earn a living.
“If we talk about the Constitution of Pakistan within Pakistan, the Constitution of Pakistan guarantees the fundamental rights to every individual of the country but you see that Pakistan Within these fundamental rights, the rights to have association, the right to express, the freedom to speak with freedom, or to have your association, or your basic fundamental right, the right to live, the right to earn, the right to educate the children, all these rights which are These are suppressed at various places.”
Women’s Rights and Social Inequality: The discussion highlights the lack of financial independence and societal freedom for women, especially in rural areas. Forced marriages and honor killings are cited as extreme examples of these violations.
“If any boy The girl has married of her choice and then it is revealed that both her families have gone after her and the poor guy has run away and ultimately after a week, 10 days or a month, you come to know that the couple has been killed and They also kill him and his own people also kill him, so this is a very sad and very regretful situation.”
“Due to lack of financial independence in India, I understand that the women who are there are far behind in the field, the situation is different in big cities, that means you are sitting in Lahore, I have lived my life in Lahore, now the women who are there are definitely becoming financially independent.”
Minority Rights: Concerns are raised regarding the treatment of religious minorities (Christian, Hindu, etc.) and the need for greater social inclusion and equal opportunities.
“There is a lot of issue with reference to minority rights, the way you yourself mentioned that those communities within Pakistan which are a little dominant i.e. are in small numbers, with reference to them. A friendly environment is also found.”
The Role of the “Establishment” (Military and Agencies): A major point of contention is the perceived overreach and control exerted by the military establishment and intelligence agencies. This control stifles political development, suppresses dissent, and contributes to a stagnant society.
“You see that the role of the military establishment here, the role of the agencies here, is the concept of control instead of it . So that they play their role as per the Constitution of Pakistan, they go after controlling the things, they control the politics, they control the politicians and this is the policy of controlling them, which brings the overall society to a standstill.”
Engineered Religious Extremism: The discussion points to the alleged creation and support of extremist religious groups (like Tehreek-e-Labbaik Pakistan – TLP) by elements within the establishment for political purposes. This has led to increased violence and intolerance.
“this TLP is Tehreek Laback Pakistan, this Tehreek Laback Pakistan, I am telling you, it was created in August 2017 when Miyan Nawaz Sharif Sahab was disqualified in July and after that his group When elections were to be held in N120, to break the N0 election vote bank of Noon Lee, the Mitt Establishment created the Tehreek Labaik”
Historical Context & Political Leaders: The speakers reflect on the actions of past leaders (Zulfiqar Ali Bhutto, General Zia-ul-Haq, Nawaz Sharif, Imran Khan) and their impact on Pakistani society, the constitution and the country’s democratic journey. Bhutto is criticised for the injection of religious elements into law, even though he had a chance to limit the army’s power after the loss of East Pakistan.
Pakistan’s International Standing: The discussion addresses Pakistan’s negative image on the global stage due to extremism and human rights abuses, which hinders trade and economic development. Pakistan’s reliance on international financial aid is contrasted with countries that thrive on trade.
Meritocracy and Equal Opportunity: The lack of meritocracy and equal opportunities is highlighted as a significant problem. The question is raised about how to ensure that individuals are judged based on their capabilities and education, rather than other factors.
“The right to earn is now the responsibility of the state to provide equal chances to every individual. So you see me, I question you that where is the meritocracy within Pakistan.”
The need for internal change It was highlighted that any lasting change in Pakistan would have to be organic to the population, it would need to come from a place of equality. The people will need to see a safe life, a sound education and an appropriate environment to promote change and grow as a society.
Key Ideas/Facts:
The discussion emphasizes the dire state of human rights in Pakistan across multiple dimensions.
The influence of the military establishment on Pakistan’s political landscape and its role in manipulating religious groups are heavily criticized.
The lack of economic progress and the dependence on international aid are linked to Pakistan’s negative global image and internal repression.
There is a strong call for the state to prioritize awareness, education, and systemic changes to address these issues.
The speakers debate the role of international conditionality on aid, weighing the potential benefits of promoting human rights against the risk of further isolating the country.
That there is a deep routed need to hold bad actors accountable and they need to be tried fairly but accordingly to the law.
Quotes:
“The way human rights are violated in the areas of our country, even the state level has a role in it.”
“Women over 50 do nothing and they do nothing for the family… their financial situation is suppressed within the social fabric.”
“Instead of giving birth to any life in it, madam, it is right that your establishment knows that that power is in their hands. They can put a nose ring on whomever they want, whenever they want, but whenever they feel like it, they can give them a free hand”
Overall Assessment:
The text paints a grim picture of Pakistani society, characterized by widespread human rights violations, political manipulation, and a lack of economic progress. The speakers express frustration with the current state of affairs and call for fundamental changes to address these deep-seated problems. The role of the “establishment” is seen as a major obstacle to progress, and the need for greater accountability and transparency is emphasized. The discussion also touches upon the complex relationship between Pakistan and the international community, particularly regarding human rights conditionality on aid.
Human Rights and Societal Issues in Pakistan: An Overview
FAQ on Human Rights and Societal Issues in Pakistan
1. What are some of the most pressing human rights issues facing Pakistan today?
Pakistan faces numerous human rights challenges, including violations against women, minorities, and marginalized communities. These include issues like honor killings, lack of financial independence for women, and discrimination against religious minorities (particularly the Christian and Hindu communities). Fundamental rights like freedom of association, expression, and the right to earn a livelihood are often suppressed, particularly in rural areas and at the state level. Meritocracy is lacking, leading to unequal opportunities based on capabilities and education.
2. How does the “Mullah-Military Alliance” contribute to human rights violations in Pakistan?
The “Mullah-Military Alliance,” referring to the collaboration between religious groups and the military establishment, is a significant driver of human rights violations. This alliance often promotes religious extremism and violence, suppressing liberal voices and hindering the development of a tolerant society. The military establishment’s control over politics and politicians further exacerbates the problem, leading to stagnation and the denial of fundamental rights.
3. What role has the Pakistani state played in perpetuating or addressing these human rights issues?
While the Constitution of Pakistan guarantees fundamental rights, the state often fails to uphold them effectively. The state’s role in creating awareness and implementing systemic change is lacking. The military establishment, rather than adhering to its constitutional role, often engages in controlling politics and suppressing dissent. The state also bears responsibility for the lack of meritocracy and equal opportunities for all citizens.
4. What impact has the military establishment had on societal progress and fundamental rights in Pakistan?
The military establishment’s interference in politics and its focus on control have led to societal stagnation and violations of human rights, fundamental rights, and minority rights. By controlling politics, politicians and the overall narrative, the establishment hinders the organic growth of society and prevents the development of a system that protects and promotes these rights.
5. How do engineered political elements, like the Tehreek-e-Labbaik Pakistan (TLP), impact Pakistani society and human rights?
Groups like the TLP, allegedly created with the support of the establishment, disrupt the organic development of society and often result in violence. These groups manipulate religious sentiments and create an atmosphere of extremism and intolerance, leading to the denial of human rights and the suppression of dissent. The violence and instability they create hinder progress and development.
6. What historical factors have contributed to the current human rights situation in Pakistan?
Several historical factors have contributed to the current human rights situation, including General Zia-ul-Haq’s policies in the 1980s that promoted religious extremism and sectarianism. Zulfikar Ali Bhutto’s earlier use of religion for political gain and his failure to control the military establishment after 1971 also played a role. These historical decisions created a foundation for the current challenges.
7. What are the implications of Pakistan’s current economic situation for human rights and societal development?
Pakistan’s reliance on international financial aid and its struggling economy have negative implications for human rights and societal development. The focus on debt and dependence on aid diverts attention and resources away from addressing human rights issues and improving the lives of ordinary citizens. The need for trade and economic independence is crucial for Pakistan to address its internal problems and open doors for the common people of Pakistan.
8. What role can international actors play in improving human rights in Pakistan?
International actors, particularly the United States and the European Union, should engage with Pakistan’s military establishment to address the issues that create a dark city, not necessarily through conditionality on aid but through consistent dialogue and pressure. They should also support independent voices and media and criticize attempts to control information and suppress dissent. Promoting peace and friendship with neighboring countries is also essential.
Human Rights Challenges and Realities in Pakistan
Human rights in Pakistan are a complex issue with violations occurring at various levels.
Key points regarding human rights:
Constitutional Guarantees: The Constitution of Pakistan guarantees fundamental rights to every individual, including the rights to association, expression, freedom of speech, life, earn a living, and educate children. However, these rights are often suppressed.
Violations: Human rights violations occur in Pakistan at both the social and state levels. These include the denial of fundamental rights, particularly in rural areas and small towns, where societal norms often override individual freedoms.
Women’s Rights: Women face significant challenges, particularly those lacking financial independence. They often experience restricted freedom and suppressed social standing. Violence against women is also prevalent, with many cases going unreported, especially those involving poor women.
Minority Rights: Minority communities, such as Christians and Hindus, often face discrimination and limited opportunities within Pakistani society.
Role of the State: The state has a responsibility to ensure equal opportunities and protect the fundamental rights of all citizens. However, the influence of the military establishment and agencies often leads to a focus on control rather than upholding constitutional rights, resulting in stagnation and human rights violations.
Mullah-Military Alliance: The presence of a “Mullah Military Ala Alliance” contributes to religious extremism and violence, further undermining human rights.
Impact of Extremism: Religious extremism, often engineered for political purposes, has had a destructive impact on Pakistani society, leading to the denial of fundamental human rights and a closed-off atmosphere.
International Perception: Pakistan is often viewed with suspicion by the international community due to its perceived “fanatical space,” which affects trade and international relations.
Need for Awareness: Increased awareness is crucial for bringing about change, but the state must take the lead in promoting and enforcing human rights.
Stagnation: A lack of a functional system and control by the establishment hinder the operation of a basic system needed to protect fundamental and human rights.
Organic Growth: Society is not allowed to grow organically, leading to violence when engineered elements are introduced.
Conditionality: There are varying views on whether international powers should impose conditions related to human rights when providing loans and credits to Pakistan. Some argue that such conditionality could lead to improvement, while others fear it may further restrict opportunities for Pakistani citizens.
Minority Rights Challenges and State Role in Pakistan
Minority rights in Pakistan are a significant concern, with these communities facing various challenges.
Key points regarding minority rights:
Discrimination: Minority communities in Pakistan, such as Christians and Hindus, often face discrimination and have limited opportunities within society.
Friendly environment: While there may be a friendly atmosphere above the general society level, these communities’ overall position needs to be revisited.
Lack of space: There is a need to assess the job opportunities and overall space available to minorities within society.
Role of the State: The state needs to ensure the protection of minority rights and provide equal opportunities.
Human Rights Violations: The worst violations include those against human rights, fundamental rights, and minority rights.
Women’s Rights Issues in Pakistan
Women’s rights in Pakistan are a critical issue, with women facing numerous challenges that impede their progress and well-being.
Key points regarding women’s rights:
Lack of Financial Independence: Due to a lack of financial independence, women in Pakistan are often far behind in various fields. Financial independence can elevate a woman’s position within her family and society.
Suppressed Social Standing: Even in big cities, women’s financial situations are suppressed within the social fabric, hindering the freedom that men enjoy.
Societal Expectations: Many believe that it is a woman’s job to consider herself inferior to men and to obey and serve them. These expectations are found even among common people in cities like Lahore.
Violence Against Women: Many incidents of violence against women go unreported, especially among the poor. It is considered a basic human right for any person, male or female, to make decisions about their life, but this right is often denied to women.
Role of the State: There is a need for the state to address these issues and ensure the protection of women’s rights.
Constitutional Rights: The Constitution of Pakistan guarantees fundamental rights to every individual, but women’s rights are still suppressed at various places.
These factors contribute to an environment where women’s fundamental rights are frequently violated.
Political Leaders and Politics in Pakistan
Political leaders in Pakistan have played a significant role in the country’s history, sometimes for better and sometimes for worse.
Key points regarding political leaders in Pakistan:
Use of Religion: Some political leaders, such as Zulfiqar Ali Bhutto, have used religion to gain political support, which has had long-lasting consequences on the country. Bhutto included religious elements in the constitution, which hindered progressive thinking.
Military Influence: The military establishment has significantly influenced Pakistani politics, sometimes undermining democratic processes. Zulfiqar Ali Bhutto could have controlled the military establishment after 1971 but instead tried to bring in a religious section.
Stature destruction: Political leaders have had their reputations destroyed through various means.
Nawaz Sharif: Nawaz Sharif has been both praised for improving infrastructure and criticized. During his time, Vajpayee and Modi visited Lahore.
Imran Khan: Imran Khan’s tenure as Prime Minister was marked by a focus on targeting political opponents and an increase in poverty. He was also called a “predator” for controlling the media and suppressing independent voices.
Bilawal Bhutto: Bilawal Bhutto is seen as part of a major political party, but he is criticized for using vulgar slogans and lacking sophisticated thinking.
Leaders in Jail: Doing politics in Pakistan is very risky as political leaders spend time in jail.
Bravery: The political leaders of Pakistan are brave.
Corruption: Corruption is prevalent, with scandals and a lack of accountability for those involved.
Responsibility: Those responsible for destruction should be held accountable under the law.
Democracy: Some individuals who claim to support democracy are actually evil from the inside, making them worse than military dictators.
Public Domain: Some political figures cause havoc in the public domain.
Popular Politics: Some political leaders are respected for their commitment to public and popular politics.
Future Leaders: Maturity and sophisticated thinking are expected from future leaders to play a significant role on the national stage.
Overall, the history of political leaders in Pakistan is complex, with instances of both progress and setbacks, and a recurring theme of military influence and challenges to democratic norms.
Pakistan: Influence of the Military Establishment
The “establishment” in Pakistan, particularly the military establishment, wields significant influence over the country’s politics and society.
Key aspects regarding the Pakistan establishment:
Role of the Military Establishment: The military establishment’s role often involves control rather than upholding constitutional rights, leading to stagnation and human rights violations. The establishment’s control extends to politics and politicians.
Mullah-Military Alliance: A “Mullah Military Ala Alliance” fosters religious extremism and violence, further undermining human rights.
Creation of Extremist Groups: The establishment has been known to create religious groups for political purposes, such as breaking the vote bank of political opponents. These engineered elements can lead to violence.
Impact on Society: The establishment’s actions have led to a “fanatical space” perception of Pakistan, affecting international relations and trade.
Control of Media: The establishment has been known to control the media and suppress independent voices.
Need for Constitutional Role: For Pakistan to progress, the establishment needs to play its constitutional role and allow space for the masses to move forward freely.
Judicial Influence: Judges have been influenced by the establishment and have escaped accountability for their actions.
Victimization: There are calls for holding those responsible for the destruction accountable, but without victimization and under the principles of justice.
Political Influence: The military establishment has significantly influenced Pakistani politics, sometimes undermining democratic processes. Zulfiqar Ali Bhutto could have controlled the military establishment after 1971 but instead tried to bring in a religious section.
Affiliate Disclosure: This blog may contain affiliate links, which means I may earn a small commission if you click on the link and make a purchase. This comes at no additional cost to you. I only recommend products or services that I believe will add value to my readers. Your support helps keep this blog running and allows me to continue providing you with quality content. Thank you for your support!